Difference between revisions of "KVM-A4"
| (15 intermediate revisions by 2 users not shown) | |||
| Line 3: | Line 3: | ||
[[File:X630-a4-IMG-4552.jpg|thumb|right|KVM-A4-Old Version]] | [[File:X630-a4-IMG-4552.jpg|thumb|right|KVM-A4-Old Version]] | ||
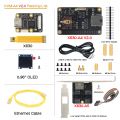
[[File:X630-IMG-2718.jpg|thumb|right|X630 HDMI to CSI-2 Module]] | [[File:X630-IMG-2718.jpg|thumb|right|X630 HDMI to CSI-2 Module]] | ||
| − | |||
| − | |||
[[File:X630-A5-acc.jpg|thumb|right|X630-A5 Packing List]] | [[File:X630-A5-acc.jpg|thumb|right|X630-A5 Packing List]] | ||
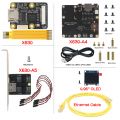
| − | [[File: | + | [[File:X630-A4-V2.0-acce.jpg|thumb|right|KVM-A4 V2.0 Packing List]] |
| − | [[File: | + | [[File:X630-A4-Acc.jpg|thumb|right|KVM-A4 V1.1 Packing List]] |
| + | [[File:Kvm-a8-cable.jpg|thumb|right|Difference between X680-A8 cable & X630-A5 cable]] | ||
| + | |||
==Update History== | ==Update History== | ||
In August 2023, the [[X630-A4]] has been updated from V1.1 to '''V2.0''' version, the PCB layout and PCB size of X630-A4 has changed a lot. | In August 2023, the [[X630-A4]] has been updated from V1.1 to '''V2.0''' version, the PCB layout and PCB size of X630-A4 has changed a lot. | ||
| Line 32: | Line 32: | ||
===How to Cool=== | ===How to Cool=== | ||
| + | * <span style="color:red;">The new version KVM-A4 V2.0 (X630-A4 V2.0) does not support [[C296]] aluminum heatsink installation, please use the ordinary heatsink for the CPU of Raspberry Pi Zero 2 W. | ||
* For use with raspberry pi zero 2 w, [[X630-A4]] V1.1 (KVM-A4) allows to use [[C296]] aluminum heatsink with your Raspberry Pi Zero 2 W, but user need to prepare 4pcs M2.5*7mm screws yourself. | * For use with raspberry pi zero 2 w, [[X630-A4]] V1.1 (KVM-A4) allows to use [[C296]] aluminum heatsink with your Raspberry Pi Zero 2 W, but user need to prepare 4pcs M2.5*7mm screws yourself. | ||
| − | + | ||
| Line 60: | Line 61: | ||
** 1 x M3.5x6mm Screw | ** 1 x M3.5x6mm Screw | ||
** 4 x ATX Control Cable(2pin Female to Female Dupont Cables) (Cable Length: 47cm / 18.50 inch) | ** 4 x ATX Control Cable(2pin Female to Female Dupont Cables) (Cable Length: 47cm / 18.50 inch) | ||
| + | |||
| + | <gallery> | ||
| + | 01-KVM-A4-V2.0-Packing-List.jpg|KVM-A4 V2.0 Packing List | ||
| + | X630+X630-A4+X630-A5+0.96OLED+Ethernet.jpg|KVM-A4 V1.1 Packing List | ||
| + | </gallery> | ||
==Installation Guide== | ==Installation Guide== | ||
===Hardware Parameters=== | ===Hardware Parameters=== | ||
| − | KVM-A4 V2.0 | + | for KVM-A4 V2.0, (Click the following picture to zoom out) |
| − | |||
| − | |||
| − | |||
| − | [[File:X630-A5-IMG-4214-700px.jpg| | + | [[File:X630-A4-V2.0-Interface.jpg|500px|X630-A4 V2.0+X630]] |
| + | [[File:X630-A4-Interface-700px.jpg|500px| '''X630-A4 V1.1 +X630''']] | ||
| + | [[File:X630-A5-IMG-4214-700px.jpg|500px| '''X630-A5 Adapter board''']] | ||
===Hardware Installation=== | ===Hardware Installation=== | ||
| Line 123: | Line 128: | ||
(<span class="tb_red">Please be sure to provide installation pictures or videos to contact us, which can effectively solve the problem.Thanks.</span>) | (<span class="tb_red">Please be sure to provide installation pictures or videos to contact us, which can effectively solve the problem.Thanks.</span>) | ||
| − | + | ===Enable OLED display=== | |
| + | Please refer to: [https://geekworm.com/community/forum/topic/85024/enable-oled-on-geekworm-pikvm-a4-kit Enable oled on Geekworm PiKVM-A4 Kit] | ||
| + | |||
| + | ==References== | ||
| + | <references /> | ||
==FAQ== | ==FAQ== | ||
| − | + | {{KVM-FAQ}} | |
| − | |||
| − | |||
| − | |||
| − | |||
| − | |||
| − | |||
| − | |||
| − | |||
| − | |||
| − | |||
| − | |||
| − | |||
| − | |||
| − | |||
| − | |||
| − | |||
| − | |||
| − | |||
| − | |||
| − | |||
| − | |||
| − | |||
| − | |||
| − | |||
| − | |||
| − | |||
| − | |||
| − | |||
| − | |||
| − | |||
| − | |||
| − | |||
| − | |||
| − | |||
| − | |||
| − | |||
| − | |||
| − | |||
| − | |||
| − | |||
| − | |||
| − | |||
| − | |||
| − | |||
| − | |||
| − | |||
| − | |||
| − | |||
| − | |||
| − | |||
| − | |||
| − | |||
| − | |||
| − | |||
| − | |||
| − | |||
| − | |||
| − | |||
| − | |||
| − | |||
| − | |||
| − | |||
| − | |||
| − | |||
| − | |||
| − | |||
| − | |||
| − | |||
| − | |||
| − | |||
| − | |||
| − | |||
| − | |||
| − | |||
| − | |||
| − | |||
| − | |||
| − | |||
| − | |||
| − | |||
| − | |||
| − | |||
| − | |||
| − | |||
| − | |||
| − | |||
| − | |||
| − | |||
| − | |||
| − | |||
| − | |||
| − | |||
| − | |||
| − | |||
| − | |||
| − | |||
| − | |||
| − | |||
| − | |||
| − | |||
| − | |||
| − | |||
| − | |||
| − | |||
| − | |||
| − | |||
| − | |||
| − | |||
| − | |||
| − | |||
| − | |||
| − | |||
| − | |||
| − | |||
| − | |||
| − | |||
| − | |||
| − | |||
| − | |||
| − | |||
| − | |||
| − | |||
| − | |||
| − | |||
| − | |||
| − | |||
| − | |||
| − | |||
| − | |||
<!--Add review function! --> | <!--Add review function! --> | ||
Latest revision as of 14:43, 28 November 2024


Contents
Update History
In August 2023, the X630-A4 has been updated from V1.1 to V2.0 version, the PCB layout and PCB size of X630-A4 has changed a lot.

Overview
PiKVM-A4 is one of the members of PiKVM[1] family, it only supports Raspberry Pi Zero 2 W without a matching metal case.
!!! warning "ZeroW reached EOL and is no longer supported, the last image it can be found here"
Or you can refer to here
The PiKVM-A4 is composed of follow parts:
- X630 HDMI to CSI-2 Board (for video capture)
- X630-A4 HAT Board (for ethernet, RTC, ATX Control power in etc)
- X630-A5 Adapter Board (it is installed inside the PC case, and it connect the computer motherboard and IO panel cabe of PC case))
- 0.96 inch OLED (for display, Resolution: 128×64 pixel)
- Ethernet Cable (TIA/EIA-568.B connection, and it's ATX control signal cable)
How to Power
- (For X630-A4 V2.0) Power Input: 5.1Vdc +/-5% , ≥3A (Power Via Micro-USB port of Raspberry Pi Zero 2W)
- (For X630-A4 V1.1) Power Input: 5.1Vdc +/-5% , ≥3A (Power Via USB Type-C port of X630-A4 V1.1)
How to Cool
- The new version KVM-A4 V2.0 (X630-A4 V2.0) does not support C296 aluminum heatsink installation, please use the ordinary heatsink for the CPU of Raspberry Pi Zero 2 W.
- For use with raspberry pi zero 2 w, X630-A4 V1.1 (KVM-A4) allows to use C296 aluminum heatsink with your Raspberry Pi Zero 2 W, but user need to prepare 4pcs M2.5*7mm screws yourself.
Geekworm KVM family products:
| Model | Compatible With | Form Factor | Max Input Resolution | ATX Control | RTC Chipset | OLED display | PoE | RS232 Console | Ethernet | M.2 NVMe Socket | Control of PCs | USB HUB | I2S audio |
|---|---|---|---|---|---|---|---|---|---|---|---|---|---|
| KVM-A3 V1.6 | Raspberry Pi 4 | HAT | 1920x1080 @50Hz | Yes | DS1307 | 0.96" | No | No | 1GbE | No | 1 | No | Yes In-phase I2S wire |
| KVM-A8 V1.8 | Raspberry Pi 4 | PCI | 1920x1080 @50Hz | Yes | PCF8563 | 0.96" (Equipped with a 2P wire to connect the OLED) |
802.3af | No | 1GbE | No | 1 | No | Yes Inverted-phase I2S wire |
| KVM-A4 V2.0 | Raspberry Pi 2W | HAT | 1920x1080 @50Hz | Yes | DS1307 | 0.96" | No | No | No | No | 1 | No | No |
| X680 V1.5 | Raspberry Pi CM4 | Box | 1920x1080 @60Hz | Yes | PCF8563 | 0.96" | No | No | 1GbE | 2280 | 4 | Yes | No |
Updated to V1.5 now |
Raspberry Pi CM4 | Box | 1920x1080 @50Hz | Yes | DS1307 | 0.96" | No | No | 1GbE | 2280 | 4 | Yes | No |
| Raspberry Pi CM4 | PCI | 1920x1080 @60Hz | Yes | DS1307 | No | No | No | 1GbE | No | 1 | No | No | |
| X650 V1.3 | Raspberry Pi CM4 | PCI | 1920x1080 @50Hz | Yes | DS1307 | No | No | No | 1GbE | No | 1 | No | No |
| X652 V1.0 | Raspberry Pi CM4 | PCI | 1920x1080 @60Hz | Yes | DS1307 | No | 802.3af (POE injector is required due to compatibility issues) |
No | 1GbE | 2280 | 1 | No | No |
Packing List
- 1 x 0.96 inch OLED: Resolution: 128×64 pixel, with 2 piece of M2*6 screws
- 1 x Ethernet Cable (Cable length: 100cm)
- 1 x X630 HDMI to CSI-2 Module
- 1 x FPC Cable(8cm length)
- 1 x X630-A4 V1.1 Expansion Board
- 1 x USB-A to USB-C OTG Cable (Cable Length: 100cm / 39.37 inch)
- 8 x M2.5x3mm Screw
- 3 x M2.5x4+4mm Spacers
- 1 x M2.5x10+4mm Spacer
- 1 x M2.5x15+4mm Spacer
- 2 x M2.5x15mm F/F Spacers
- 1 x X630-A4 V2.0 Expansion Board
- 1 x USB-A to Micro USB OTG Cable (Cable Length: 100cm / 39.37 inch)
- 2 x M2.5x4+4mm Spacers
- 2 x M2.5x17mm F/F Spacers
- 1 x M2.5x9mm F/F Spacer
- 1 x M2.5x15mm F/F Spacer
- 8 x M2.5x4mm Screws
- 1 x X630-A5 V1.0 Adapter Board
- 1 x M3.5x6mm Screw
- 4 x ATX Control Cable(2pin Female to Female Dupont Cables) (Cable Length: 47cm / 18.50 inch)
KVM-A4 V2.0 Packing List
KVM-A4 V1.1 Packing List


Installation Guide
Hardware Parameters
for KVM-A4 V2.0, (Click the following picture to zoom out)


Hardware Installation
For X630-A4 V2.0:

For X630-A4 V1.1:

For X630-A4 V2.0:

For X630-A4 V1.1:

Note:
- The X630-A5 adapter board will be install into the PC Case.
- The wire group ① connect to X630-A5 comes from the PANEL of PC Case.
- The black and red wires(wire group ②) come from X630-A5 accessories.
Installation Video
New Version KVM-A4 V2.0: https://youtu.be/RUY6J6LVDhY
Old Version KVM-A4 Kit: https://youtu.be/a2oYTEh7QC0
OS Download & Installation
1. Firstly, need prepair a micro sd card, a minimum 16 Gb class 10 memory card is recommended.
2. Download an appropriate OS image for the PiKVM, the url link is: https://pikvm.org/download/, For Raspberry Pi Zero 2W, please use Raspberry Pi Zero 2 W, V2 platform.

!!! warning "ZeroW reached EOL and is no longer supported
3. Flash it to a microSD memory card by following the simple instructions or Official installation tutorial
4. Power the device, then open explore to login the pikvm web ui.
5. Blog sharing for reference: https://www.andysblog.de/kvm-over-ip-pikvm-als-bausatz
Firstly, we recommend carefully reading official documentation from website: https://docs.pikvm.org/faq/.
If you run into any issues you can check the following Q&A. If that still doesn't help you you're welcome to raise an issue ticket at https://geekworm.com/community/forum/topic/78220/pikvm-faq or email to us (support@geekworm.com)
(Please be sure to provide installation pictures or videos to contact us, which can effectively solve the problem.Thanks.)
Enable OLED display
Please refer to: Enable oled on Geekworm PiKVM-A4 Kit
References
- ↑ PiKVM © belongs to https://pikvm.org
FAQ
PiKVM is first and foremost a trademark, which is controlled by https://pikvm.org, and it does not belong to Geekworm.
PiKVM is Free and Open Source Software released under the GPLv3.
Geekworm's KVM products use the open source pikvm software developed by pikvm.org under the GPLv3 without any modification. Geekworm will regularly donate to pikvm.org
About after-sales service of Geekworm KVM Products:
The after-sales service of all products sold by Geekworm should be the responsibility of our Geekworm team (email: support@geekworm.com), please DO NOT disturb the official PiKVM support team.
- First of all, we recommend you to get more FAQ information on the official website: official FAQ, or check the following FAQ;
- You can post a issue ticket at Geekworm forum or email to us (support@geekworm.com) and attached your installation pictures or videos to get some help.
- Blog sharing for reference: https://www.andysblog.de/kvm-over-ip-pikvm-als-bausatz

Q: Which pins are available on the KVM-A3?
Q. How to login pikvm os?
Q: How to connect to wifi?
Q. How to switch root user?

Q: Why is the X680 not working?


Q: Why is USB mass driver not recognized on X680?

Q: Does the x680 support audio?
Q: Does the X680 support PoE power? How to enable PoE Power?
Q: Why can't I switch to another PC on X680?'
Q: Why NVME SSD cannot be recognized on X680?
Q: How to boot from NVMe SSD on X680?
Q: Why OLED is not display?

Q. How do I emulate various USB devices on the target machine?

<comments />
Enable comment auto-refresher