Difference between revisions of "NASPi"
(No difference)
|
Latest revision as of 18:18, 21 December 2023
Contents
Foreword
Click GEEKWORM NAS Family to know more.
Update History
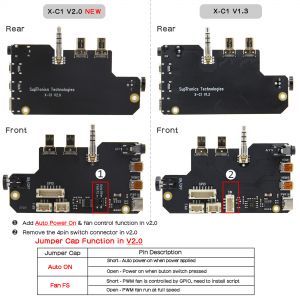
On April 28th 2022, NASPi is updated to NASPi V2.0(New add Auto Power On function, and only the X-C1 adapter shield was upgraded from V1.3 to V2.0 version)
Note: Due to the different arrival times of products on each platform, please refer to the platform information for the purchased version.
- Add Auto Power On Function (Automatically turn on when there is a power supply)
- Add FAN FS jumper to control the PWM fan; Because we found that there are some beginners who don't know how to install the script to make the PWM fan run, or the installation script doesn't support 3rd party OS, at this time, you just need to remove the FAN FS jumper, the PWM fan will run at full speed.
- Remove the 4-Pin connector for external power switch
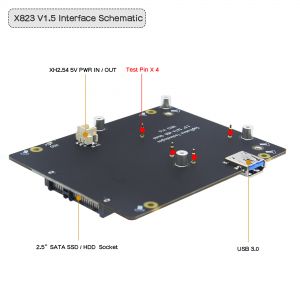
On August 17th 2021, the X823 board in NASPi has been updated from V1.3 to V1.5 version.
X823 V1.5 added 4pcs test pins so that RPi 4 and X823 V1.5 power each other via test pins, so 2pin power wire is no longer needed in X823 1.5, (But if you get X823 V1.3 version, you still need to connnect 2pin power cable from X-C1 to X823 V1.3, and X813 V1.3 is sold out.)
On 28th July 2021, We added one backup acrylic front panel to help improve WiFi signal.
But acrylic material is fragile, be careful for the installation. According to our test 2.4G WIFI is usable. But 5GHz WIFI networks will be more stable. So strongly recommend to use 5GHz WIFI networks or Ethernet. Refer to 5G WIFI test video; The wireless keyboard we tested usable is logitech K520.
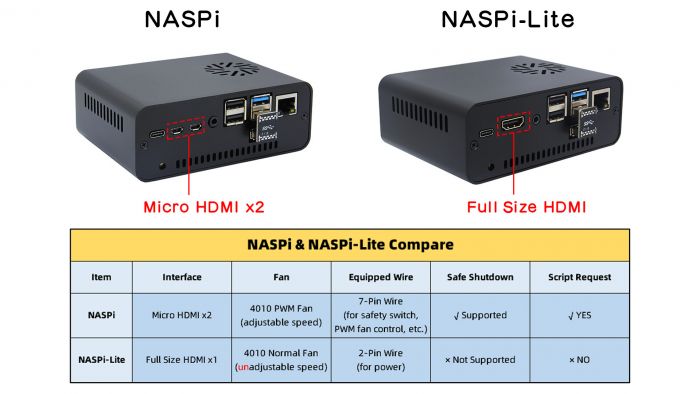
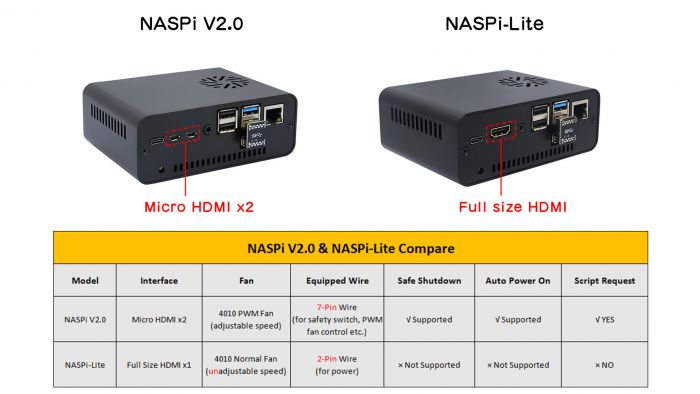
Difference between NASPi & NASPi-Lite
On Oct., 18th 2021, we released NASPi Lite, which is a simplified version of NASPi.
On March 30th, we also launched a larger storage solution NASPi Gemini 2.5, which supports dual 2.5" sata hdd/ssd working at the same time.
What's the difference between NASPi and NASPi Lite?
Overview
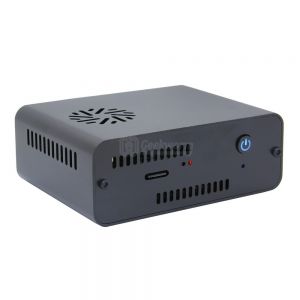
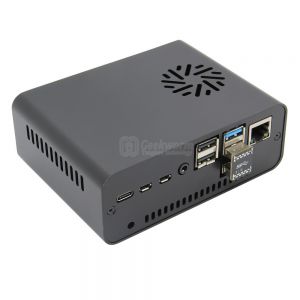
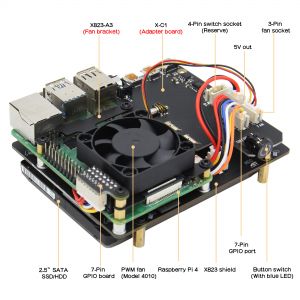
NASPi is a NUC-style NAS storage solution based on the latest Raspberry Pi 4. It supports 2.5-inch sata HDD/SSD. All the Raspberry Pi 4 interfaces are adjusted to the back through the X-C1 adapter board, build in software safety shutdown function, using PWM fan can dynamically adjust the speed of the fan according to the temperature of the CPU, the shell is made of all aluminum alloy, CNC processing method, surface anodizing treatment.
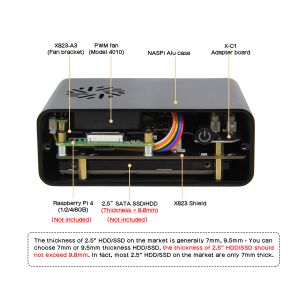
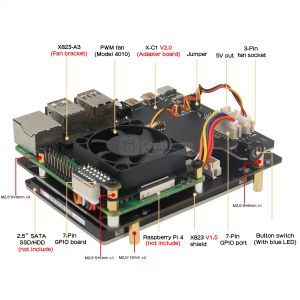
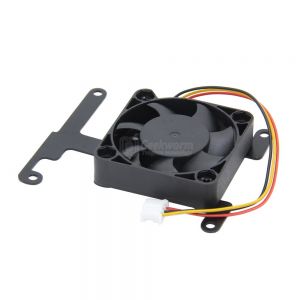
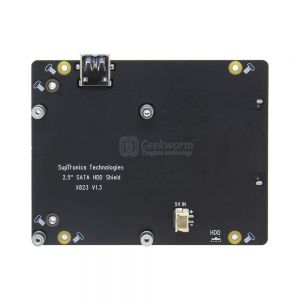
NASPi adopts modular design, and NASPi is composed of three parts: X823 storage shield, X-C1 adapter board, heat dissipation system(include X823-A3 metal fan bracket and 4010 PWM fan), and they will be packed into a ALU-case to get a complete NASPi;
- X823 provides 2.5 inch HDD/SSD storage function(UASP supported);
- X-C1 provides power management, interface adapter and safe shutdown function, new add Auto Power On and Fan Control in Version 2.0.
- For the heat dissipation system, we chose a relatively simple and practical heat dissipation solution: a custom metal bracket and a PWM fan to achieve it. in fact, you can use P165-B passive cooling heatsink to get same function, but maybe P165-B will have a slight impact on WIFI.
Features
- NUC style set-top box, compact design
- All aluminum alloy chassis
- UASP supported only for Raspberry Pi 4, does not support TRIM
- Support software safe shutdown (this function is from X-C1 shield)
- With PWM Silent fan, The fan speed will be automatically adjusted according to the CPU temperature, you can also modify the script yourself
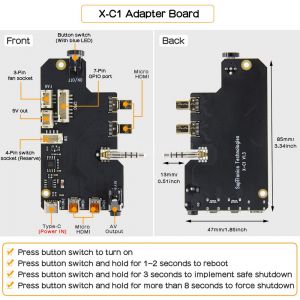
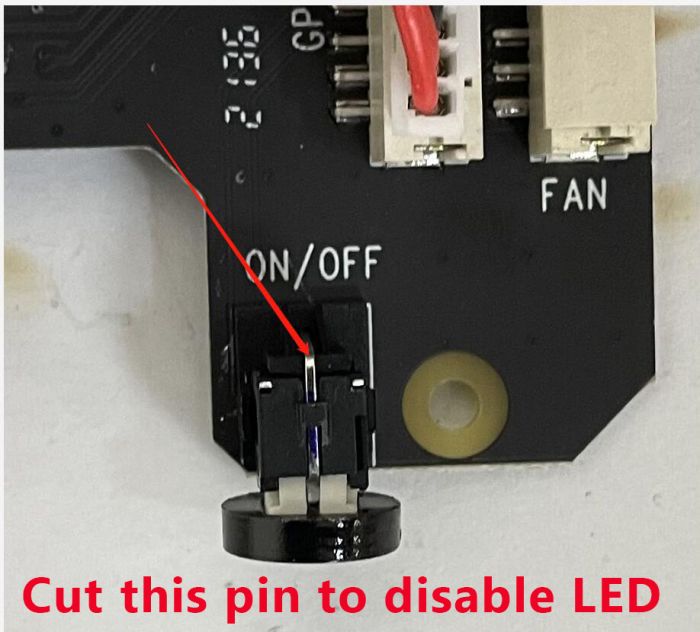
- On-board blue light button switch on X-C1, and X-C1 supports external 4-pin switch also
- Press button switch to turn on
- Press button switch and hold for 1~2 seconds to reboot
- Press button switch and hold for 3 seconds to implement safe shutdown
- Press button switch and hold for more than 8 seconds to force shutdown
- Support auto power on function for NASPi V2.0 Only(NASPi with X-C1 V1.3 adapter does not support auto power on)
- Support Max. 9.8mm thickness 2.5" HDD/SSD, you can choose 7mm or 9.5mm thickness HDD/SSD.
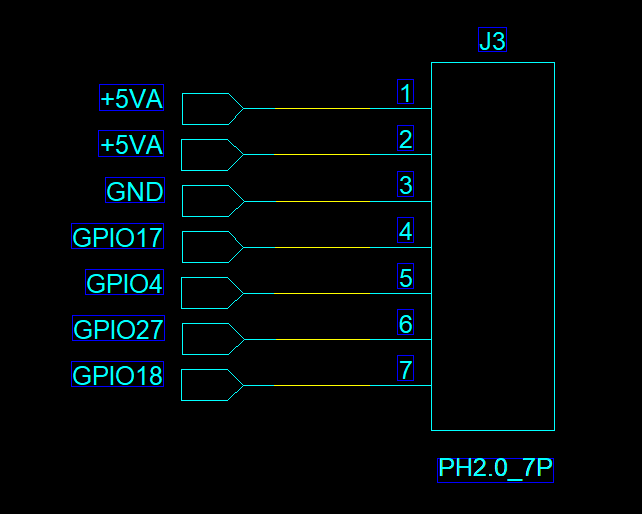
X-C1 V1.3&V2.0 Shield GPIO Used
| Rpi GPIO | Description | Note |
|---|---|---|
| 4 | Power management | 3.3V |
| 17 | Power management | 3.3V |
| 27 | Power management | 3.3V |
| 18 | for PWM fan | 3.3V |
How to Power
Power supply: 5Vdc +/-5% , ≥4A (Via Type-C Port of X-C1)
We recommend that you use our 20W 5V 4A Type-C power adapter USB C PSU, and we also sell it in our Geekworm Amazon store
Warning about power supply:
- Don't use that adjustable voltage power supply.
- Don't use the same power supply used on LED strips.
These power supplies are of poor quality and are not suitable for the NASPi series
User Manual
Installation Video
For NASPi Kit with X823 V1.5(RPi4+X823 V1.5+X-C1 V1.3/V2.0): https://youtu.be/ithz2Mg5Vrc
How to Install Script
Refer to how to install the shell script, and this script is required to install to enable PWM fan runs and safe shutdown function.
Some tutorials
- How to View/Partition/Format/Mount HDD/SSD
- How to Format and Mount a USB drive on Raspberry Pi
- How to migrate Raspberry Pi SD card to a USB SSD: https://www.youtube.com/watch?v=AenM-JrG098
- How to Run Raspberry Pi 4 or 3 Off an SSD or Flash Drive: Does the X825/X855 support USB boot
- Tutorial – How to Initialize, Partition and Format a Brand New SSD in Windows: File:Tutorial Initalize New SSD.pdf
- How to set up OpenMediaVault on Raspberry Pi 4
Some Tips
- Properly Mount USB Storage on Raspberry Pi
- Auto Mount an NTFS USB Drive on Raspberry Pi
- Difficulty booting from SSD drive
- How to build a Raspberry Pi NAS: https://youtu.be/gyMpI8csWis
5G AP WIFI Test
Stress test
This is stree test tool, you can refer to Naspi stress test. You can run this tool to check the thermal capability of NASPi
Other video
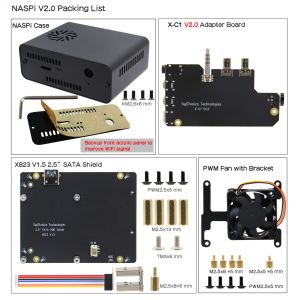
Packing List
- 1 x NASPi alu case
- 1 X X823 Shield
- 1 x X-C1 adapter board
- 1 x X823-A3 metal bracket with PWM fan
- Scews pack accessories;
FAQ
Q. Why the SSD cannot start or is very slow?
A: If you have a Raspberry Pi 4 and are getting bad speeds transferring data to/from USB3.0 SSDs, read this https://www.raspberrypi.org/forums/viewtopic.php?t=245931Q. Will the Alu case affect the WIFI?
A. There is nothing reliable than wired Ethernet, so it's better to use it.As our test, 2.4G WIFI AP was usable. But different Raspberry Pi individuals have different degrees of WIFI interference. As well as aluminum alloy case will interfere with pi 4’s WIFI to a certain extent. So it is strongly recommend to use Ethernet or 5G AP. You can refer to video test of 5G WIFI AP: https://youtu.be/LKJVIBQFYXs
Q. What is the thickness of a 2.5" HDD/SSD that can be accommodated?
A. The thickness of 2.5" HDD/SSD on the market is generally 7mm, 9.5mm, 12.5 and 15mm,You only can choose 7mm or 9.5mm thickness HDD/SSD, NASPi is not compatible with 12.5mm and 15mm thickness 2.5" HDD/SSD.The thickness of 2.5" HDD/SSD should not exceed 9.8mm. In fact, most 2.5" HDD/SSD on the market are only 7mm thick.Q. How to make the PWM cooling fan running?
A. You will need to install the shell script to make the cooling fan run, please refer to: X-C1_SoftwareWe can manually run the following commands:
sudo python /home/pi/x-c1/fan-rpi.py &or
sudo python3 /home/pi/x-c1/fan-rpi.py &Then the pwm fan will start working.
Q. How to find and use the Raspberry Pi 4 5G wifi?
A. Please refer to: Raspberry pi 4 can't find 5ghz wifiQ. Does the PWM cooling fan running or not?
A. 1. The fan is very silent, and it is not easy to hear the sound of the fan;2. The fan is a PWM fan which dynamically adjusts the speed according to the temperature of the CPU. If the temperature of the CPU is low, the speed of the fan is extremely low, and it is not easy to hear the sound of the fan;
3. Only when the CPU temperature reaches 65 degrees or more, the fan will run at full speed, and you may be able to hear the sound of the fan;
4. The fan is controlled by the PWM signal. The fan will only run after the ‘python /home/pi/x-c1/fan.py&’ command runs successfully; you can run the following command to check whether the fan is running; sudo jobs
Q. What is the read/write performance when used as a NAS?
A. The read and write performance is determined by the speed of the Raspberry Pi’s USB 3 bus and SSD. It should be noted that the Raspberry Pi’s USB3 bandwidth is only 3Gbps. Normally, the R/W speed is about 300MB/S.Q. Does the NASPi support PoE?
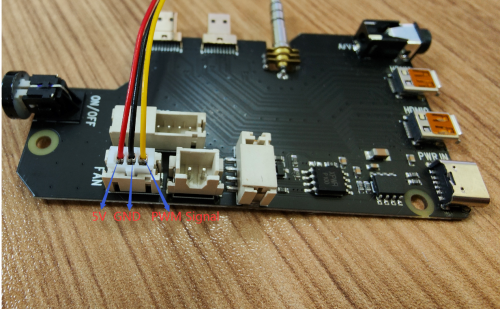
A. According to the customer feedback(based on 2021-05-07-raspios-buster-arm64-lite), the NASPi is OK to use with PoE splitter, but make sure to use high quality PoE splitter, or the power maybe not enough to power the NASPi kit.Q. Can the PWM fan in NASPi be replaced by other fan like noctua 5v 40mm 3-pin pwm fan?
A. Please refer to the below photo of the fan port interface definition of X-C1 adapter:red cable = 5V
black cable = GND
yellow cable = for PWM signal
Q. Does the NASPi support SATA III?
A. Yes, it support SATA III, also support SATA I, SATA II.Q. What to do if HDD/SSD is not recognized?
A. Please refer to How to View/Partition/Format/Mount HDD/SSDQ. Does the NASPi support add RTC module?
A. Sorry, no, the NASPi does not support add RTC module.Q. How to enable fan temperature control?
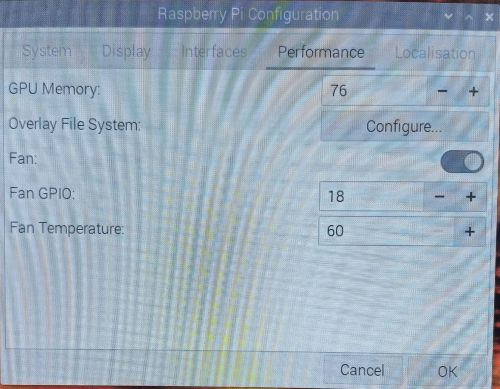
A. This setting is based on the latest Raspberry Pi OS ONLY. Run the command: sudo raspi-config and navigate to Performance Options to set the Fan Temperature. The fan speed is not adjustable.Q. What SSD is not supported?
A. 4TB SAMSUNG SSD is not supported according to the customer feedback. The NASPi can support 4TB HDD.Collect Feedback
https://geekworm.com/community/forum/topic/33043/solicit-naspi-user-experience-feedback-solutions
Enable comment auto-refresher
Anonymous user #35
Permalink |
Ruby
Anonymous user #34
Permalink |
Lisa
Anonymous user #33
Permalink |
Lisa
Anonymous user #32
Permalink |
Lisa
Anonymous user #31
Permalink |
Lisa
Anonymous user #30
Permalink |
Anonymous user #30
Permalink |
Anonymous user #29
Permalink |
Anonymous user #23
Permalink |
Anonymous user #28
Permalink |
Lisa
Anonymous user #27
Permalink |
Lisa
Anonymous user #26
Permalink |
Lisa
Anonymous user #25
Permalink |
Anonymous user #24
Permalink |
Anonymous user #24
Anonymous user #24
Lisa
Anonymous user #23
Permalink |
Lisa
Anonymous user #22
Permalink |
Lisa
Anonymous user #21
Permalink |
Lisa
Anonymous user #21
Anonymous user #20
Permalink |
Lisa
Anonymous user #19
Permalink |
Lisa
Anonymous user #18
Permalink |
Lisa
Anonymous user #16
Permalink |
Lisa
Anonymous user #17
Anonymous user #15
Permalink |
Lisa
Anonymous user #14
Permalink |
Lisa
Anonymous user #13
Permalink |
Harry
Anonymous user #12
Permalink |
Anonymous user #12
Permalink |
Anonymous user #11
Permalink |
Lisa
Anonymous user #11
Anonymous user #10
Permalink |
Lisa
Anonymous user #9
Permalink |
Lisa
Anonymous user #8
Permalink |
Lisa
Anonymous user #7
Permalink |
Lisa
Anonymous user #6
Permalink |
Lisa
Harry
Anonymous user #5
Permalink |
Lisa
Harry
Anonymous user #4
Permalink |
Lisa
Anonymous user #3
Permalink |
Lisa
Anonymous user #2
Permalink |
Lisa
Anonymous user #1
Permalink |
Lisa