-
X728


Safety Instructions & Warnings
- The power adapter must with overvoltage and surge voltage protection; otherwise, it may easily damage the circuit board. Damage caused by a substandard power supply will not be covered under warranty.
- It is essential to read and understand these safety instructions and warnings before charging your batteries.
- Lithium Polymer and Li-ion batteries are volatile. Failure to read and follow the instructions below may result in fire, personal injury, and damage to property if charged or used improperly.
- Never make a wrong polarity connection when charging or discharging battery packs. Always double-check the polarity of the battery's connector to ensure that "+" is connected to "+" and "-" is connected to "-".
- Do not mix and use old batteries with new batteries, or batteries with different brand names.
- Lithium batteries have a limited cycle life. Please replace old batteries with new ones when they reach their service life or when they are two years old, whichever comes first.
- When charging the Battery Pack, please place the battery in a fireproof container. Do not leave the UPS shield on wood material or carpet unattended.
- Keep the UPS shield away from children to ensure their safety.
- Ensure your fingers do not touch the solder pads when inserting the battery into the battery holder, as this could cause a short circuit. This is extremely important!!!
- Make sure to insert the battery before turning on the UPS.
- Make sure to insert the battery before connecting the external charger to charge it.
- Please watch Main Video and Tutorial Video regarding 18650 batteries at: https://www.staysafebattery.com/en/
- Battery Recommend for Geekworm UPS board, please refer to: File:NCR18650B.pdf
Overview
[NOTE]:
X728 supports also Raspberry Pi 5 hardware, the installation script is updated. Refer to X728-script, If you have any problems with RPi5, please refer to #FAQ: Q1
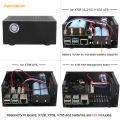
The X728 is an advanced uninterruptible power supply expansion board for all current models of the Raspberry Pi using a 40 pin header.
It provides 5.1V 5000mA Power Backup for even the most demanding Raspberry Pi set ups, intelligent and safe power management, safe shutdown,AC power loss/ power adapter failure detection , auto power-on, full poweroff from software, battery capacity reading, and a real- time clock(RTC), buzzer alarm.
The X728 reserves the 40-pin header that can be stacked with other Raspberry Pi accessory boards for enhanced applications. The X728 can also be used with the X825/X828/X829 (2.5" HDD/SSD Shield) and X857/X862/X872 (MSATA/M.2 SSD shield) for safe data backup.
Video Test Max 5.1V 5000mA Output: https://youtu.be/m_oIDrMEp0U
Note: X708, X703 UPS does not support Raspberry Pi 5.
Geekworm UPS Series for Raspberry Pi 5
▼ Expand 📋 Geekworm Raspberry Pi 5 UPS Family:
- *The Matching Case section only indicates compatibility between the case, UPS and Raspberry Pi 5 Board, and excludes products in the Product Matching Reference section. Compatibility of these referenced products with the case is subject to their actual specifications.
- *In addition to voltage and current, ensure that the total power of the power supply meets or exceeds the recommended input power (Total Power = Voltage × Current).
| Model | Compatible with | Mounting Position | Lithium battery type | Battery Holders | Power Input Connector | Power Output Connector | Matching Case | Product Matching Reference | Note |
|---|---|---|---|---|---|---|---|---|---|
| X1200 | Raspberry Pi 5 | Bottom | 3.7V 18650 Battery | 2-Cell |
|
5Vdc Power Output XH2.54-2P x2 | X1200-C1 |
|
- |
| X1201 | Raspberry Pi 5 | Bottom | 3.7V 18650 Battery | 2-Cell |
|
5Vdc Power Output XH2.54-2P x3 | X1201-C1 |
|
Ultra-thin |
| X1202 | Raspberry Pi 5 | Bottom | 3.7V 18650 Battery | 4-Cell |
|
5Vdc Power Output XH2.54-2P x2 | X1202-C1 |
|
- |
| X1203 | Raspberry Pi 5 | Bottom | 3.7V Lithium Battery | No battery holder(recommended to use with X12-A1) |
|
5Vdc Power Output XH2.54-2P x2 | - |
|
- |
| *X1205 | Raspberry Pi 5 | Bottom | 3.7V 21700 Battery | 2-Cell |
|
5Vdc Power Output XH2.54-2P x2 | X1205-C1 |
|
- |
| *X1206 | Raspberry Pi 5 | Bottom | 3.7V 21700 Battery | 4-Cell |
V2.0 Version
V1.1 Version
|
5Vdc Power Output XH2.54-2P x2 | X1206-C1 |
X1206 V2.0 Version: Geekworm 12 V / 5 A Power Adapter / PSU12V10A
|
- |
| *X1207 | Raspberry Pi 5 | Top | 3.7V 21700 Battery | 1-Cell |
|
- | X1207-C1 |
|
Support PoE-Powered |
| *X1208 | Raspberry Pi 5 | Top | 3.7V 21700 Battery | 1-Cell |
|
- | X1207-C1 | - | Support M.2 NVMe SSD 2230/2242/2280 |
| *X1209 | RPi 5B/4B/3B/3B+ | Top | 3.7V Lithium Battery | No battery holder(recommended to use with X12-A1) |
|
5V Power Output XH2.54-2P x2 | - |
|
- |
| *X728 | All RPi that use a 40-pin header | Top | 3.7V 18650 Battery | 2-Cell |
|
5V Power Output
|
- |
|
- |
| *X-UPS1 | All RPi & Most Single Board Computers (SBC) that uses 12Vdc or 5Vdc | Standalone | 3.7V 18650 Battery | 4-Cell |
|
|
- |
|
- |
Update History
X728 V2.5
Released on 27th July. 2023;
Adds battery charging control via GPIO16, and this function is only suitable for advanced players, please refer to How to Use GPIO16 to control battery charging for specific usage.
X728 V2.3
Released on 20th Aug. 2022;
No any functional changes; just change the SMD 18650 battery holder to a pin battery holder to improve the reliability of battery holer soldering.
WARNING!!!
- Please be sure to install the X728 and Raspberry Pi in the correct order. The copper pillars must be fixed before installing the x728. Avoid short circuit caused by the X728 board touching the USB connector of the motherboard, which may cause the chip to be burned.
- Never make wrong polarity connection when charging and discharging battery packs. Always double check polarity of battery's connector to make sure "+" to "+" and "-" to "-".
Installation Video:https://youtu.be/q_TmqMNhJPM
X728 V2.2
Adds Battery Reverse Polarity Protection circuit & LED indiciators on v2.2
X728 V2.1
Released on 23th Sep. 2021;
Update:
- New add a buzzer controled by GPIO20
- DC jack is changed from DC5525 to DC5521.
- User guide refer to X728-Software
X728 V2.0
- PIN33 (GPIO13) is replaced by the PIN37 (GPIO26) to avoid the I2S interface from v1.3 to v2.0.
- Improve the power path function, the battery will only charge and not discharge when connected to the PSU(power supply unit). [The PSU power will charge the battery and also pass through to the RPi when it has power. If the PSU loses power (power failure), the X728 will switch over to battery power.]
- You can choose to charge when boot up by short "CHG EN" and stop charging at shutdown.
- Increase battery overcharge, overdischarge protection circuit, added power input surge protection circuit.
- PCB Size change: 87x63.7mm
X728 V1.3
X728 V1.3 is released at Febuary 2021.
- Remove the hardware ASD function and change it to software implementation
- The charging power indicator (LED1-LED4) is relatively brighter than V1.2.
Features
FOR USE WITH
- Raspberry Pi 1 Model B+/ 2 Model B / 3 Model B / 3 Model B+ / 3 Model A+ / 4 Model B/ 5 Model B
OPERATING SYSTEM
- Raspbian Stretch
- Safe shutdown function tested for Raspbian, other operating systems to be tested and advised
KEY FEATURES
X728 18650 UPS + Power management board
- Smart and powerful Uninterruptible Power Supply (UPS)
- Provides continuous operations for up to 10~30hours (depending on battery type and qty used)
- Max 5.1V 5000mA Power Backup for even the most demanding RPi set ups
- Can work with X728-A2 2-cell battery holder(discontinued) / X708-A1 8-cell battery holder to increase battery capacity
- Supports 3000mA fast battery charging
- Integrated over current protection and over voltage protection
- Integrated Maxim's fuel-gauge systems (Reading battery voltage and percentage via i2c)
- Integrated 10-A fully-integrated synchronous boost converter
- Intelligent automatic charging and discharging
- On-board 4 green LEDs indicate battery charging and discharging levels of 25%, 50% , 75% and 100%
- Intelligent and safe power management
- Equipped with momentary button for easy power control
- Press the button to turn on
- Press the button and hold for 1~2seconds to reboot
- Press the button and hold for 3~7seconds to implement safe shutdown
- Press the button and hold for >8seconds to force shutdown
- Supports safe shutdown and full poweroff through software
- On-board blue LED shows the status of power on, reboot and shutdown
- AC power loss or power adapter failure detection (LED and GPIO detection)
- On-board pin header allows to select auto power-on when power supplied
- Automatic safe shutdown when battery low (voltage <3.0V)
- Ultra-low standby power consumption to maximize battery life
- Operate in both charge mode and boost mode to allow full system management and battery power management
- Integrated IN-to-SYS pass-through path to pass the input voltage to the system
- Advanced system power-path management avoids batteries frequent charging and discharging
- Advanced system power-path management allows 3A fast charging and powering Raspberry Pi at the same time
- Integrated Hardware DS1307 Real Time Clock (RTC) with Battery Back-Up
- Keeps track of the time while the Raspberry Pi is switched off
- Allows the Raspberry Pi to retrieve the current date and time when it is switched back on
- Uses the 18650 battery to maintain the date and time - no additional battery required
- Powers the Raspberry Pi via the 40-pin header - no additional cabling required
- On-board DC power jack (5.5*2.1mm) and Type-C socket convenient for power input
- On-board PH2.0 connector allows to connect external power switch and DIY your perfect case
- On-board XH2.54 power output connector allows to power other devices
- Reserves the 40-pin header that can be stacked with other Raspberry Pi accessory boards
SPECIFICATION
- Power supply via Type-C socket : 5Vdc ±5%, ≥3A, Via DC power jack 5521 : 5Vdc ±5%, ≥4A
- UPS output : 5.1V ±5% Max 5A
- UPS charging current: 2.3~3.2A
- Terminal Battery Voltage : 4.24V
- Recharge Threshold : 4.1V
Note:
- Do not apply power to your Raspberry Pi via the Micro USB socket or Type-C socket.
- Do not use 18650 battery with built-in protection circuit
PCB Size
- X728 V2.0/V2.1/V2.2: 87x63.5mm
- X728 V1.3: 85x63.5mm
How to Power
- Power via DC5521 Jack of X728, 5.1Vdc +/-5% , ≥4A (DC5525 Jack is compatible with DC5521, also support 5V PSU with DC5525 Jack)
- Power via USB Type-C port of X728, 5.1Vdc +/-5% , ≥3A (Geekworm Type-C 5V 4A 20W power supply is recommended.)
User manual
- X728-script: This is script installation tutorial for X728 shield
- x728-hardware: Provides some hardware parameter information.
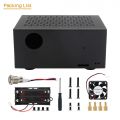
Packing List
- X728 Expansion Board x 1
- Screw M2.5x5mm x 8
- Spacer M/F M2.5x20+6mm x 4
- Spacer F/F M2.5x20mm x 4
- Jumper link Pitch 2.54mm x 2

X728-C1
X728-C1 is a metal case for X728 V2.3/V2.2/V2.1/V2.0 or X708/X735.
Installation Video: https://youtu.be/QOG30LXb6ds
-
 for X728 V2.x/x735/x708
 -
 with metal switch
 -
 active cool
 -
 application
 -
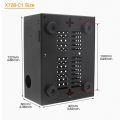 dimension
 -
 x728-c1 Accessories
 -
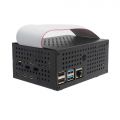 with GPIO hole


X728-A1
X728-A1 Optional Raspberry Pi cooling fan(Discontinued)
- Completely solve the overheating problem of your Raspberry Pi
- Efficient drop temp of your Raspberry Pi by using the X728-A1
- Stackable design allows you to connect both X728 and X728-A1 on your Raspberry Pi
- On-board XH2.54 power output connectors allow to power other devices
- Reserves the 40-pin header that can be stacked with other Raspberry Pi accessory boards
Packing List:
- 1 x X728-A1 Shield
- 4 x M2.5*12 F/F Spacer
- 4 x M2.5*25 + 6 M/F Spacer
- 8 x M2.5*5 screwss
X728-A2
X728-A2 Optional 18650 2-Cell battery holder(Discontinued)
- Stackable 18650 two cells lithium Ion holder
- Ideal solution to increase battery capacity
- Integrated battery protection circuit
X728 Extended Application


FAQ
Q1: Why does the message "This power supply is not capable of supplying 5A" appear on RPi 5??
X728/X729 UPS shield can provide enough 5A power supply capacity;
Please set as follows:
Step 1: (Required) Open the Teminal window based on Raspberry Pi OS and execute the following command:
sudo rpi-eeprom-config -e
Add PSU_MAX_CURRENT=5000 at the end of the file that reads like this:

Press Ctrl-O, then enter, to write the change to the file.
Press Ctrl-X to exit nano (the editor).
Step 2: (Optional, if you use USB peripherals and require higher current)
Set usb_max_current_enable=1 in /boot/firmware/config.txt
Reboot your Raspberry Pi 5 to make the change take effect.
Note: If you are using other OS like Ubuntu, please flash Raspberry Pi OS first, and then re-flash other OS such as Ubuntu etc after completing the above settings.
Q2: Why Raspberry Pi is randomly rebooting all the time?
A: You can follow the steps to test if the X728 issue:
- Take the X728 off from the Raspberry Pi, remove all the batteries, power supply, and all jumper caps. Then connect the battery or power supply, press the blue power button on X728, the blue LED should be on, and then press and hold the power button for more than 8 seconds, the blue LED should be off.(These steps indicate that the X728 has no issue.)
- Please check and confirm if other device occupy the GPIO with X728.
- Still not find out the issue, please attach a video to contact us show more details.
Q3: Why the X728 V1.3 remove the ASD function?
A: Because the ASD jumper will generate some issues, so we remove the ASD jumper, but now you can achieve ASD function by software. Read the voltage through I2C, and then decide whether to shut down.
Q4: How to restart the pi board when AC Power supply is connected?
A: Please enable 'AUTO POWER ON' or 'AUTO ON' function if you want restart when the AC Power supply is reapplied.
Q5: Which GPIO is used to power the X728-A1 cooling fan?
A: The X728-A1 does not occupy the GPIO, it use the PIN 2,4 to provide the power.
Q6: Are the batteries on X728 hot-swappable? In other words, can I connect an external power supply and swap the batteries out while that is on?
A: Sorry, the batteries on X728 is not support hot-swappable. Please cut off the power to swap the batteries.
Q7: Does the rtc have a separate battery? or does it run on the 18650 batteries? what happens if you remove them? will it "lose" time?
A: No, the RTC function runs on the 18650 batteries. It will "lose" time if you remove the batteries.
Q9: What will lead to the X728 board be burnt out?
A: Please make sure the polarity of battery is "+" to "+" and "-" to "-" and match with the "+" "-" mark on battery holder. The battery protection chip IC will be over-current, heat and then burnt if one or two of the batteries are connected reversely. PS: the X728 board will not be burnt immediately if one or two of the batteries are connected reversely.
Q10: What frequency does X728 use in the I2C communication bus used to communicate with RPI?
A: It depends on the motherboard and OS, please refer to this topic as reference: https://forums.raspberrypi.com/viewtopic.php?p=312582
Q11: What the maximum current rating of X728-A1 is?
A: The maximum current rating of X728-A1 is 90MA.
Q12: Simulate power outage and reconnection scenario. Why does the Raspberry Pi fail to auto boot after unplugging and reconnecting the power supply?
A: In the process of X728 auto power-on test, the Raspberry Pi fails to auto boot after power reconnection due to incomplete power discharge. This issue usually occurs when cutting power by unplugging the power adapter, while it will not happen if you disconnect the USB port directly.
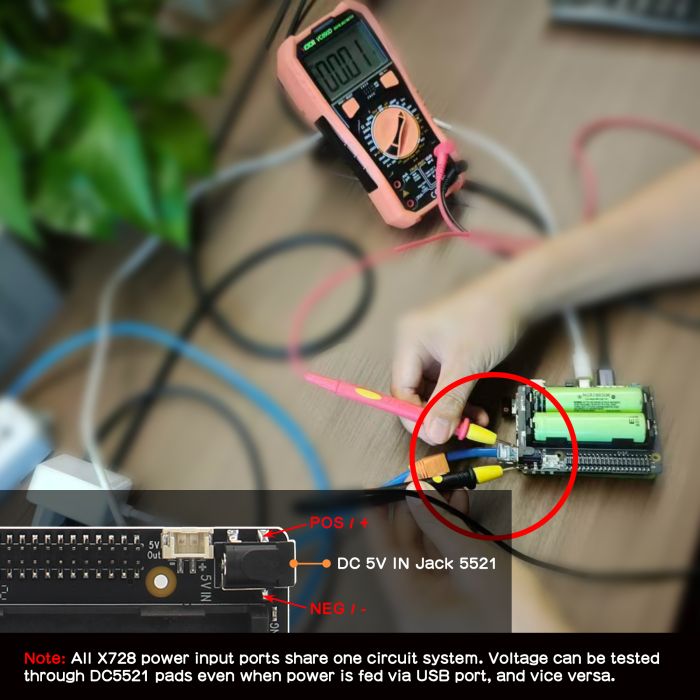
- 1. Cause
- Residual charge remains in the power adapter after disconnection, keeping voltage present at the X728 input terminal. Reconnecting power immediately fails to fully cut off the circuit, hence the auto power-on function cannot be triggered.
- 2. Discharge Completion Check (refer to the picture)
- Measure the voltage on the X728 DC jack input pads. The auto power-on function will be invalid if the reading is non-zero. Full discharge is achieved when voltage falls to zero, which usually takes more than 30 seconds. Discharge time varies depending on different power adapters.