Difference between revisions of "X1500"
| (109 intermediate revisions by 5 users not shown) | |||
| Line 1: | Line 1: | ||
{{GD Template Impl}} | {{GD Template Impl}} | ||
| + | [[File: X1500-IMG-9222-Interface.jpg | right |thumb|X1500 CM5 IO Board - Interface]] | ||
| + | [[File:X1500-IMG-9213-J2-J6-GPIO-FAN.jpg|thumb|right|X1500 Pin Header]] | ||
| + | [[File: X1500-IMG-9216-SSDs.jpg | right |thumb|X1500 CM5 IO Board - Support Dual NVMe SSDs]] | ||
| + | [[File: X1500-IMG-9227-Single-Board.jpg | right |thumb|X1500 CM5 IO Board]] | ||
| + | [[File: X1500-IMG-9236.jpg | right |thumb|X1500 CM5 IO Board - Assembly]] | ||
| + | [[File:X1500-IMG-9381.jpg|thumb|right|Support Hailo-8 AI Accelerator]] | ||
| + | [[File:X1500-X1501-compare.jpg|thumb|right|X1500 VS X1501]] | ||
| + | |||
| + | |||
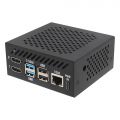
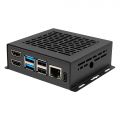
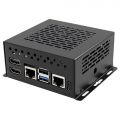
==Overview== | ==Overview== | ||
| − | The '''X1500''' is a purpose-built IO board tailored for the Raspberry Pi Compute Module 5 (CM5). It features '''two full-size M.2 NVMe slots''' and integrates a variety of peripherals into an ultra-compact design. This carrier board is meticulously engineered to streamline system development, allowing you to rapidly assemble solutions using readily available off-the-shelf components, such as existing Raspberry Pi HATs and M.2 NVMe devices. | + | The '''X1500''' is a purpose-built '''IO board''' tailored '''for the Raspberry Pi Compute Module 5 (CM5)'''. It features '''two full-size M.2 NVMe slots''' and integrates a variety of peripherals into an ultra-compact design. This carrier board is meticulously engineered to streamline system development, allowing you to rapidly assemble solutions using readily available off-the-shelf components, such as existing Raspberry Pi HATs and M.2 NVMe devices. |
For ease of integration, the board features a streamlined layout with major user connectors positioned along one edge, making enclosure design straightforward and efficient. Whether you're developing with the Compute Module 5 or deploying it as part of an embedded end product, the X1500 is designed to meet your needs with flexibility and performance. | For ease of integration, the board features a streamlined layout with major user connectors positioned along one edge, making enclosure design straightforward and efficient. Whether you're developing with the Compute Module 5 or deploying it as part of an embedded end product, the X1500 is designed to meet your needs with flexibility and performance. | ||
| + | |||
| + | {{CM5 IO Board}} | ||
==Features== | ==Features== | ||
| Line 12: | Line 23: | ||
|- | |- | ||
| '''Key Features''' || | | '''Key Features''' || | ||
| − | * '''Compact Design ( | + | * '''Compact Design (87x88x25mm)''': Combines a small footprint with a rich array of I/O peripherals for versatile applications. |
| − | * '''Gigabit Ethernet Port''': Features 1GbE with PoE+ support (for simplified power delivery) | + | * '''Gigabit Ethernet Port''': Features 1GbE with PoE+ support (for simplified power delivery, requires separate Raspberry Pi PoE+ HAT+) |
| − | * '''Dual M.2 2280 NVMe SSD Slots''': Supports up to 8TB (4TB+4TB) via PCIe 2.0 (5Gbps) for fast data transfers and boot times, compatible with M.2 NVMe SSDs in 2280, 2242, and 2230 form factors. | + | * '''Dual M.2 2280 NVMe SSD Slots''': Supports up to 8TB (4TB+4TB) via PCIe 2.0 (5Gbps) for fast data transfers and boot times, compatible with M.2 NVMe SSDs in '''2280, 2242, and 2230 form''' factors. |
* '''Dual HDMI 2.0 Ports''': Enables dual 4K display output for multimedia or industrial use cases. | * '''Dual HDMI 2.0 Ports''': Enables dual 4K display output for multimedia or industrial use cases. | ||
| − | * '''Dual USB 3.2 Gen 1 Ports''': delivering high-speed data transfer rates of up to 5 Gbps. | + | * '''Dual USB 3.2 Gen 1 Ports''': delivering high-speed data transfer rates of up to 5 Gbps. <span class="tb_red">USB 3.0 = USB 3.2 Gen 1 (identical specs)</span> |
| − | * '''Dual MIPI DSI/CSI-2 Connectors''': 22-pin FPC connectors (0.5mm pitch) compatible with Raspberry Pi 5 CSI and DSI modules for seamless camera and display integration. | + | * '''Dual MIPI DSI/CSI-2 Connectors''': 22-pin FPC connectors (0.5mm pitch) compatible with Raspberry Pi 5 CSI and DSI modules for seamless camera and display integration. |
| + | CAM/DISP 0 supports both displays or cameras. CAM/DISP 0 supports using a signal to power down the camera to save power. CAM/DISP 1 typically needs two jumpers fitting to '''J6''' to route the I2C signals from the GPIO connector to the camera connector. CAM/DISP 1 can be used with displays and cameras. If it is used with a camera, it isn’t possible to power down the camera. Also refer to [https://datasheets.raspberrypi.com/cm5/cm5io-datasheet.pdf Raspberry Pi Compute Module 5 IO Board datasheet (Page 5)] | ||
* '''MicroSD Card Slot''': Supports Compute Module 5 Lite variants (without onboard eMMC) | * '''MicroSD Card Slot''': Supports Compute Module 5 Lite variants (without onboard eMMC) | ||
* '''Raspberry Pi HAT+ Compatibility''': Reuse existing Raspberry Pi HATs to save time and reduce development costs. | * '''Raspberry Pi HAT+ Compatibility''': Reuse existing Raspberry Pi HATs to save time and reduce development costs. | ||
* '''Convenient Power Button''': Easily wake or shut down the Compute Module 5 with a single press. | * '''Convenient Power Button''': Easily wake or shut down the Compute Module 5 with a single press. | ||
| − | * '''RTC Battery Socket (CR1220)''': Ensures accurate timekeeping during power interruptions. | + | * '''RTC Battery Socket (CR1220 coin battery is not included)''': Ensures accurate timekeeping during power interruptions. |
* '''PWM Fan Support''': Includes a fan power connector for adjustable cooling in demanding environments. | * '''PWM Fan Support''': Includes a fan power connector for adjustable cooling in demanding environments. | ||
| − | * '''USB-C Port''': Handles both power delivery and OS image loading directly into the CM5’s eMMC. | + | * '''USB-C Port''': Handles both power delivery and OS image loading directly into the CM5’s eMMC.(<span class="tb_red">The OTG port is generally used for flashing the eMMC. If it's used for other purposes, power should be supplied via the 40-pin header—just like the official CM5 IO board.</span>) |
* '''Configurable Jumpers''': Allows disabling features like wireless connectivity or EEPROM writing for customization. | * '''Configurable Jumpers''': Allows disabling features like wireless connectivity or EEPROM writing for customization. | ||
* '''Streamlined Connector Layout''': USB, HDMI, Ethernet, and power ports are grouped along one edge for clean cable management and easy enclosure integration. | * '''Streamlined Connector Layout''': USB, HDMI, Ethernet, and power ports are grouped along one edge for clean cable management and easy enclosure integration. | ||
| + | * '''40-Pin GPIO header''': Uses the same GPIO pinout as the Raspberry Pi 5 | ||
|- | |- | ||
| '''Technical Specification''' || | | '''Technical Specification''' || | ||
| − | '''Power supply''': | + | <span class="tb_red">'''Power supply''': </span> |
| − | 5.1Vdc +/-5% 5A power via USB-C power supply | + | * <span class="tb_red">5.1Vdc +/-5% 5A power via USB-C power supply</span> |
'''Connectivity''': | '''Connectivity''': | ||
* USB-C (Power in and OS image loading) | * USB-C (Power in and OS image loading) | ||
| − | * 1Gigabit RJ45 Ethernet with PoE+ HAT+ support (requires separate Raspberry Pi PoE+ HAT+) | + | * 1Gigabit RJ45 Ethernet with PoE+ HAT+ support '''(requires separate Raspberry Pi PoE+ HAT+)''' |
* 2 x USB3.0 Type-A | * 2 x USB3.0 Type-A | ||
* 2 x USB2.0 Type-A | * 2 x USB2.0 Type-A | ||
| Line 59: | Line 72: | ||
<span class="tb_red">For optimal performance, please use the official Raspberry Pi '''27W USB-C''' Power Supply or an alternative power supply capable of delivering '''5.1V at 5A'''. An incompatible power supply with a lower output voltage may fail to power on the system.</span> | <span class="tb_red">For optimal performance, please use the official Raspberry Pi '''27W USB-C''' Power Supply or an alternative power supply capable of delivering '''5.1V at 5A'''. An incompatible power supply with a lower output voltage may fail to power on the system.</span> | ||
|} | |} | ||
| + | |||
| + | ==User Manual== | ||
| + | * The hardware design refers to the official design, please refer to: https://datasheets.raspberrypi.com/cm5/cm5io-datasheet.pdf | ||
| + | * '''Hardware Installation: [https://suptronics.com/Raspberrypi/cm5/x1500-v1.0_hardware.html X1500 Hardware]''', <span class="tb_red">'''please click the left link to view it, it's very important!''' </span> | ||
| + | * '''How to make it work: [https://suptronics.com/Raspberrypi/cm5/x1500-v1.0_software.html X1500 Software]''', <span class="tb_red">'''please click the left link to view it, it's very important!''' </span> | ||
| + | * You can also refer to the [https://datasheets.raspberrypi.com/cm5/cm5io-datasheet.pdf official CM5 IO board] of the Raspberry Pi Foundation. The usage of X1500 is the same as it. | ||
| + | * https://smarthomecircle.com/how-to-install-os-on-raspberry-pi-compute-module-5-emmc-storage | ||
| + | * how to flash os into cm5 emmc, Refer to the following: | ||
| + | #https://smarthomecircle.com/how-to-install-os-on-raspberry-pi-compute-module-5-emmc-storage | ||
| + | #https://www.youtube.com/watch?v=SWv-WYlHJWQ | ||
| + | * Configuration steps for using an external antenna: | ||
| + | https://www.raspberrypi.com/documentation/computers/compute-module.html#antenna | ||
==Packing List== | ==Packing List== | ||
| − | |||
* X1500 V1.0 CM5 carrier board x 1 | * X1500 V1.0 CM5 carrier board x 1 | ||
| − | * M.2 extension board x 2 ( | + | * M.2-A1 extension board x 2 (to fix M.2 2230 and 2242 SSDs) |
| − | * 2.54mm jumer cap x | + | * 2.54mm jumer cap x 2 |
| − | * | + | * M2*3 screw x 6 |
| + | [[File: X1500-Packing-List.jpg|800px]] | ||
| + | |||
| + | ==Matching Case== | ||
| + | According to user feedback, we have designed a metal case [[X1500-C1]] / [[X15-C1]] specifically for [[X1500]] / [[X1501]] IO boards. [[X15-C1]] and [[X1500-C1]] have different sizes, different appearances, and the same usage. | ||
| + | |||
| + | Here is a detailed comparison: | ||
| + | |||
| + | {| class="wikitable" | ||
| + | ! Model !! Compatible with !!compatibility!!Cooler / Heatsink | ||
| + | |- | ||
| + | | [[X15-C1]] V1.0 ||Raspberry Pi CM5||[[X1500]]/[[X1501]]/other low-profile expansion HATs||[[X15-F1]] | ||
| + | |- | ||
| + | | [[X1500-C1]] ||Raspberry Pi CM5||[[X1500]]/[[X1501]]||[[C519]] | ||
| + | |} | ||
| + | |||
| + | '''Please note''': The metal case will shield the wifi signal, so please use Ethernet when you use this case | ||
| + | |||
| + | <gallery> | ||
| + | X15-C1-IMG-9680.jpg|X15-C1 | ||
| + | X1500-C1-IMG-9275-NEW.jpg|X1500-C1 | ||
| + | File:X1500-C2-IMG-9819.jpg|X1500-C2 | ||
| + | |||
| + | </gallery> | ||
| + | |||
| + | ==Installation Tips for C519 & X1500/X1501== | ||
| + | |||
| + | Since both the C519 heatsink and PCB holes are threaded, proper alignment and minimal spacing are crucial during assembly. Carefully align the C519 with the PCB mounting holes, press down firmly until the heatsink touches the PCB, then tighten the screws. | ||
| + | |||
| + | [[File:C519-IMG-9184-1-WiKi.jpg|900px]] | ||
| + | |||
| + | [[File: X1500-IMG-9252-Installtion.jpg|900px]] | ||
| + | |||
| + | [[File:X1500-C1-IMG-9379-Installaion.jpg|900px]] | ||
| − | |||
| − | |||
| − | |||
| − | == | + | ===Video Guide=== |
| − | + | Installation Video: https://youtu.be/H1vgT2lrJQI | |
| + | {{#ev:youtube|https://youtu.be/H1vgT2lrJQI}} | ||
==FAQ== | ==FAQ== | ||
| − | + | {{X150x-FAQ}} | |
| − | |||
| − | |||
| − | |||
| − | |||
| − | |||
| − | |||
| − | |||
| − | |||
<!--Add review function! --> | <!--Add review function! --> | ||
| Line 93: | Line 140: | ||
[[Category:Product Manual]] | [[Category:Product Manual]] | ||
[[Category:Raspberry pi]] | [[Category:Raspberry pi]] | ||
| + | [[Category:Knowledge]] | ||
Latest revision as of 16:40, 25 February 2026


Contents
Overview
The X1500 is a purpose-built IO board tailored for the Raspberry Pi Compute Module 5 (CM5). It features two full-size M.2 NVMe slots and integrates a variety of peripherals into an ultra-compact design. This carrier board is meticulously engineered to streamline system development, allowing you to rapidly assemble solutions using readily available off-the-shelf components, such as existing Raspberry Pi HATs and M.2 NVMe devices.
For ease of integration, the board features a streamlined layout with major user connectors positioned along one edge, making enclosure design straightforward and efficient. Whether you're developing with the Compute Module 5 or deploying it as part of an embedded end product, the X1500 is designed to meet your needs with flexibility and performance.
The difference between X1500, X1501, X1502 and X1507
| Features | X1500 | X1501 | X1502 | X1507 |
|---|---|---|---|---|
| Compatible with | Raspberry Pi CM5 | Raspberry Pi CM5 | Raspberry Pi CM5 | Raspberry Pi CM5 |
| Ethernet Port | 1GbE Ethernet Port x 1 | 1GbE Ethernet Port x 1, 2.5GbE Ethernet Port x 1 |
1GbE Ethernet Port x 1, 2.5GbE Ethernet Port x 1 |
1GbE Ethernet Port x 1 |
| USB-C Power In Port | ✔ | ✔ | ✔ | ✔ |
| USB-A Ports | 2 x USB2.0 Type-A, 2 x USB3.0 Type-A |
1 x USB2.0 Type-A, 1 x USB3.0 Type-A |
1 x USB2.0 Type-A, 1 x USB3.0 Type-A |
2 x USB2.0 Type-A, 2 x USB3.0 Type-A |
| HDMI 2.0 Ports | 2 x HDMI 2.0 | 2 x HDMI 2.0 | 2 x HDMI 2.0 | 2 x HDMI 2.0 |
| M.2 NVMe Key-M Slot | Dual 2230/2242/2260/2280 |
Dual 2230/2242/2260/2280 |
Four 2230/2242/2260/2280 |
Dual 2230/2242 |
| Dual MIPI DSI/CSI-2 Connectors | ✔ | ✔ | ✔ | ✔ |
| MicroSD Card Slot | ✔ | ✔ | ✔ | ✔ |
| Power Button | ✔ | ✔ | ✔ | ✔ |
| RTC Battery Socket | ✔ Require CR1220 | ✔ Require CR1220 | ✔ Require CR2032 | ✔ with a RTC Battery Connector, Require CR1220 and battery holder |
| 4Pin PWM Fan Port | ✔ | ✔ | ✔ | ✔ |
| Support Hailo-8 AI Accelerator | ✔ | ✔ | ❌ | ✔ |
| PoE header | ✔ | ✔ | ❌ | ✔ |
| 40pin GPIO header | ✔ | ✔ | ✔ | ✔ |
| 12pin Configurable header J2 | ✔ | ✔ | ✔ | ✔ |
| Jumper setting for CAM/DISP1 J6 | ✔ | ✔ | ✔ | ✔ |
| PoE HAT support | X15-POE1 | X15-POE1 | Currently no compatible PoE HAT | Currently no compatible PoE HAT Can work with X1012 POE HAT to achieve POE function, but the NVME function of the X1012 is no longer available |
| Matching Case | X1500-C1 / X15-C1 | X1500-C1 / X15-C1 | X1502-C1 | X1507-C1 TBD.If a casing is produced, it will be notified here. |
| Matching Cooler | C519 | C519 | C519 | Equipped with a passive cooler |
Features
| For use with |
Raspberry Pi Compute Module 5 (CM5) |
| Key Features |
CAM/DISP 0 supports both displays or cameras. CAM/DISP 0 supports using a signal to power down the camera to save power. CAM/DISP 1 typically needs two jumpers fitting to J6 to route the I2C signals from the GPIO connector to the camera connector. CAM/DISP 1 can be used with displays and cameras. If it is used with a camera, it isn’t possible to power down the camera. Also refer to Raspberry Pi Compute Module 5 IO Board datasheet (Page 5)
|
| Technical Specification |
Power supply:
|
| Important Notes |
For optimal performance, please use the official Raspberry Pi 27W USB-C Power Supply or an alternative power supply capable of delivering 5.1V at 5A. An incompatible power supply with a lower output voltage may fail to power on the system. |
User Manual
- The hardware design refers to the official design, please refer to: https://datasheets.raspberrypi.com/cm5/cm5io-datasheet.pdf
- Hardware Installation: X1500 Hardware, please click the left link to view it, it's very important!
- How to make it work: X1500 Software, please click the left link to view it, it's very important!
- You can also refer to the official CM5 IO board of the Raspberry Pi Foundation. The usage of X1500 is the same as it.
- https://smarthomecircle.com/how-to-install-os-on-raspberry-pi-compute-module-5-emmc-storage
- how to flash os into cm5 emmc, Refer to the following:
- https://smarthomecircle.com/how-to-install-os-on-raspberry-pi-compute-module-5-emmc-storage
- https://www.youtube.com/watch?v=SWv-WYlHJWQ
- Configuration steps for using an external antenna:
https://www.raspberrypi.com/documentation/computers/compute-module.html#antenna
Packing List
- X1500 V1.0 CM5 carrier board x 1
- M.2-A1 extension board x 2 (to fix M.2 2230 and 2242 SSDs)
- 2.54mm jumer cap x 2
- M2*3 screw x 6

Matching Case
According to user feedback, we have designed a metal case X1500-C1 / X15-C1 specifically for X1500 / X1501 IO boards. X15-C1 and X1500-C1 have different sizes, different appearances, and the same usage.
Here is a detailed comparison:
| Model | Compatible with | compatibility | Cooler / Heatsink |
|---|---|---|---|
| X15-C1 V1.0 | Raspberry Pi CM5 | X1500/X1501/other low-profile expansion HATs | X15-F1 |
| X1500-C1 | Raspberry Pi CM5 | X1500/X1501 | C519 |
Please note: The metal case will shield the wifi signal, so please use Ethernet when you use this case
X15-C1
X1500-C1
X1500-C2


Installation Tips for C519 & X1500/X1501
Since both the C519 heatsink and PCB holes are threaded, proper alignment and minimal spacing are crucial during assembly. Carefully align the C519 with the PCB mounting holes, press down firmly until the heatsink touches the PCB, then tighten the screws.


Video Guide
Installation Video: https://youtu.be/H1vgT2lrJQI
FAQ
Q. Why can't X1500/X1501 boot up?
A: First, please confirm that your Raspberry Pi CM5 module is working properly. You can refer to online guides for instructions on how to verify that the CM5 is functioning correctly.
Due to PD power compatibility issues, some PD power supplies may cause X1500/X1501 to fail to boot up. Please replace the official Raspberry Pi 5 power supply or Geekworm PSU20 power supply.
Q: Does the X1500/X1501 support Hailo-8 M.2 AI Accelerator?
A: According to the test, the X1500/X1501 can support one Hailo-8 M.2 AI Accelerator Module and one M.2 Key-M NVMe SSD.
Q: Is X1500/X1501 compatible with POE+ Hat?
A: X1500/X1501 is compatible with X15-POE1.
We tested the [Official Raspberry Pi4 POE+ Hat] and it can be compatible, but the cooling fan did not work, probably due to the OS configuration. If you are interested, you can also test it and look forward to your sharing of your suggestions.


Q: Is the X1501 2.5G ethernet port on the PICe bus along with the M.2 devices?
A: No, the X1501 2.5G Ethernet port is connected via the USB 3.0 interface.
Q: How to configure for an external antenna?
A: When using an external antenna, you need to configure the device accordingly. Please follow the official Raspberry Pi documentation for the configuration steps: https://www.raspberrypi.com/documentation/computers/compute-module.html#antenna

Q: What driver do I need for the X1501 2.5GbE Ethernet on OpenWrt?
A: No additional driver is required. Once the X1501 is installed on the CM5, it works just like a Raspberry Pi 5, and the 2.5GbE Ethernet can be used directly under OpenWrt.

Enable comment auto-refresher
Anonymous user #2
Permalink |
Anonymous user #1
Permalink |
Lisa