Difference between revisions of "X728"

From Geekworm Wiki
Jump to navigation Jump to search
Line 164: Line 164:
 
* Spacer M/F M2.5 *20mm x 4  
 
* Spacer M/F M2.5 *20mm x 4  
 
* Spacer F/F M2.5 *20mm x 4  
 
* Spacer F/F M2.5 *20mm x 4  
* Jumper link Pitch 2.54mm x 3
+
* Jumper link Pitch 2.54mm x 2
  
 
[[File: IMG-0449-Packing-List.jpg|600px]]
 
[[File: IMG-0449-Packing-List.jpg|600px]]

Revision as of 14:47, 20 September 2024

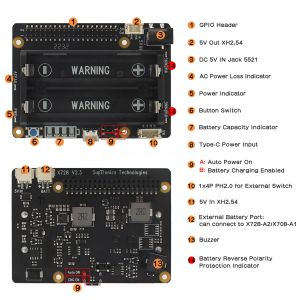
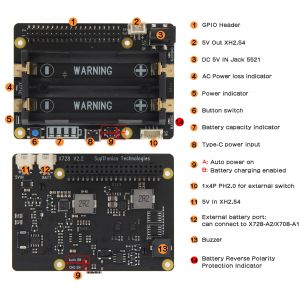
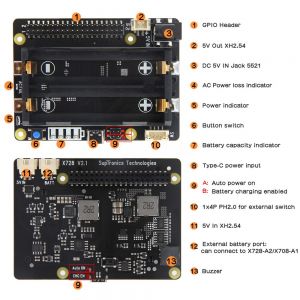
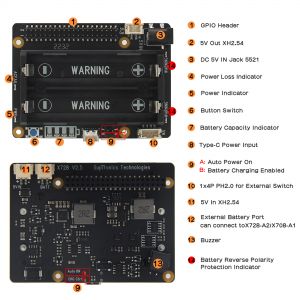
X728 V2.5 Interface
X728 V2.3 Interface
X728 V2.2 Interface
X728 V2.1 Interface
X728 V2.1 Jumper Cap Function
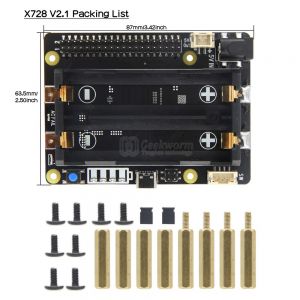
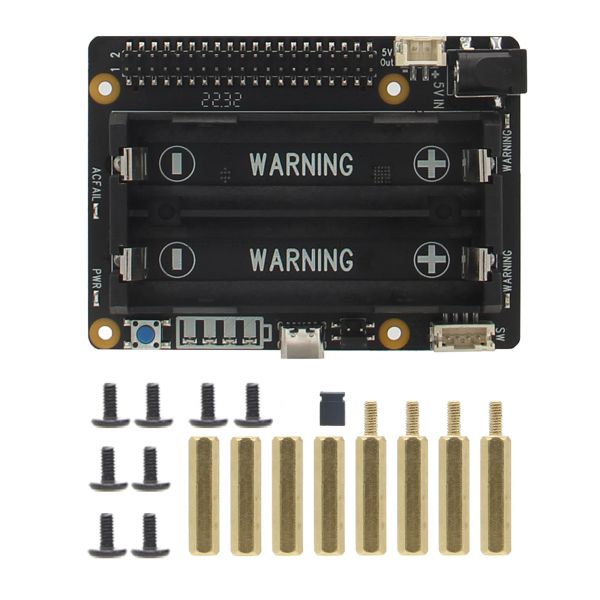
X728 V2.1 packing list
X728 V2.0 Jumper cap function
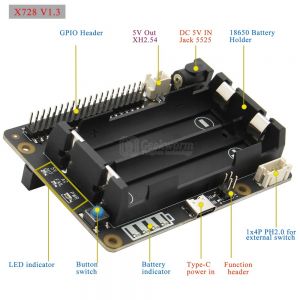
X728 ups board-Interface
X728 V1.3 ups board-Jumper cap function
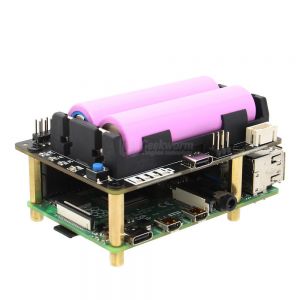
X728 ups board
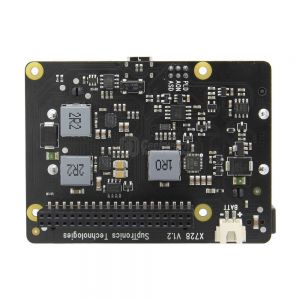
X728 v1.2 ups board-Back
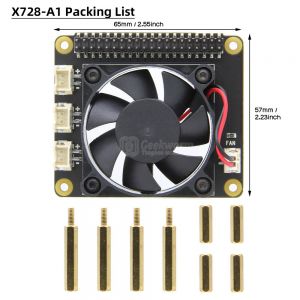
X728-A1 Packing List
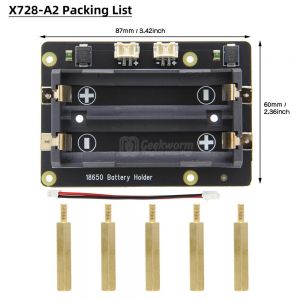
X728-A2 Packing List
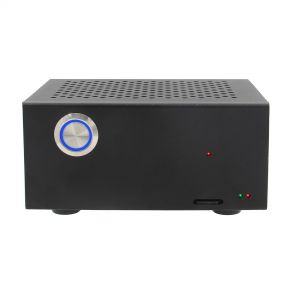
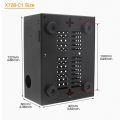
X728-C1 metal case for X728 V2.x/x735/x708
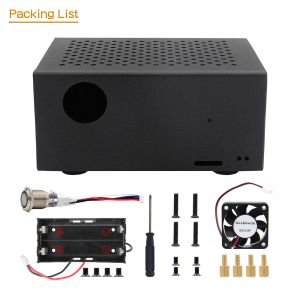
x728-c1 Accessories
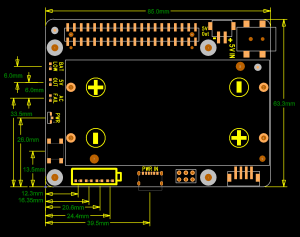
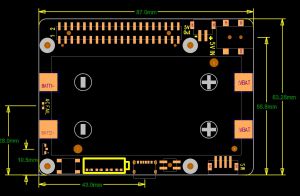
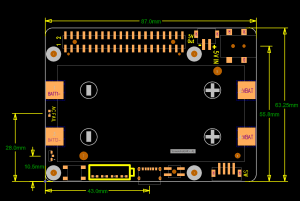
X728 V1.3 PCB Layout
X728 V2.0 PCB Layout
X728 V2.1 PCB Layout

Overview

[NOTE]: X728 supports also Raspberry Pi 5 hardware, the installation script is updated. Refer to X728-script


The X728 is an advanced uninterruptible power supply expansion board for all current models of the Raspberry Pi using a 40 pin header.

It provides 5.1V 6000mA Power Backup for even the most demanding Raspberry Pi set ups, intelligent and safe power management, safe shutdown,AC power loss/ power adapter failure detection , auto power-on, full poweroff from software, battery capacity reading, and a real- time clock(RTC), buzzer alarm.

The X728 reserves the 40-pin header that can be stacked with other Raspberry Pi accessory boards for enhanced applications. The X728 can also be used with the X825/X828/X829 (2.5" HDD/SSD Shield) and X857/X862/X872 (MSATA/M.2 SSD shield) for safe data backup.

Video Test Max 5.1V 6000mA Output: https://youtu.be/m_oIDrMEp0U

Note: X708, X703 UPS does not support Raspberry Pi 5.

Update History

X728 V2.5

Released on 27th July. 2023;

Adds battery charging control via GPIO16, and this function is only suitable for advanced players, please refer to How to Use GPIO16 to control battery charging for specific usage.

X728 V2.3

Released on 20th Aug. 2022;

No any functional changes; just change the SMD 18650 battery holder to a pin battery holder to improve the reliability of battery holer soldering.

WARNING!!!

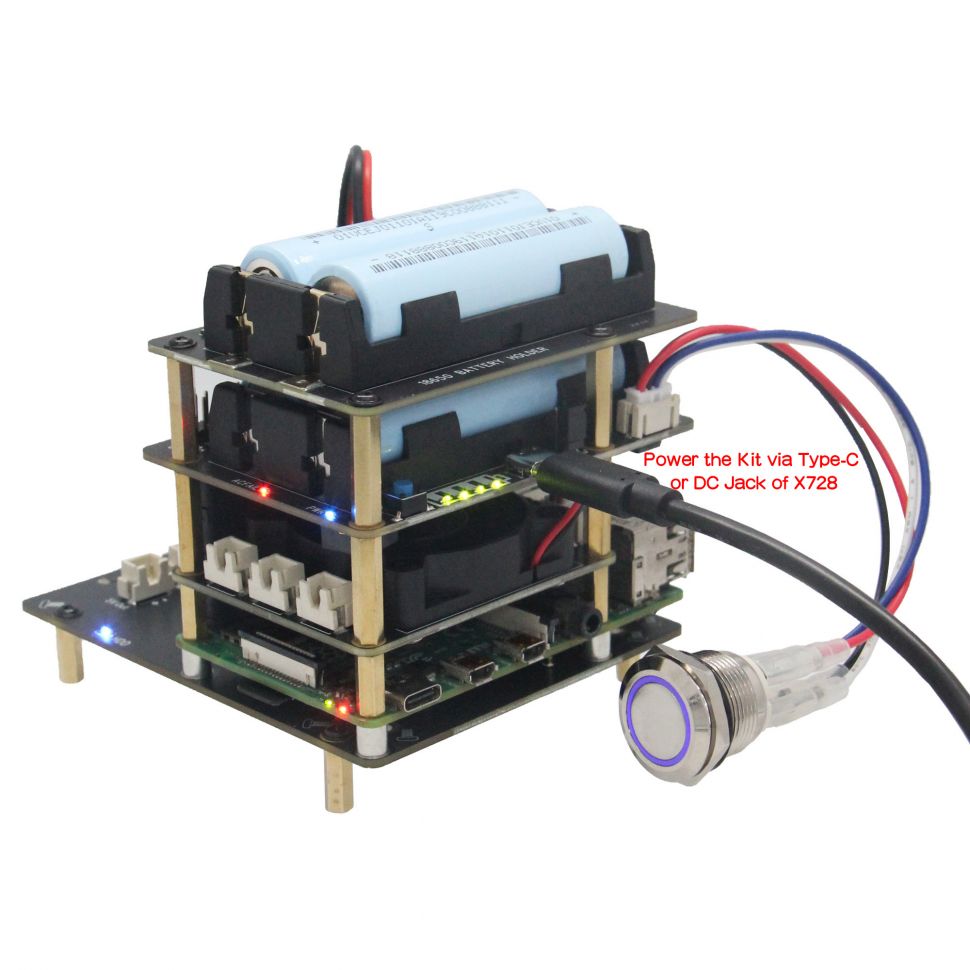
  • Please be sure to install the X728 and Raspberry Pi in the correct order. The copper pillars must be fixed before installing the x728. Avoid short circuit caused by the X728 board touching the USB connector of the motherboard, which may cause the chip to be burned.
  • Never make wrong polarity connection when charging and discharging battery packs. Always double check polarity of battery's connector to make sure "+" to "+" and "-" to "-". 

Installation Video:https://youtu.be/q_TmqMNhJPM

X728 V2.2

Adds Battery Reverse Polarity Protection circuit & LED indiciators on v2.2

X728 V2.1

Released on 23th Sep. 2021;

Update:

  • New add a buzzer controled by GPIO20
  • DC jack is changed from DC5525 to DC5521.

X728 V2.0

  • PIN33 (GPIO13) is replaced by the PIN37 (GPIO26) to avoid the I2S interface from v1.3 to v2.0.
  • Improve the power path function, the battery will only charge and not discharge when connected to the PSU(power supply unit). [The PSU power will charge the battery and also pass through to the RPi when it has power. If the PSU loses power (power failure), the X728 will switch over to battery power.]
  • You can choose to charge when boot up by short "CHG EN" and stop charging at shutdown.
  • Increase battery overcharge, overdischarge protection circuit, added power input surge protection circuit.
  • PCB Size change: 87x63.7mm

X728 V1.3

X728 V1.3 is released at Febuary 2021.

  • Remove the hardware ASD function and change it to software implementation
  • The charging power indicator (LED1-LED4) is relatively brighter than V1.2.

SAFETY INSTRUCTIONS AND WARNINGS

  • You must read these safety instructions and warnings before charging your batteries.
  • Lithium Polymer and Li-ion batteries are volatile. Failure to read and follow the below instructions may result in fire, personal injury and damage to property if charged or used improperly.
  • Never make wrong polarity connection when charging and discharging battery packs. Always double check polarity of battery's connector to make sure "+" to "+" and "-" to "-".
  • Do not mix and use old batteries and new batteries, or batteries with different brand names.
  • Lithium batteries has it's cycle life, please replace old battery with new one when it reaches it's service life or when it is two year old, whichever comes first.
  • When charging Battery Pack, please put battery in a fire proof container. Please don't leave the X728 on the wood material or carpet and unattended.
  • Must keep the X728 away from children.
  • Please watch Main Video and Tutorial Video regarding 18650 batteries at: https://www.staysafebattery.com/en/
  • Battery Recommend for X728 board, please refer to: File:NCR18650B.pdf

Features

FOR USE WITH

  • Raspberry Pi 1 Model B+/ 2 Model B / 3 Model B / 3 Model B+ / 3 Model A+ / 4 Model B/ 5 Model B

OPERATING SYSTEM

  • Raspbian Stretch
  • Safe shutdown function tested for Raspbian, other operating systems to be tested and advised

KEY FEATURES

X728 18650 UPS + Power management board

  • Smart and powerful Uninterruptible Power Supply (UPS)
  • Provides continuous operations for up to 10~30hours (depending on battery type and qty used)
  • Max 5.1V 6000mA Power Backup for even the most demanding RPi set ups
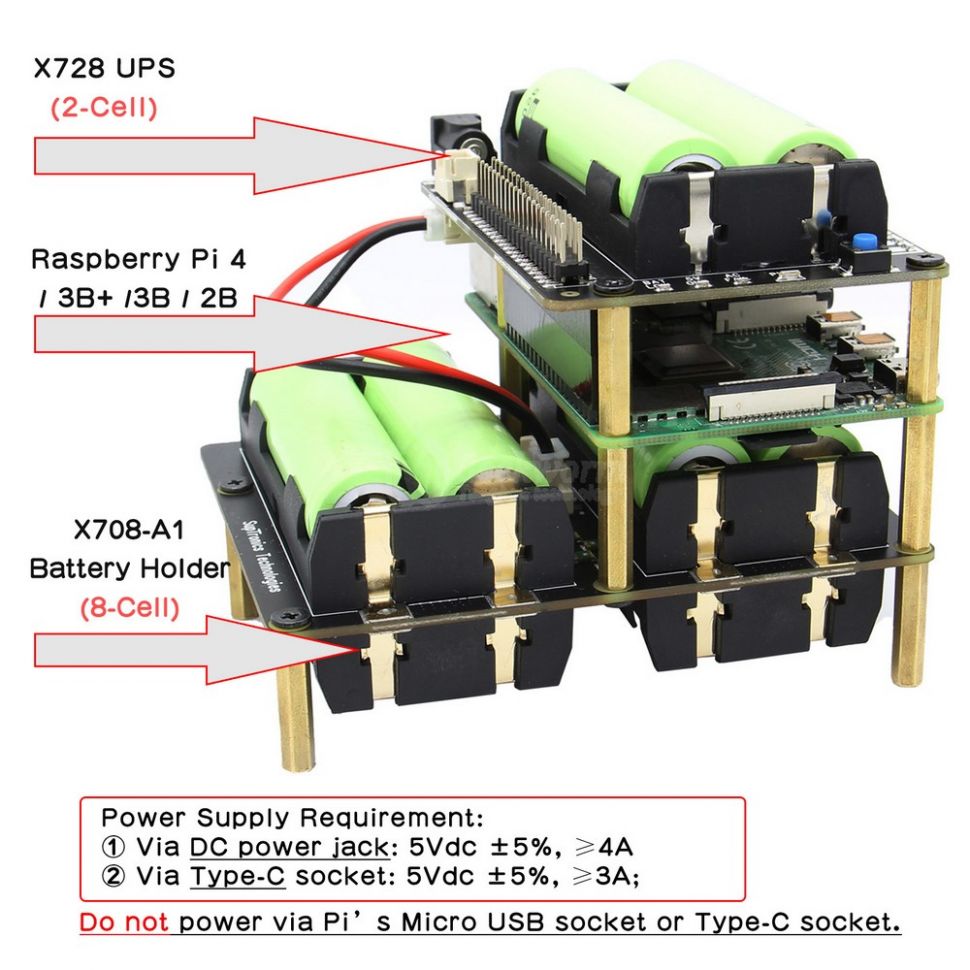
  • Can work with X728-A2 2-cell battery holder(discontinued) / X708-A1 8-cell battery holder to increase battery capacity
  • Supports 3000mA fast battery charging
  • Integrated over current protection and over voltage protection
  • Integrated Maxim's fuel-gauge systems (Reading battery voltage and percentage via i2c)
  • Integrated 10-A fully-integrated synchronous boost converter
  • Intelligent automatic charging and discharging
  • On-board 4 green LEDs indicate battery charging and discharging levels of 25%, 50% , 75% and 100%


  • Intelligent and safe power management
  • Equipped with momentary button for easy power control
  • Press the button to turn on
  • Press the button and hold for 1~2seconds to reboot
  • Press the button and hold for 3~7seconds to implement safe shutdown
  • Press the button and hold for >8seconds to force shutdown
  • Supports safe shutdown and full poweroff through software
  • On-board blue LED shows the status of power on, reboot and shutdown
  • AC power loss or power adapter failure detection (LED and GPIO detection)
  • On-board pin header allows to select auto power-on when power supplied
  • Automatic safe shutdown when battery low (voltage <3.0V)
  • Ultra-low standby power consumption to maximize battery life
  • Operate in both charge mode and boost mode to allow full system management and battery power management
  • Integrated IN-to-SYS pass-through path to pass the input voltage to the system
  • Advanced system power-path management avoids batteries frequent charging and discharging
  • Advanced system power-path management allows 3A fast charging and powering Raspberry Pi at the same time


  • Integrated Hardware DS1307 Real Time Clock (RTC) with Battery Back-Up
  • Keeps track of the time while the Raspberry Pi is switched off
  • Allows the Raspberry Pi to retrieve the current date and time when it is switched back on
  • Uses the 18650 battery to maintain the date and time - no additional battery required


  • Powers the Raspberry Pi via the 40-pin header - no additional cabling required
  • On-board DC power jack (5.5*2.5mm) and Type-C socket convenient for power input
  • On-board PH2.0 connector allows to connect external power switch and DIY your perfect case
  • On-board XH2.54 power output connector allows to power other devices
  • Reserves the 40-pin header that can be stacked with other Raspberry Pi accessory boards

SPECIFICATION

  • Power supply via Type-C socket : 5Vdc ±5%, ≥3A, Via DC power jack : 5Vdc ±5%, ≥4A
  • UPS output : 5.1V ±5% Max 6A
  • UPS charging current: 2.3~3.2A
  • Terminal Battery Voltage : 4.24V
  • Recharge Threshold : 4.1V

Note:

  • Do not apply power to your Raspberry Pi via the Micro USB socket or Type-C socket.
  • Do not use 18650 battery with built-in protection circuit

PCB Size

  • X728 V2.0/V2.1/V2.2: 87x63.5mm
  • X728 V1.3: 85x63.5mm

How to Power

  • Power via DC5521 Jack of X728, 5.1Vdc +/-5% , ≥4A (DC5525 Jack is compatible with DC5521, also support 5V PSU with DC5525 Jack)
  • Power via USB Type-C port of X728, 5.1Vdc +/-5% , ≥3A (Geekworm Type-C 5V 4A 20W power supply is recommended.)

Packing List

  • X728 Expansion Board x 1
  • Screw M2.5 *5mm x 8
  • Spacer M/F M2.5 *20mm x 4
  • Spacer F/F M2.5 *20mm x 4
  • Jumper link Pitch 2.54mm x 2

IMG-0449-Packing-List.jpg

User manual

  • X728-script: This is script installation tutorial for X728 shield
  • x728-hardware: Provides some hardware parameter information.

X728-C1

X728-C1 is a metal case for X728 V2.3/V2.2/V2.1/V2.0 or X708/X735.

Installation Video: https://youtu.be/QOG30LXb6ds

X728-A1

X728-A1 Optional Raspberry Pi cooling fan

  • Completely solve the overheating problem of your Raspberry Pi
  • Efficient drop temp of your Raspberry Pi by using the X728-A1
  • Stackable design allows you to connect both X728 and X728-A1 on your Raspberry Pi
  • On-board XH2.54 power output connectors allow to power other devices
  • Reserves the 40-pin header that can be stacked with other Raspberry Pi accessory boards

Packing List:

  • 1 x X728-A1 Shield
  • 4 x M2.5*12 F/F Spacer
  • 4 x M2.5*25 + 6 M/F Spacer
  • 8 x M2.5*5 screwss

X728-A2

X728-A2 Optional 18650 2-Cell battery holder

  • Stackable 18650 two cells lithium Ion holder
  • Ideal solution to increase battery capacity
  • Integrated battery protection circuit

X728 Extended Application

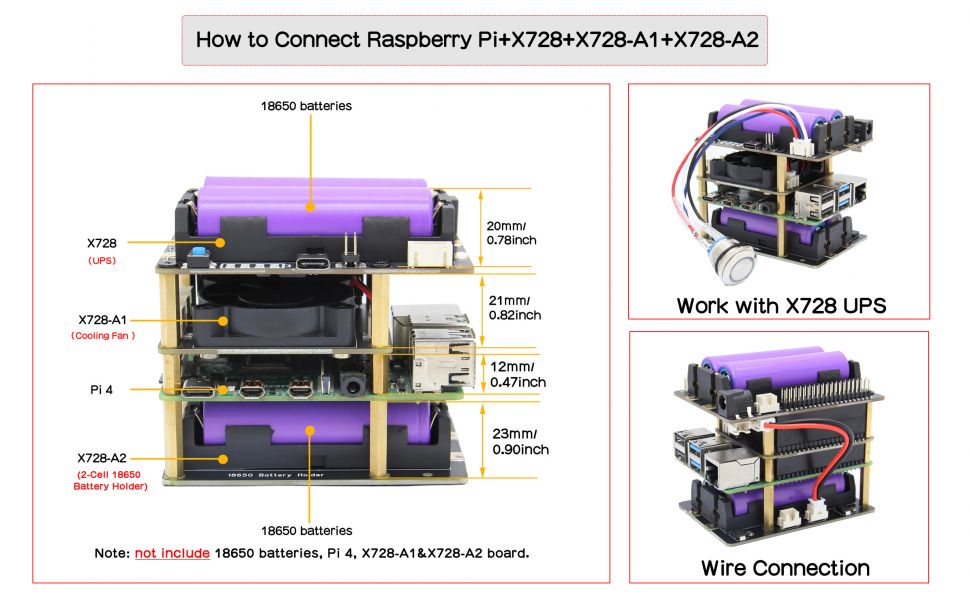
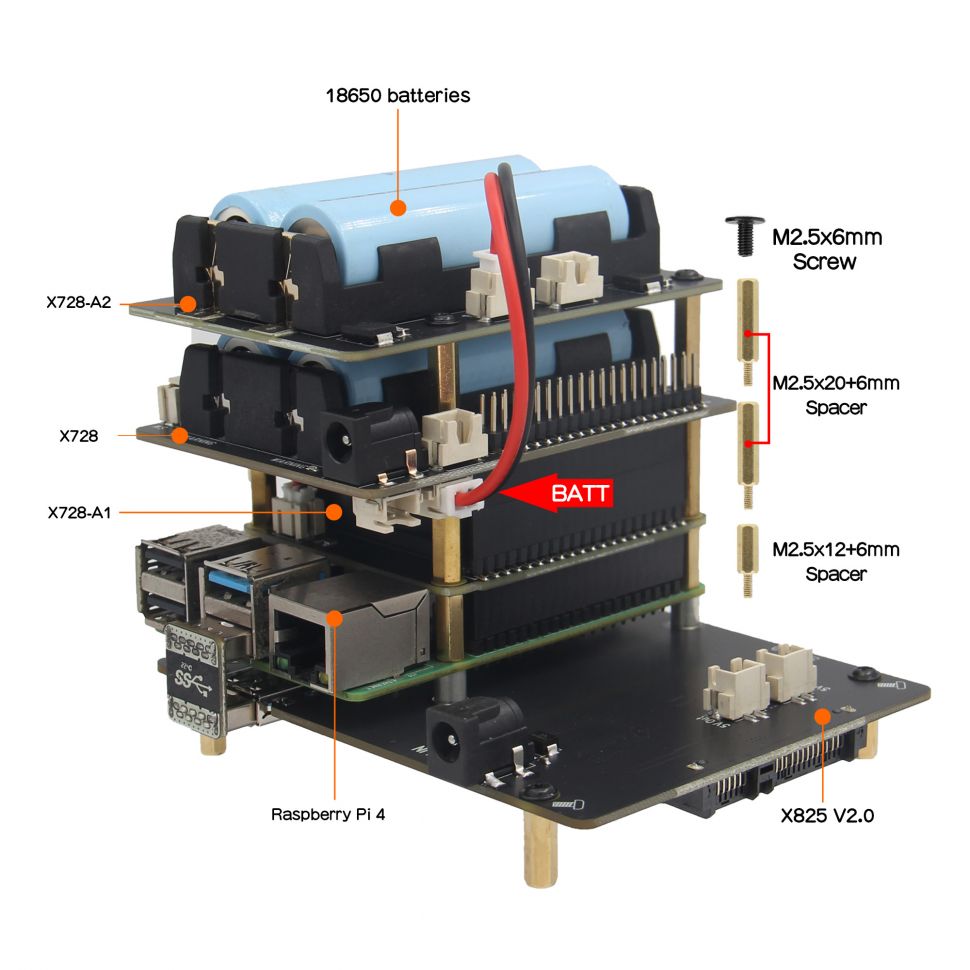
How to Connect Raspi and X728

X728 with X708-A1

X825 + X728 + X708-A1 + X728 A2

X825-x728-IMG-5941-1.jpg

FAQ

Q:Why Raspberry Pi is randomly rebooting all the time?

A:You can follow the steps to test if the X728 issue:

a:Take the X728 off from the Raspberry Pi, remove all the batteries, power supply, and all jumper caps. Then connect the battery or power supply, press the blue power button on X728, the blue LED should be on, and then press and hold the power button for more than 8 seconds, the blue LED should be off.(These steps indicate that the X728 has no issue.)

b:Please check and confirm if other device occupy the GPIO with X728.

c:Still not find out the issue, please attach a video to contact us show more details.


Q: Why the X728 V1.3 remove the ASD function?

A: Because the ASD jumper will generate some issues, so we remove the ASD jumper, but now you can achieve ASD function by software. Read the voltage through I2C, and then decide whether to shut down.


Q1: Why X728 V1.2 automatically shuts down?

A: 1. X728 V1.2 will automatic safe shutdown when battery voltage is low than 3.0V, please charge in time;

2. Please try the following operation by step:

  1. Remove all jumper cap,
  2. Remove all 18650 battery
  3. Place 18650 battery again and wait a few seconds before testing

3. What battery is recommended for X728?

A:Because there are so many kind of batteries, and the quality is also various. So we suggest to use the NCR18650B from Panasonic. Also do not use 18650 battery with built-in protection circuit for X728.


Q3: How to restart the pi board when AC Power supply is connected?

A: Please enable 'AUTO POWER ON' or 'AUTO ON' function if you want restart when the AC Power supply is reapplied.


Q4: About auto shutdown, found your board auto shutdown.

A: Please check if enable the ASD function (shorted the ASD header), if you enable the ASD function, please make sure your operation is right: first, place the battery into the battery holder, insert the jumper to ASD header after 3 seconds,this is very important!!


Q5:Is the recharge threshold and terminal battery voltage adjustable? I want to keep the batteries between 80% and 20%

A: Sorry, this is not support.


Q6: Which GPIO is used to power the X728-A1 cooling fan?

A: The X728-A1 does not occupy the GPIO, it use the PIN 2,4 to provide the power.


Q7: How can I remove all software created by the setup and start over?

A: 1) sudo /etc/rc.local , delete x728pwr.sh

2) sudo rm /etc/x728pwr.sh

3) sudo rm /usr/local/bin/x728softsd.sh


Q8: What are GPIO5 and GPIO12 used for X728 V1.3/V2.0?

A: GPIO5 control shutdown, GPIO12 BOOK OK.


Q9: Are the batteries on X728 hot-swappable? In other words, can I connect an external power supply and swap the batteries out while that is on?

A:Sorry, the batteries on X728 is not support hot-swappable. Please cut off the power to swap the batteries.


Q10: Does the rtc have a separate battery? or does it run on the 18650 batteries? what happens if you remove them? will it "lose" time?

A:No, the RTC function runs on the 18650 batteries. It will "lose" time if you remove the batteries.


Q11: What will lead to the X728 board be burnt out?

A: Please make sure the polarity of battery is "+" to "+" and "-" to "-" and match with the "+" "-" mark on battery holder. The battery protection chip IC will be over-current, heat and then burnt if one or two of the batteries are connected reversely. PS: the X728 board will not be burnt immediately if one or two of the batteries are connected reversely.


Q11: What frequency does X728 use in the I2C communication bus used to communicate with RPI?

A: It depends on the motherboard and OS, please refer to this topic as reference: https://forums.raspberrypi.com/viewtopic.php?p=312582


Q12: What the maximum current rating of X728-A1 is?

A: The maximum current rating of X728-A1 is 90MA.
Add your comment
Geekworm Wiki welcomes all comments. If you do not want to be anonymous, register or log in. It is free.


Anonymous user #72

3 months ago
Score 0++

I have an X728 v2.5 - both AUTO_ON and CHG_EN links are in place. All software from "x728-script" is installed on the Pi 4B - rtc works, software and push-button shutdown/reboot works

When the Pi is off a momentary push on the button or connecting power does not always start the Pi - about 50% of the time it just wakes the green battery capacity LEDs, a second push of the button or reconnect/re-apply power is needed to cause the Pi to power on.

Is my X728 faulty or is there some other config I'm missing to make this work as described?

Anonymous user #72

3 months ago
Score 0++
for the benefit of other users, be ware xSoft.sh has been updated on 13/09/2024 to fix this - GPIO pins were not being reset properly

Anonymous user #70

5 months ago
Score 0++
Hi, what are the jumpers next to the USB-C power in for on the 1.2v board? There are 6 pins vs 4 on the newer versions?

Lisa

5 months ago
Score 0++

Anonymous user #69

6 months ago
Score 0++
After power loss the batteries were fully discharged. After that power was restored and now LEDs 5V OUT and AC FAIL are blinking. What does it mean?

Lisa

6 months ago
Score 0++

Hello, X728-hardware V1.2/1.3 version : 5V OUT: LED green on flashing indicates 5V power out and UPS powered by battery; AC FAIL:LED red on indicates AC power loss or PSU failure or PSU disconnected;

Please check whether the power supply is normal to the battery and the battery charging LED light status.

Anonymous user #71

5 months ago
Score 0++
Hello, it looks there is no way to meaningfully use X728 without scritps for software shutdown. If you power loss happens to RPI without scripts the power to RPI will remain until the butteries are completely discharged or RPI breaks because of repeating reboot on low input voltage. There is on standalone UPS behavior (confirmed by email from support).

Anonymous user #68

6 months ago
Score 0++

After a battery failure I had to replace the battery in X728. But now the red led and three of the four green battery status leds are blinking. This does not happen without PI, but my PI is unchanged ..

PI is starting up normally, but the shutdown hook "xSoft.sh" also does not shutdown the PI, but reboots. Is the GPIO circuit damaged somehow ?

Lisa

6 months ago
Score 0++
Hi,Just replace the battery, the X728 will not be damaged. Suggest you uninstall the script and reinstall it.

Anonymous user #67

7 months ago
Score 0++

Hello, apologies for the dumb question: my external power button correctly turns the board on, and "x728off" works, but the external power button stopped working to turn the board off recently. I think I may have accidentally deleted a script or service. However, I cannot figure it out. I am using V1.3. I tried following your software tutorial, but it only seems to make "x728off" work.

If you can tell me how the 4-pin external power button works, I can write a script to make it work for me again. I'm not sure which pin it should look for to send the "x728off" command.

Thank you!

Anonymous user #67

7 months ago
Score 0++
Small update: I compared the status of all GPIO pins with and without the button pressed, and none change (including 5, 13, and 26).

Anonymous user #67

7 months ago
Score 0++

OK, sorry, I figured it out. I was trying to follow the schematic from the 4-pin LED momentary push button, but everything works as expected if you follow what the Wiki suggests.

The LED button has four pins: S1, S2, LED+, LED- The x728 has four pins: PWR, GND, GND, LED+

Connect them as such: PWR - S1 GND - S2 GND - LED- LED+ - LED+

I don't know why my incorrect wiring ever worked, but this is what it always should have been. Leaving this here in case anyone else has the same problem!

Anonymous user #65

9 months ago
Score 0++
My % of charge is above 100, like 104...it is normal?

Anonymous user #66

9 months ago
Score 0++
Hi,It is normal. The algorithm for reading the power is very complicated. You can try draining the battery, then fully charging it, and then try reading the battery level again.

Anonymous user #65

9 months ago
Score 0++
Can I use 3xAA adaptor instead of 18650 battery?

Lisa

9 months ago
Score 0++
Hi,X728 not support 3xAA adaptor

Anonymous user #64

9 months ago
Score 0++
Hi. I have the 2.1 version without the "Battery Reverse Polarity Protection circuit".. and I really wish I did because I did a oopsie. I realized the issue a second later when smoke started to plume. I thought the device was dead, but interestingly enough, it does seem to work still when I put them in correctly - so question is, is it dangerous to use the device now when "something" have burned or did it not "burn enough" to break the board?

Lisa

9 months ago
Score 0++
Hi,If the board is burned, we do not recommend continuing to use it to avoid safety concerns.

Anonymous user #63

10 months ago
Score 0++
How about someone replaces the Links to X728-Software to X728-script, which actually works and is maintained.

Harry

10 months ago
Score 0++
There may be those who prefer the old ways

Anonymous user #62

11 months ago
Score 0++
Please provide the STP file / CAD / measurement diagram so we can build a rear plate that accommodates both the PI4/5 and the UPS power connector. I do realize you already have your own case. Ours is completely different so we need the measurements. Thank you!

Walker

11 months ago
Score 0++
Hello, we can't provide this, and we also need to remind you that X728 can't be used on Raspberry Pi 5, about UPS for Raspberry Pi 5 please refer to: X1200 X1201 X1202

Anonymous user #59

11 months ago
Score 0++

Hello,

we looking for solution to softshutdown RPI4B when power fails and boot again when power restores in factory - over 100pcs. Can x728 achieve this function? Purchased one x728v2.5 for tests - installed exactly as instructed here but it behaves strange. Shoulddown action is ok, but when power restores it does no boot. If power removed and restored once again - RPI starts as expeted. Does anybody know what is that? Any cjances to resolve this? AUTO_ON jumper installed. Shutdown is done by running x728-v2.x-plsd.py script. Power supply 5V 7.0A. During test power removed from DC jack or USB-C.

Walker

11 months ago
Score 0++
We just did a simple test, by unplugging or plugging in the USB-C port, the X728 V2.5 is able to restore the power , it is not clear what the exact cause of your situation, you can contact our technical support at support@geekworm.com ,If possible, you can provide a video of your operation, so that we can more clearly understand the causes of the problem.(By the way, provide your order number)

Anonymous user #58

12 months ago
Score 0++
Hello, can i use x728 with Pi 5?

Walker

12 months ago
Score 0++
Hi, currently, the Raspberry Pi 5 related products are under design, please wait for the update of our next products (we haven't tested X728 on Raspberry Pi 5)

Anonymous user #61

11 months ago
Score 0++
Any news from Pi5 and x728?

Walker

11 months ago
Score 0++
Hi, Raspberry Pi 5 UPS series, please refer to the X1200 X1201 X1202

Anonymous user #61

11 months ago
Score 0++
Hi, can i use x728 with pi5? I have 2 hats and i want to know.

Walker

11 months ago
Score 0++
Hi, can't use X728 on Raspberry Pi 5 ,The Raspberry Pi 5 has a dedicated UPS board.

Lisa

9 months ago
Score 0++
Hi,We tested that X728 is compatible with Pi5,please refer to X728-script

Anonymous user #57

12 months ago
Score 0++
When using with the X715 do you still install the X715 software? Will the latching switch input for bootup and shutdown control still work?

Walker

12 months ago
Score 0++
Hello, X715 can be used with X728, of course, you still need to install the X715 software, the two together, will not interfere with their respective functions

Anonymous user #56

15 months ago
Score 0++
It would be a perfect UPS if there was some sort of thermal monitoring present (mainly for safety: stop charging and low and high temp). Please consider adding temperature sensors for batteries in your next board revision.

Walker

15 months ago
Score 0++
Thank you for your suggestion, we will take your suggestions into account. Please pay attention to our products if they are updated in the future.

Anonymous user #55

16 months ago
Score 0++
can the unit handle 12V input on the USB C port?

Walker

16 months ago
Score 0++
Hello, the maximum support of x728 is 5V, and the voltage of 12V cannot be used

Anonymous user #60

11 months ago
Score 0++
I too would appreciate a 10-30 vdc input on the 5521 jack. It's easy to provide that range and let the x728 drop it to 5.1 +/-5%. It's much harder to build up an external 5.1 v 4 amp ps. I'd happily pay extra for that feature.

Anonymous user #54

16 months ago
Score 0++
Hello, another user who wishes to design a custom enclosure, who requests a STEP model file to reference the dimensions and component placement.

Walker

16 months ago
Score 0++

Hello, X728 we have designed a shell, you can buy it directly:

https://www....t=4itemAdapt

Anonymous user #53

19 months ago
Score 0++

Hello again,

Previous 18650 LiFePO4 comment extended:

For X708 model there is the Key Features (wiki-geekworm-com/X708#Features) saying that it "supports 3.7V 18650 lithium battery and 3.7V lithium polymer battery. No capacity limit, only request 3.7V lithium battery".

However, on this wiki I couldn't find such information for X728 regarding the kind of batteries supported and the voltage. I just found the recommendation for Panasonic NCR18650B batteries which have 3.6v.

I discovered that LiFePO4 batteries are safer, they just can't burn. Which for me is something crucial if you want to leave RPi unattended. The only thing is that for 18650 LiFePO4 batteries, the more powerful I found was 3.2V and 1800mAh, and also the battery specs (copied bellow) say "Charge mode: CC/CV, use special Lithium LFP charger".

So, I would love to know if this LiFePO4 18650 battery model will still work in X728 UPS. The setup would be 4 x 18650 LiFePO4 3.2V 1800mAh, as I already have X728-C1 with space for 2 more batteries.

The battery specs are: Nominal voltage: 3.2V Nominal capacity (0.2C, 25ºC, current value of 1800mAh at 1C): 1800±2mAh Minimum capacity (0.2C, 25ºC): 1750mAh Discharge - Normal current: ≤0.9A Discharge - Fast discharge current: 1.8A Discharge - Max continuous current: 5.4A (@ 5min) Discharge - Max peak current: 10A (@ 5sec) Discharge - Cut-off voltage: 2.5±0.2V Charge - Charge voltage: 3.65±0.05V Charge - Charge current: ≤ 1.8A Charge - Cut-off current: 0.01C Charge - Charge mode: CC/CV, use special Lithium LFP charger

Thanks in advance!

Walker

19 months ago
Score 0++
Hello, in the FAQ on the X728 WIKI page, it is written that we suggest to use the NCR18650B from Panasonic. We have read the battery specifications of 18650 LiFePO4 batteries, and it should be usable. If this LiFePO4 batteries are safer, it is ok It is used, but it needs to be noted that when using batteries and power supply, be careful

Anonymous user #52

19 months ago
Score 0++

Hello! Can I use 18650 LiFePO4 3.2V 1800mAh?

Thanks!

Walker

19 months ago
Score 0++
Hello, it is possible in theory, I suggest you take a look at our SAFETY INSTRUCTIONS AND WARNINGS on X728, there are suggestions about using batteries, precautions, and battery recommendations for X728 boards

Anonymous user #51

21 months ago
Score 0++
How can I deactivate the buzzer? I use a Homematic radio adapter (). Each time there is a service or error message, the buzzer beeps. I really need to deactivate the buzzer. Please advise!

Cindy

21 months ago
Score 0++

Hi, we have the guide about how to use the buzzer, please refer to X728-Software.

Any more issue, please contact us at support@geekworm.com.

Anonymous user #50

21 months ago
Score 0++
The WSP4407 next to the RPi connector burned out. The unit is still functional. Do you know what could be causing this?

Cindy

21 months ago
Score 0++
Hi,please provide the order number and photos of the burnt part to contact us at support@geekworm.com, thanks!

Anonymous user #49

24 months ago
Score 0++

As others have mentioned, I was finding that the provided scripts were immediately shutting down the x728 but were not doing a safe shutdown of the raspberry pi. The power was immediately being cut to the raspberry pi resulting in a crash.

See the last command for an example

pi@raspberrypi:~ $ last ... reboot system boot 5.15.76-v7l+ Wed Dec 31 18:00 - 10:22 (19348+16:22) pi pts/0 192.168.68.70 Thu Dec 22 09:48 - crash (-19348+15:48) pi tty7 :0 Thu Dec 22 09:47 - crash (-19348+15:47) pi tty1 Thu Dec 22 09:47 - crash (-19348+15:47) ...

I created a new script to do a safe shutdown and while I was at it, I added functionality and made the script configurable so you can choose the behavior you want for a given system. I also added a testing mode that provides more output, doesn't do a shutdown and cleanly exits the GPIO settings for the next test run.

I have created a bin directory in the pi home for testing. The script can be setup in the root crontab as follows, which will create a log file in /home/pi/log.

@reboot python -u /home/pi/bin/auto_shutdown.py >> /home/pi/log/auto_shutdown.log 2>&1

You can then tail the logfile to see the current status.

pi@raspberrypi:~/log $ tail -20f auto_shutdown.log

12/24/2022, 21:38:02 : System Startup 12/24/2022, 21:38:02 : AC Power GOOD 12/24/2022, 21:38:02 : Battery Capacity Good (96.23%) 12/24/2022, 21:38:02 : Battery Voltage Good (4.22V) 12/25/2022, 09:26:47 : AC Power Lost - Shutdown in 15 minutes 12/25/2022, 09:28:47 : AC Power Restored - Shutdown cancelled 12/25/2022, 09:56:09 : AC Power Lost - Shutdown in 15 minutes 12/25/2022, 10:11:00 : Shutdown in progress due to AC power loss

12/25/2022, 10:16:25 : System Startup 12/25/2022, 10:16:25 : AC Power GOOD 12/25/2022, 10:16:25 : Battery Capacity Good (98.77%) 12/25/2022, 10:16:25 : Battery Voltage Good (4.22V)

As you can see, if power is restored prior to the automatic shutdown, it will return to it's normal state. This is to prevent unneeded shutdowns in the event the power is cycling as it is being restored from the grid.

Here is the last command showing good shutdowns with this script.

pi@raspberrypi:~ $ last ... reboot system boot 5.15.76-v7l+ Wed Dec 31 18:00 - 21:36 (19351+03:36) pi pts/0 192.168.68.70 Sat Dec 24 21:08 - 21:11 (00:03) pi tty7 :0 Sat Dec 24 21:07 - 21:11 (00:04) pi tty1 Sat Dec 24 21:07 - down (00:04) ...

I recommend using testing mode from the command line and then once you have all the configurations the way you want them, turn off testing mode and schedule in crontab. Remember, testing mode will provide mush more output but will not trigger a shutdown.

Here is the script. Please use it at your own risk. You will want to set the configurations appropriate for your raspberry pi purpose. I am using all three triggers because I want a clean shutdown after 15 minutes or if there is an issue with the batteries so I'm triggering well before the batteries are drained. I hope some find this helpful.

pi@raspberrypi:~/bin $ cat auto_shutdown.py

  1. !/usr/bin/env python

import RPi.GPIO as GPIO import time import os import datetime import struct import smbus import sys


  1. Start Config

SHUTDOWN_TRIGGER = "All" # (AC Power,Capacity,Voltage,All) - determines what settings will trigger a shutdown. AC_LOSS_WAIT_MINUTES = 15 # Number of minutes after power loss before shutdown is issued CAPACITY_THRESHOLD = 50 # Shutdown will occur when capacity drops below the stated percentage CAPACITY_STATUS_LOW = 20 # Low capacity warning below this level VOLTAGE_THRESHOLD = 3.70 # Shutdown will occur when voltage drops below the stated percentage VOLTAGE_STATUS_LOW = 3.50 # Low voltage warning below this level TEST_MODE = "N" # (Y,N) - Will show extra output and will not perform shutdown when TEST_MODE = "Y", normal operation TEST_MODE = "N" BUZZER_ON = "N" # (Y,N) - BUZZER_ON = "Y" and buzzer will beep when power is initially lost and right before shutdown BUZZER_SECONDS = 0.5 # Number of seconds the buzzer will sound

  1. End Config

WAIT_SECONDS = AC_LOSS_WAIT_MINUTES * 6 WAIT_STR = str(AC_LOSS_WAIT_MINUTES)

GPIO_PORT = 26 I2C_ADDR = 0x36

GPIO.setmode(GPIO.BCM) GPIO.setup(GPIO_PORT, GPIO.OUT)

PLD_PIN = 6 BUZZER_PIN = 20 GPIO.setwarnings(False) GPIO.setmode(GPIO.BCM) GPIO.setup(PLD_PIN, GPIO.IN) GPIO.setup(BUZZER_PIN, GPIO.OUT) GPIO.output(BUZZER_PIN, 0) POWER_LOST_SEC = 0

def soundBuzzer(BUZZER_ON,BUZZER_SECONDS,BUZZER_PIN): if ( BUZZER_ON == "Y" ): GPIO.output(BUZZER_PIN, 1) time.sleep(BUZZER_SECONDS) GPIO.output(BUZZER_PIN, 0)

def acPower(PLD_PIN):

AC_STATUS = "GOOD" i = GPIO.input(PLD_PIN) if ( i == 0 ): AC_STATUS = "GOOD" elif ( i == 1 ): AC_STATUS = "LOST" return AC_STATUS

def readVoltage(bus,VOLTAGE_STATUS_LOW):

address = I2C_ADDR read = bus.read_word_data(address, 2) swapped = struct.unpack("<H", struct.pack(">H", read))[0] VOLTAGE = swapped * 1.25 /1000/16 VOLTAGE_STATUS = "Good" if ( VOLTAGE <= VOLTAGE_STATUS_LOW ): VOLTAGE_STATUS = "Low" return VOLTAGE,VOLTAGE_STATUS

def readCapacity(bus,CAPACITY_STATUS_LOW):

address = I2C_ADDR read = bus.read_word_data(address, 4) swapped = struct.unpack("<H", struct.pack(">H", read))[0] CAPACITY = swapped/256 CAPACITY_STATUS = "Good" if ( CAPACITY >= 100 ): CAPACITY_STATUS = "Full" elif ( CAPACITY <= CAPACITY_STATUS_LOW ): CAPACITY_STATUS = "Low" return CAPACITY,CAPACITY_STATUS

def safeShutdown(GPIO_PORT):

GPIO.output(GPIO_PORT, GPIO.HIGH) os.system('sudo shutdown -h now') time.sleep(3) GPIO.output(GPIO_PORT, GPIO.LOW)

bus = smbus.SMBus(1) # 0 = /dev/i2c-0 (port I2C0), 1 = /dev/i2c-1 (port I2C1)

now = datetime.datetime.now() date_time = now.strftime("%m/%d/%Y, %H:%M:%S")

AC_STATUS = acPower(PLD_PIN) VOLTAGE,VOLTAGE_STATUS = readVoltage(bus,VOLTAGE_STATUS_LOW) CAPACITY,CAPACITY_STATUS = readCapacity(bus,CAPACITY_STATUS_LOW)

print ("******************************************") print(date_time + " : System Startup") print(date_time + " : AC Power " + AC_STATUS) print(date_time + " : Battery Capacity " + CAPACITY_STATUS + " (" + str(round(CAPACITY,2)) + "%)" ) print(date_time + " : Battery Voltage " + VOLTAGE_STATUS + " (" + str(round(VOLTAGE,2)) + "V)" ) if ( TEST_MODE == "Y" ): print(date_time + " : Started in Test Mode, No actual shutdown will occur, program will exit after shutdown triggered.")

while True:

  1. print ("******************************************")

now = datetime.datetime.now() date_time = now.strftime("%m/%d/%Y, %H:%M:%S")

AC_STATUS = acPower(PLD_PIN) VOLTAGE,VOLTAGE_STATUS = readVoltage(bus,VOLTAGE_STATUS_LOW) CAPACITY,CAPACITY_STATUS = readCapacity(bus,CAPACITY_STATUS_LOW)

if ( SHUTDOWN_TRIGGER == "AC Power" or SHUTDOWN_TRIGGER == "All" ): if ( AC_STATUS == "GOOD" ): if ( POWER_LOST_SEC > 0 ): print(date_time + " : AC Power Restored - Shutdown cancelled") POWER_LOST_SEC = 0 else: if ( TEST_MODE == "Y" ): print(date_time + " : AC Power " + AC_STATUS) elif ( AC_STATUS == "LOST" ): if ( TEST_MODE == "Y" ): print(date_time + " : AC Power " + AC_STATUS) POWER_LOST_SEC += 1 if ( POWER_LOST_SEC == 1 ): print(date_time + " : AC Power Lost - Shutdown in " + str(AC_LOSS_WAIT_MINUTES) + " minutes") soundBuzzer(BUZZER_ON,BUZZER_SECONDS,BUZZER_PIN) if ( POWER_LOST_SEC >= WAIT_SECONDS ): print(date_time + " : Shutdown in progress due to AC power loss") soundBuzzer(BUZZER_ON,BUZZER_SECONDS,BUZZER_PIN) if ( TEST_MODE != "Y" ): safeShutdown(GPIO_PORT) else: print(date_time + " : Started in Test Mode, No actual shutdown will occur, program will exit.") break

if ( SHUTDOWN_TRIGGER == "Capacity" or SHUTDOWN_TRIGGER == "All" ): if ( CAPACITY > CAPACITY_THRESHOLD ): if ( TEST_MODE == "Y" ): print(date_time + " : Battery Capacity " + CAPACITY_STATUS + " (" + str(round(CAPACITY,2)) + "%)" ) elif ( CAPACITY <= CAPACITY_THRESHOLD ): print(date_time + " : Battery Capacity " + CAPACITY_STATUS + " (" + str(round(CAPACITY,2)) + "%)" ) print(date_time + " : Shutdown in progress due to battery Capacity below " + str(CAPACITY_THRESHOLD) + "% threshold") soundBuzzer(BUZZER_ON,BUZZER_SECONDS,BUZZER_PIN) if ( TEST_MODE != "Y" ): safeShutdown(GPIO_PORT) else: print(date_time + " : Started in Test Mode, No actual shutdown will occur, program will exit.") break

if ( SHUTDOWN_TRIGGER == "Voltage" or SHUTDOWN_TRIGGER == "All" ): if ( VOLTAGE > VOLTAGE_THRESHOLD ): if ( TEST_MODE == "Y" ): print(date_time + " : Battery Voltage " + VOLTAGE_STATUS + " (" + str(round(VOLTAGE,2)) + "V)" ) elif ( VOLTAGE <= VOLTAGE_THRESHOLD ): print(date_time + " : Battery Voltage " + VOLTAGE_STATUS + " (" + str(round(VOLTAGE,2)) + "V)" ) print(date_time + " : Shutdown in progress due to battery Voltage below " + str(VOLTAGE_THRESHOLD) + "V threshold") soundBuzzer(BUZZER_ON,BUZZER_SECONDS,BUZZER_PIN) if ( TEST_MODE != "Y" ): safeShutdown(GPIO_PORT) else: print(date_time + " : Started in Test Mode, No actual shutdown will occur, program will exit.") break

time.sleep(10)

GPIO.cleanup()

Anonymous user #49

24 months ago
Score 0++

Sorry, the code did not paste nicely when copied directly from Linux. I'll try again with a copy from windows.

  1. !/usr/bin/env python

import RPi.GPIO as GPIO import time import os import datetime import struct import smbus import sys


  1. Start Config

SHUTDOWN_TRIGGER = "All" # (AC Power,Capacity,Voltage,All) - determines what settings will trigger a shutdown. AC_LOSS_WAIT_MINUTES = 15 # Number of minutes after power loss before shutdown is issued CAPACITY_THRESHOLD = 50 # Shutdown will occur when capacity drops below the stated percentage CAPACITY_STATUS_LOW = 20 # Low capacity warning below this level VOLTAGE_THRESHOLD = 3.70 # Shutdown will occur when voltage drops below the stated percentage VOLTAGE_STATUS_LOW = 3.50 # Low valtage warning below this level TEST_MODE = "N" # (Y,N) - Will show extra output and will not perform shutdown when TEST_MODE = "Y", normal opperation TEST_MODE = "N" BUZZER_ON = "N" # (Y,N) - BUZZER_ON = "Y" and buzzer will beep when power is initially lost and right before shutdown BUZZER_SECONDS = 0.5 # Number of seconds the buzzer will sound

  1. End Config

WAIT_SECONDS = AC_LOSS_WAIT_MINUTES * 6 WAIT_STR = str(AC_LOSS_WAIT_MINUTES)

GPIO_PORT = 26 I2C_ADDR = 0x36

GPIO.setmode(GPIO.BCM) GPIO.setup(GPIO_PORT, GPIO.OUT)

PLD_PIN = 6 BUZZER_PIN = 20 GPIO.setwarnings(False) GPIO.setmode(GPIO.BCM) GPIO.setup(PLD_PIN, GPIO.IN) GPIO.setup(BUZZER_PIN, GPIO.OUT) GPIO.output(BUZZER_PIN, 0) POWER_LOST_SEC = 0

def soundBuzzer(BUZZER_ON,BUZZER_SECONDS,BUZZER_PIN): if ( BUZZER_ON == "Y" ): GPIO.output(BUZZER_PIN, 1) time.sleep(BUZZER_SECONDS) GPIO.output(BUZZER_PIN, 0)

def acPower(PLD_PIN):

AC_STATUS = "GOOD" i = GPIO.input(PLD_PIN) if ( i == 0 ): AC_STATUS = "GOOD" elif ( i == 1 ): AC_STATUS = "LOST" return AC_STATUS

def readVoltage(bus,VOLTAGE_STATUS_LOW):

address = I2C_ADDR read = bus.read_word_data(address, 2) swapped = struct.unpack("<H", struct.pack(">H", read))[0] VOLTAGE = swapped * 1.25 /1000/16 VOLTAGE_STATUS = "Good" if ( VOLTAGE <= VOLTAGE_STATUS_LOW ): VOLTAGE_STATUS = "Low" return VOLTAGE,VOLTAGE_STATUS

def readCapacity(bus,CAPACITY_STATUS_LOW):

address = I2C_ADDR read = bus.read_word_data(address, 4) swapped = struct.unpack("<H", struct.pack(">H", read))[0] CAPACITY = swapped/256 CAPACITY_STATUS = "Good" if ( CAPACITY >= 100 ): CAPACITY_STATUS = "Full" elif ( CAPACITY <= CAPACITY_STATUS_LOW ): CAPACITY_STATUS = "Low" return CAPACITY,CAPACITY_STATUS

def safeShutdown(GPIO_PORT):

GPIO.output(GPIO_PORT, GPIO.HIGH) os.system('sudo shutdown -h now') time.sleep(3) GPIO.output(GPIO_PORT, GPIO.LOW)

bus = smbus.SMBus(1) # 0 = /dev/i2c-0 (port I2C0), 1 = /dev/i2c-1 (port I2C1)

now = datetime.datetime.now() date_time = now.strftime("%m/%d/%Y, %H:%M:%S")

AC_STATUS = acPower(PLD_PIN) VOLTAGE,VOLTAGE_STATUS = readVoltage(bus,VOLTAGE_STATUS_LOW) CAPACITY,CAPACITY_STATUS = readCapacity(bus,CAPACITY_STATUS_LOW)

print ("******************************************") print(date_time + " : System Startup") print(date_time + " : AC Power " + AC_STATUS) print(date_time + " : Battery Capacity " + CAPACITY_STATUS + " (" + str(round(CAPACITY,2)) + "%)" ) print(date_time + " : Battery Voltage " + VOLTAGE_STATUS + " (" + str(round(VOLTAGE,2)) + "V)" ) if ( TEST_MODE == "Y" ): print(date_time + " : Started in Test Mode, No actual shutdown will occur, program will exit after shutdown triggered.")

while True:

  1. print ("******************************************")

now = datetime.datetime.now() date_time = now.strftime("%m/%d/%Y, %H:%M:%S")

AC_STATUS = acPower(PLD_PIN) VOLTAGE,VOLTAGE_STATUS = readVoltage(bus,VOLTAGE_STATUS_LOW) CAPACITY,CAPACITY_STATUS = readCapacity(bus,CAPACITY_STATUS_LOW)

if ( SHUTDOWN_TRIGGER == "AC Power" or SHUTDOWN_TRIGGER == "All" ): if ( AC_STATUS == "GOOD" ): if ( POWER_LOST_SEC > 0 ): print(date_time + " : AC Power Restored - Shutdown cancelled") POWER_LOST_SEC = 0 else: if ( TEST_MODE == "Y" ): print(date_time + " : AC Power " + AC_STATUS) elif ( AC_STATUS == "LOST" ): if ( TEST_MODE == "Y" ): print(date_time + " : AC Power " + AC_STATUS) POWER_LOST_SEC += 1 if ( POWER_LOST_SEC == 1 ): print(date_time + " : AC Power Lost - Shutdown in " + str(AC_LOSS_WAIT_MINUTES) + " minutes") soundBuzzer(BUZZER_ON,BUZZER_SECONDS,BUZZER_PIN) if ( POWER_LOST_SEC >= WAIT_SECONDS ): print(date_time + " : Shutdown in progress due to AC power loss") soundBuzzer(BUZZER_ON,BUZZER_SECONDS,BUZZER_PIN) if ( TEST_MODE != "Y" ): safeShutdown(GPIO_PORT) else: print(date_time + " : Started in Test Mode, No actual shutdown will occur, program will exit.") break

if ( SHUTDOWN_TRIGGER == "Capacity" or SHUTDOWN_TRIGGER == "All" ): if ( CAPACITY > CAPACITY_THRESHOLD ): if ( TEST_MODE == "Y" ): print(date_time + " : Battery Capacity " + CAPACITY_STATUS + " (" + str(round(CAPACITY,2)) + "%)" ) elif ( CAPACITY <= CAPACITY_THRESHOLD ): print(date_time + " : Battery Capacity " + CAPACITY_STATUS + " (" + str(round(CAPACITY,2)) + "%)" ) print(date_time + " : Shutdown in progress due to battery Capacity below " + str(CAPACITY_THRESHOLD) + "% threshold") soundBuzzer(BUZZER_ON,BUZZER_SECONDS,BUZZER_PIN) if ( TEST_MODE != "Y" ): safeShutdown(GPIO_PORT) else: print(date_time + " : Started in Test Mode, No actual shutdown will occur, program will exit.") break

if ( SHUTDOWN_TRIGGER == "Voltage" or SHUTDOWN_TRIGGER == "All" ): if ( VOLTAGE > VOLTAGE_THRESHOLD ): if ( TEST_MODE == "Y" ): print(date_time + " : Battery Voltage " + VOLTAGE_STATUS + " (" + str(round(VOLTAGE,2)) + "V)" ) elif ( VOLTAGE <= VOLTAGE_THRESHOLD ): print(date_time + " : Battery Voltage " + VOLTAGE_STATUS + " (" + str(round(VOLTAGE,2)) + "V)" ) print(date_time + " : Shutdown in progress due to battery Voltage below " + str(VOLTAGE_THRESHOLD) + "V threshold") soundBuzzer(BUZZER_ON,BUZZER_SECONDS,BUZZER_PIN) if ( TEST_MODE != "Y" ): safeShutdown(GPIO_PORT) else: print(date_time + " : Started in Test Mode, No actual shutdown will occur, program will exit.") break

time.sleep(10)

GPIO.cleanup()

Anonymous user #49

24 months ago
Score 0++
Oh well, strike 2. The code is all there, you just may have to clean up the formatting.

Anonymous user #48

24 months ago
Score 0++
Mit was sind die GPIO5, 6 und 13 belegt und wie lassen sich diese als normal weiter nutzen?

Lisa

24 months ago
Score 0++

Anonymous user #47

24 months ago
Score 0++
is it possible to safe shutdown Raspberry just after AC power OFF and NOT when batteries are low charge? how to do?

Lisa

24 months ago
Score 0++

Yes,you can refer V2.1 script

Anonymous user #45

25 months ago
Score 0++

Can you share wire connection of switch to button? I want to connect another button with C-NC-NO. With the small blue button it works to restart with 3 seconds press. But I have tried all combinations with a button in switch and not works to shutdown and power on.

Thanks

Lisa

25 months ago
Score 0++
Hi,The x728 supports the connection of a 4pin momentary switch, but the safe shutdown function requires an installation script to be realized. Please refer to here for the switch:X728-hardware#Connector for External Power Switch

Anonymous user #46

25 months ago
Score 0++
Hello Lisa. Your documentation is wrong. Is pin 1 and 3 with a single button. Thanks

Anonymous user #43

28 months ago
Score 0++

Hello. I have been using multiple versions of v1.0v -> v1.3 -> v2.0 -> v2.2. I am currently using v2.2. Thanks for a great product.

I have ASD enabled. I have CHG enabled. In this state ...Power supply from AC ON -> Startup. This is OK. Power supply from AC is turned off → shutdown by detection in the script. This is also OK.

However... The next timing, "power supply ON from AC -> startup" does not go well. The red LED on the board lights up for a moment. It does not turn on automatically.

If I turn off the power supply again and then turn it on again, the automatic power ON works.

This did not occur in v2.0. Do you know what this problem is?

Translated with www.DeepL.com/Translator (free version)

Lisa

28 months ago
Score 0++

Hello,

This should be related to discharging time of your power adapter. once removed the power supply from AC outlet, there is still voltage output but will reduce slowly. in this perid, the X728 can detect the voltage so it cannot turn on automatically. You can try 1) Remove the power supply and wait for a longer time (normally 10~15 seconds) then plug in again. 2) Change the script and adjust the time to be longer to shut down after AC power loss. the time is subject to dicharging time of your power supply.

Anonymous user #44

28 months ago
Score 0++

Thank you for your prompt reply.

I understood the content. However, since we were considering and implementing an automatic startup and shutdown of the Raspberry Pi linked to the motorcycle key (main power), it is difficult to unplug the power supply. Therefore, I gave up on 1).

We believe that a set of 1) and 2) will be effective, but (2) alone. So, after detecting AC off, I waited 15 seconds before shutting down the system. After shutdown, I waited 30 seconds to turn AC on, but there was no improvement.

********* Key on -> auto startup -> key off -> shutdown. After that, I will try to operate it as key on -> key off immediately (like a reset process).

This didn't occur with the previous version.

Has something changed?

Lisa

28 months ago
Score 0++

If the voltage there still present, then the X728 cannot implement auto-on. we can change the script or a resistor to match your applicaiton but will need to know the timing from 5V to 0V after key off. for this new verison, we changed the MCU and auto-on shoud be more reliable as long as the timing is confirmed.

Anonymous user #42

31 months ago
Score 0++

Hello, Is it possible to stop the buzzer using a button (Hardware interruption)?If yes, How can it be achieved .

Thanks

Lisa

31 months ago
Score 0++

Hello,

Yes, you can block buzzer in the script.

Anonymous user #42

31 months ago
Score 0++

Hello, I want the buzzer to work when AC power fails, but buzzer should not go on indefinitely, I want to use a button to switch off the buzzer sound.

Which pins i can use to execute this functionality ?

Lisa

31 months ago
Score 0++

Hi,

①Please refer X728-Software#FAQ--Raspberry Pi Tutorial: How to Use a Buzzer

②AC FALL(AC Power Loss LED)----When AC power supply is not connected or power supply fails, the red indicator light is always on. If connected to AC power, the red indicator will not light up.

Anonymous user #40

32 months ago
Score 0++
by the way, is there a sequence we have to follow to unassmble the hat to avoid damagin itsel or the raspberry?

Anonymous user #40

32 months ago
Score 0++
Finally got it working, are there any other commands that could be useful? is there a way to disable te buzzer?

Harry

32 months ago
Score 0++

Hi, check the x728pld.py file, try to comment out the following python code: GPIO.output(BUZZER_PIN, 1) time.sleep(0.1) GPIO.output(BUZZER_PIN, 0)

time.sleep(0.1)

Anonymous user #41

32 months ago
Score 0++

Good day,

Can both input power supplies (USB Type-C and DC Jack) be used at the same time? What would happen if one (or both) of the input's voltage or current drops below the specification?

I believe in the event where both the first, and second power supply inputs requirements fail, the AC FAIL LED will light up and the board will now use it's 18650 batteries.

Is it safe for the board to receive an input below the requirements? e.g. solar panels outputting 0V at night, or below 5V and below 3A on a cloudy day. Would the board automatically recognize the failed requirements and switch to it's 18650 batteries safely without damage to the board?

If so, what would be the threshold values of low voltage and amperes to activate the switch to it's 18650 batteries?

Also, doing some testing, I connected the board's input to a power bank battery that outputs 5V, but it's 2A (1A below the required current). The board is booting up and charging correctly. At what current would the board stop recognizing the input as reliable and activate the AC FAIL LED?

Great product by the way, I would love to know the answers to these questions. Thank you.

- Miguel

Lisa

32 months ago
Score 0++

Hi,Miguel

①Please do not use USB Type-C and DC Jack power to X728 at the same time.

②When the input voltage is lower than about 4.2~4.5, gradually switch to battery power supply

Anonymous user #40

32 months ago
Score 0++
Hi, both button top and flat top batteries woudl fit right?

Lisa

32 months ago
Score 0++

Hi, The size of the button top batteries may be a bit large. you can use flat top batteries.

please refer to:X728-hardware#18650 battery dimension;Please buy the correct size battery.

Anonymous user #39

32 months ago
Score 0++

Is it a specification that the UPS does not power down after the RPI shuts down successfully using the X728? Due to this phenomenon, RPI does not start even if power is supplied to the UPS after shutdown.

The AON pin is set to short.

Lisa

32 months ago
Score 0++

Hi,

Short the AON pin;

after shutting down, the Raspberry Pi will not restart automatically if the power supply is not replugged in or unplugged. But AON function detection is more sensitive, if it detects a voltage, it will automatically turn on.and we will improve this feature in the future.Thanks~

Anonymous user #38

33 months ago
Score 0++
On the underside of the X728 is a 5v in port (just under the barrel jack). Can this be used to supply power to the hat, or can I only use the barrel jack or USB C port?

Anonymous user #38

33 months ago
Score 0++

OP here,

the reason I am asking is that I tried to supply power to this hat through the port from a LM2968 buck convertor but the converter belw up. If I can't supply power in to the 5v XH2.54 connector, I will have to wire it in to the barrel jack (or maybe using dupont connectors straight on to the GPIO pins??????)

Lisa

33 months ago
Score 0++

Hi,

Yes,you can use [5v IN XH2.54], but please note :DO NOT connect 5V to the BATT connector, this is very dangerous.

Anonymous user #37

34 months ago
Score 0++

Hello - I am running Raspberry Pi OS Bullseye (January 2022 release). I followed the documentation as well as I could understand it. I ran 'sudo raspi-config' and enabled the I2C interface, then rebooted the Raspberry Pi with the X728 v2.1 installed.


When I run dmesg, I see the following message displayed:

i2c i2c-1: new_device: Instantiated device ds1307 at 0x68 i2c i2c-1: Failed to register i2c client ds1307 at 0x68 (-16)

Is this something I should be concerned about?

Also - I cloned the GitHub repository and have both the x728bat.py and x728pld.py scripts in /home/pi, but I am having difficulty understanding what I am supposed to do with them. All I am interested in is having the RPi shut itself down if there is a power outage and the batteries are drained.

Lisa

34 months ago
Score 0++

Hello,

Did you find the address [0x68] of the RTC with the command [sudo i2cdetect -y 1] ?

Anonymous user #36

34 months ago
Score 0++

Hello geekworm! I've been findin X728v2.1 an excellent product! Very usefull and great quality for the price.

I forgot to turn off RPi on standby mode and it drained my cells down to 2,97V. The Cell is Samsung INR18650-35E which has a 2.65V of cut-off voltage and therefore you rescued my cells! But when I plugged DC-Jack with 5,01V to X728 it draws only 0,15A current. So It's charging very slow or not at all. One of four battery diodes is blinking.

Anonymous user #36

34 months ago
Score 0++
Oh It's me again! Just got above 3V and the current is now higher! I understand that if the voltage is extremely low then it charges very slowly in order not to destroy the cells. When voltage is above 3V it charges normally. Am I right?

Lisa

34 months ago
Score 0++

Hello,

beacuse X728 has overcurrent protection and overvoltage protection

Automatic safe shutdown when battery low (voltage <3.0V)

Ultra-low standby power consumption to maximize battery life

Anonymous user #35

34 months ago
Score 0++
I just got my board today and put batteries in and USB c power and I can't get it to stop buzzing. Hold button to shutdown and restart and its still buzzes.

Lisa

34 months ago
Score 0++

Hello,

1/ X728 V2.1 add a buzzer controlled by CPIO 20; please plug in the power supply to the X728 without raspberry pi , and turn it on to check if it is still calling; if not, please check GPIO 20 is occupied.

Raspberry Pi Tutorial: How to Use a Buzzer: please refer to :X728-Software#FAQ

Anonymous user #35

34 months ago
Score 0++
I plug in power supply without anything plugged in. No pi or batteries. Blue light comes on. Press the power button and it beeps continuously. Add batteries, still beeps. What do I do with pin 20 to get it to stop beeping?

Anonymous user #35

34 months ago
Score 0++
Plug power in and it still buzzes. Installed the python scripts from github. They work fine and says AC power is connected. I even wrote my own python script to turn pin 20 to 0 and IT STILL IS BUZZING. Can I return this? Bought on amazon

Lisa

34 months ago
Score 0++

Hi,

could you please send us some test videos?and tell us your order number,please send to <support@geekworm.com>;thanks~

Anonymous user #35

34 months ago
Score 0++
I ripped off the buzzer. Couldn't take it anymore. Everything else works as it should for my testing purposes.

Anonymous user #34

36 months ago
Score 0++
What's the power output of X728-A1's XH2.54 pins?

Lisa

36 months ago
Score 0++
Hello, It's 5V output, directly connected to the Raspberry Pi 40-pin header--pin 2,pin 4 ;output current is shared, and X728-A1 has no set limit.

Anonymous user #33

36 months ago
Score 0++
Does the X728 stop charging the batteries once they reach 100% charge?

Lisa

36 months ago
Score 0++
Yes.

Anonymous user #32

37 months ago
Score 0++
I am designing my own daughter board that must work in conjunction with the X728 DC UPS. I need to use several GPIO pins, but want to make sure I don't cause a conflict between my the board I am designing and the X728 DC UPS. I know that you use I2C on pins 3 and 5, and I believe you also use GPIO5 and GPIO12. You use Pins 2,4 for power too. Are there any other GPIO pins used by the X728 DC UPS, or am I free to use all the rest of the GPIO port?

Lisa

37 months ago
Score 0++
Hi,please refer x728-hardware--(Pins and GPIO used);you can use pins that are not occupied by x728

Anonymous user #31

37 months ago
Score 0++
  • WARNING* This hardware is not yet supported by BULLSEYE released 10/30/21. python packages needed to drive the software are not available at this time. Do not upgrade to BULLSEYE until you are certain all python packages are updated.

Anonymous user #30

37 months ago
Score 0++

Hi, my AC fail led is blinking while my usbc is connected to the x782 V2.1. Any reason?

Also another x782 V2.1. is just continuously beeping while the batteries are connected. Why is that?

Lisa

37 months ago
Score 0++

Hi,1/for the BEEPING: X728 V2.1 add a buzzer controlled by CPIO 20; please plug in the power supply to the X728 without raspberry pi , and turn it on to check if it is still calling; if not, please check GPIO 20 is occupied.

2/[AC fail led is blinking]: We need to troubleshoot whether it is a line problem. Could you send us a video to check it? <support@geekworm.com> and please tell us your order NO.

Anonymous user #29

40 months ago
Score 0++
According to the "X728-hardware" on the wiki, pins 2, 3, 4, 5, 6, 29, 31, 32 and 33 are used by the X728. Are the remaining Pi pins available for us to use and does the connector on the X728 pass those through?

Lisa

40 months ago
Score 0++
Hi,Yes, you can use unoccupied Pins and GPIO

Anonymous user #16

40 months ago
Score 0++
the mosfet blew so I replaced it but it only outputs 3.7v now. What could have caused this? i see no other damage on the board.

Lisa

40 months ago
Score 0++
Hi,If the voltage across the capacitor is also 3.7V, then it is very likely that the chip is burned out(next to the upper right corner of the ups [2R2] ). Please check it.

Anonymous user #28

41 months ago
Score 0++
Is the DC Barrel positive tip or negative tip?

Lisa

41 months ago
Score 0++
Hi,DC Barrel positive tip(the tip inside the DC port is positive.)

Anonymous user #27

41 months ago
Score 0++

I'm currently using an unprotected battery. Can you tell me why I shouldn't use a protected battery?

I think it's safer.

Lisa

41 months ago
Score 0++
Hello,Because the x728 battery holder has a built-in protection circuit.

Anonymous user #27

41 months ago
Score 0++
Thank you. I understand.

Anonymous user #27

41 months ago
Score 0++
Where can I get the switch with the four wires connected in the image?

Lisa

41 months ago
Score 0++
Hello,You can find it here: https://geekworm.com/

Anonymous user #27

41 months ago
Score 0++
Thanks, I wanted this for my X728.

Anonymous user #26

42 months ago
Score 0++
Does A2 battery holder shows power remaining?

Lisa

42 months ago
Score 0++
Hello,There is no LED light on the X728-A2 battery holder; The green indicator of x728 will show the battery status.

Anonymous user #26

42 months ago
Score 0++
I got X728 and X728-A2 (battery holder). I have Pi 4B. I can't figure it out on assembly. There were no instructions on assembly and not even steps to connect jumper. What the heck? How can I assemble this?

Anonymous user #26

42 months ago
Score 0++
My bad. I found the manual.

Anonymous user #25

43 months ago
Score 0++

Hello, Can I use gpio6 directly in gpio13 to shut it down immediately in case of AC failure? using the script x728pwr.sh ?? I have a x728 v1.3

greetings

Lisa

42 months ago
Score 0++
Hello,We do not recommend this,and we have not tested like that. Please refer the software of X728 V1.3;regards

Anonymous user #24

43 months ago
Score 0++
How to enable 'AUTO POWER ON' or 'AUTO ON' function?

Lisa

42 months ago
Score 0++
Hi,please refer here:https://wiki...E6%98%8E.jpg

Anonymous user #23

43 months ago
Score 0++
Is there a maximum number of A2 battery packs that can be chained together?

Lisa

42 months ago
Score 0++
Hello,no limit. If you want to use more batteries, we recommend X708-A1, which supports 18650 batteries/8pcs ;please refer here:https://wiki...08-A1-05.jpg