|
|
| Line 77: |
Line 77: |
| | | | |
| | == Raid setup== | | == Raid setup== |
| − | 【RAID setup and Jumper setting】
| + | Refer to [[How to Configure RAID Setting]] |
| − | | |
| − | *'''Warning''' : Please backup your data before setup and switch, otherwise you maybe lost your data.
| |
| − | | |
| − | 1. Install the HDDs
| |
| − | | |
| − | 2. Please connect the X882 to your PC or Raspberry Pi board and keep power on
| |
| − | | |
| − | 3. Switch RAID mode
| |
| − | * Set the switch button to your preferred RAID mode(PM/RAID 0/RAID 1/SPAN) as per the RAID illustration table.
| |
| − | * Press the '''SET''' button for about 5 seconds, and release it till the blue LED indicators starts flashing.
| |
| − | * After RAID mode changed, please confirm that the PC can recognize the disk(s) properly and shows the right capacity.
| |
| − | | |
| − | or you can run the fdisk -l command to view the hard drive on raspberry pi OS when you connect x880 to raspberry pi board:
| |
| − | fdisk -l
| |
| − | You can found two hard drives if you select 'clear raid mode'(this is PM mode)
| |
| − | | |
| − | or
| |
| − | | |
| − | You found only one hard drive if you select the RAID0/RAID1 mode
| |
| − | | |
| − | 4. Set CLEAR RAID mode (PM, factory default setup)
| |
| − | * Press the SET button for about 5 seconds then and release it till blue LED indicators starts flashing.
| |
| − | * After above processes, the setup for CLEAR RAID is done.
| |
| | | | |
| | ==Matching Metal Case== | | ==Matching Metal Case== |
Revision as of 18:43, 26 July 2023
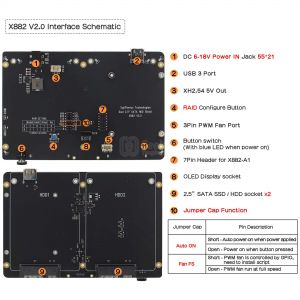
X882 V2.0 Interface Indication
Connection diagram of GPIO connector and OLED screen
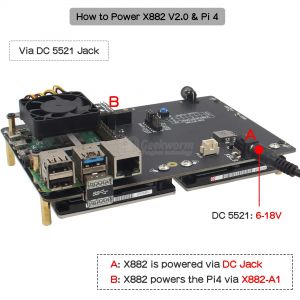
How to Power X882 V2.0&Pi4
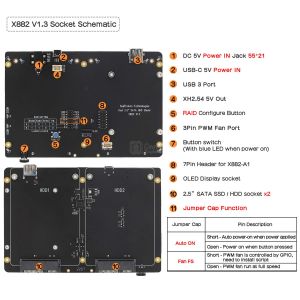
X882 V1.3 Interface Indication
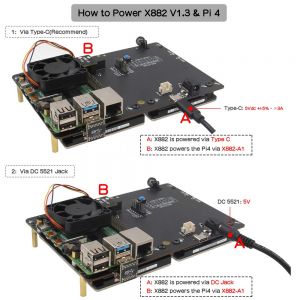
How to Power X882 V1.3&Pi4
Overview
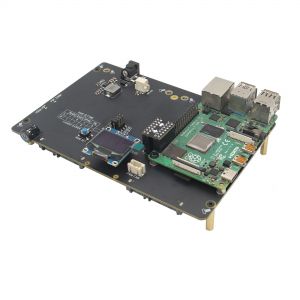
This is an ultra-compact raspberry pi 4 dual 2.5 inch sata hdd/ssd storage board X882, it allows two 2.5" HDD/SSD to working at the same time with your Raspberry Pi 4. The SuperSpeed USB 3.0 port delivers a blistering data transfer rate of up to 5Gbps, letting you transfer a large amount of data in seconds.
X882 is not sold seperately, we have designed a case for X882 and sold it as a set, please refer to NASPi Gemini
Update History:
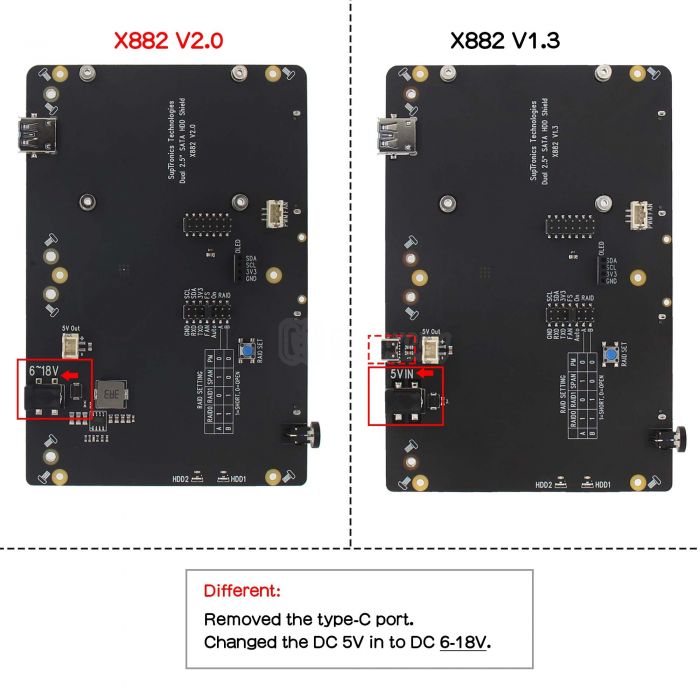
In December 2022, the X882 V1.3 has been updated to X882 V2.0, remove the USB-C port on X882 V1.3, and update DC 5V power in to wide voltage input DC6-18V power in.
The new version completely solve the issue of I/O error.
Features
| FOR USE WITH |
Raspberry Pi 4 Model B
|
| Operating System |
All Raspberry Pi operating systems
|
| KEY FEATURES |
- Ultra-compact storage solution for Raspberry Pi 4 - Dual 2.5" SATA HDD/SSD Shield
- UASP supported ONLY, NOT support TRIM
- Supports dual 2.5 SATA HDDs/SSDs working at the same time
- Allows booting OS from your HDD/SSD for faster app opens, web serving and file copying
- Function to power the RPI via XH2.54 only needing a single power supply
- Integrated USB 3.1 Gen1 to SATA 6Gb/s bridge controllers
- Integrated USB 3.1 Gen 1 Hub Controller
- USB3.1 Gen1 5Gb/s connectivity offers plug-and-play functionality on your Raspberry Pi 4
- Specially-made USB3.1 jumper to connect with Raspberry Pi - no additional cables needed
- Specially-made X882-A1 connector to connect with Raspberry Pi - power Pi4 without additional cables
- Ultra-compact design allows for ease of use two HDD/SSD with Raspberry Pi 4
- LED blue indicator(HDD1,HDD2) indicates each drive status
- Support Auto power on function
- Support connecting 3pin PWM Fan
- On board switch with LED light
- Press button switch to turn on
- Press button switch and hold for 1~2 seconds to reboot
- Press button switch and hold for 3 seconds to implement safe shutdown
- Press button switch and hold for more than 8 seconds to force shutdown
|
| SPECIFICATION |
- Power supply: 5.1Vdc +/-5% , ≥4A(For X882 V1.3 Version)
- Power supply: 6-18Vdc +/-5% , ≥4A(For X882 V2.0 Version)
- Ports & Connectors:
- DC jack - 5.5x2.1mm (DC5525 Jack is compatible with DC5521, you can also use the PSU with DC5525 Jack)
- Type-C port(Geekworm Type-C 5V 4A 20W power supply is recommended.)
- USB socket - USB 3.0 type A
- Power connector - 5V Out XH2.54 2-pin
- PWM Fan port 3-pin
- SATA socket - 7+15P Female
|
| Power Supply Requirement |
- Please use high quality power adapter, or the HDD/SSD may cannot be recognized.
- Since X882 can install two 2.5-inch hard drives, it needs a high-quality power supply to provide enough current.
|
| NOTES |
- Due to installation restrictions, please pay attention to the thickness of 2.5" SSD/HDD.
- We do not recommend using Samsung hard drives,Please use hard drives of other brands.
- As with all SSDs, new SSD/HDD must be formatted before use.
- Older SSD drives with less efficient flash media may not perform as well as newer drives.
- A microSD card is required for forceing the Raspbian OS to use the HDD/SSD for its "root" partition
- Additional USB3.0 A Male to A Male cable is required (not supplied)
- Do not power your Raspberry Pi via the Pi's 40-pin header and Type-C USB socket at the same time.
|
Raid setup
Refer to How to Configure RAID Setting
Matching Metal Case
X882-C1 metal case with 4010 PWM cooling fan, you can refer to NASPi Gemini.
Packing List
- 1 x X882 Dual 2.5 SATA HDD Shield(V2.0 or V1.3 Version)
- 1 x X882-A1 Connector
- 1 x USB Connector
- 3 x Jumper Link Pitch 2.54mm
- 4 x TM3 *6mm Screws (to fix 2.5" HDD/SSD)
- 4 x F/F Spacer M2.5 *20mm
- 8 x M2.5 * 5mm Screws
User Manual
Software guide, please refer to X-C1 Software
Important!!
For better system compatibility & performance, Please format your HDD/SSD to Ext4 file system.
Document
Some Tips
FAQ
Q1. Why did the second HDD is not recognized?
You found only one hard drive if you select the RAID0/RAID1 mode.
Please exit the RAID mode and check again after entering the PM mode(clear raid mode).
More details please refer to Set CLEAR RAID mode of How to configure RAID
Q2: What to do if HDD/SSD is not recognized?
A: Please refer to How to View/Partition/Format/Mount HDD/SSD


Enable comment auto-refresher
Anonymous user #10
Permalink |
Harry
Anonymous user #9
Permalink |
Anonymous user #11
Anonymous user #7
Permalink |
Walker
Anonymous user #6
Permalink |
Anonymous user #6
Walker
Anonymous user #8
Walker
Anonymous user #8
Walker
Anonymous user #8
Walker
Anonymous user #6
Anonymous user #5
Permalink |
Walker
Anonymous user #4
Permalink |
Walker
Anonymous user #3
Permalink |
Walker
Anonymous user #2
Permalink |
Lisa
Anonymous user #1
Permalink |
Abby
Anonymous user #1
Permalink |
Lisa