-
X1009: Difference between revisions
| (21 intermediate revisions by 6 users not shown) | |||
| Line 1: | Line 1: | ||
{{GD Template Impl}} | {{GD Template Impl}} | ||
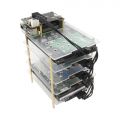
[[File:X1009-V1.1-IMG-7801-Interface.jpg|thumb|right|X1009 V1.1]] | [[File:X1009-V1.1-IMG-7801-Interface.jpg|thumb|right|X1009 V1.1 Interface Diagram]] | ||
[[File:X1009-IMG-0655.jpg|thumb|right|X1009 V1.1]] | |||
[[File:X1009-V1.1-P4.jpg|thumb|right|X1009 V1.1]] | |||
[[File:X1009-V1.1-P6.jpg|thumb|right|X1009 V1.1]] | [[File:X1009-V1.1-P6.jpg|thumb|right|X1009 V1.1]] | ||
[[File:X1009-V1.1-P5.jpg|thumb|right|X1009 V1.1 - How to connect SATA Powre Spillter cable]] | [[File:X1009-V1.1-P5.jpg|thumb|right|X1009 V1.1 - How to connect SATA Powre Spillter cable]] | ||
[[File:X1009-V1.1.jpg|thumb|right|X1009 V1.1]] | [[File:X1009-V1.1.jpg|thumb|right|X1009 V1.1]] | ||
[[File:X1009-V1.1-Bottom.jpg|thumb|right|X1009 V1.1]] | [[File:X1009-V1.1-Bottom.jpg|thumb|right|X1009 V1.1]] | ||
| Line 15: | Line 16: | ||
* Older SATA drives with less efficient flash media may not perform as well as newer drives | * Older SATA drives with less efficient flash media may not perform as well as newer drives | ||
* New SATA HDDs/SSDs are not partitioned and will need to be both partitioned and formatted when first connected to the Raspberry Pi before they will be accessed in the Explorer. | * New SATA HDDs/SSDs are not partitioned and will need to be both partitioned and formatted when first connected to the Raspberry Pi before they will be accessed in the Explorer. | ||
* <span style="color:red;">Disks not detected after Raspberry Pi 5 Kernel upgrade</span>, please refer to <span style="color:red; font-weight:bold;">[[#FAQ]]-Q2</span>. | |||
==Overview== | ==Overview== | ||
| Line 73: | Line 75: | ||
* X1009 V1.1 PCIe to SATA shield x1 | * X1009 V1.1 PCIe to SATA shield x1 | ||
* SATA power spillter cable x1 | * SATA power spillter cable x1 | ||
* PCIe FFC 30mm | * PCIe FFC 30mm x2 | ||
* Screw pack x1 | * Screw pack x1 | ||
| Line 82: | Line 84: | ||
==User Manual== | ==User Manual== | ||
* Dimensions source file (DXF): [[File:X1009-V1.0.dxf]] - You can view it with [https://viewer.autodesk.com/ Autodesk Viewer] online | * Dimensions source file (DXF): [[File:X1009-V1.0.dxf]] - You can view it with [https://viewer.autodesk.com/ Autodesk Viewer] online | ||
===Hardware=== | ===Hardware=== | ||
[[File: X1009v1.1-dwg.png | 700px]] | [[File: X1009v1.1-dwg.png | 700px]] | ||
[[File:X-1009-V1.1-install.jpg | 700px]] | [[File:X-1009-V1.1-install.jpg | 700px]] | ||
| Line 93: | Line 95: | ||
Thanks for the video from HG Software: https://youtu.be/zD5zkPcbtaw | Thanks for the video from HG Software: https://youtu.be/zD5zkPcbtaw | ||
{{#ev:youtube|https://youtu.be/zD5zkPcbtaw}} | {{#ev:youtube|https://youtu.be/zD5zkPcbtaw}} | ||
==Matching Case== | |||
There is no dedicated case for X1009 installation. However, you can use the [https://geekworm.com/products/3-5-inch-hard-drive-mounting-rack 5-Layer 3.5-inch Hard Drive Mounting Rack Case with Cooling Fan for HDD/SSD mounting]. Additionally, the [https://geekworm.com/products/x880-a3 X880-A3 acrylic plate] can be used for HDD/SSD installation. | |||
<gallery> | |||
File:3.5-inch-HDD-Mounting-Rack-IMG-9337.jpg|3.5 inch HDD Mounting Rack | |||
File:3.5-inch-HDD-Mounting-Rack-IMG-9499-size.jpg|3.5 inch HDD Mounting Rack | |||
File:3.5-inch-HDD-Mounting-Rack-IMG-9490-Acc.jpg|3.5 inch HDD Mounting Rack | |||
File:X880-A3-IMG-8367.jpg|none|X880-A3 Acrylic Plate | |||
File:X880-A3-IMG-3627-Installation-Hole.jpg|X880-A3 Acrylic Plate | |||
</gallery> | |||
==FAQ== | ==FAQ== | ||
<div class="toccolours mw-collapsible mw-collapsed"> | <div class="toccolours mw-collapsible mw-collapsed"> | ||
<div style="font-weight:bold;line-height:1.0; color:red;"> | <div style="font-weight:bold;line-height:1.0; color:red;"> | ||
Q1:Display error message: ata1: '''SATA link down''' (SStatus 0 SControl 300) | Q1: Display error message: ata1: '''SATA link down''' (SStatus 0 SControl 300) | ||
</div> | </div> | ||
<div class="mw-collapsible-content"> | <div class="mw-collapsible-content"> | ||
| Line 103: | Line 116: | ||
[[File:X1009-error-message.png|none]] | [[File:X1009-error-message.png|none]] | ||
If the above error message appears, please check if the <code>lspci</code> command is running. If the PCIe device can be found, | If the above error message appears, please check if the <code>lspci</code> command is running. If the PCIe device can be found, then check if the HDD is powered by X1009. | ||
If there is a problem with the data cable and the power supply of the HDD, a '''LINK DOWN''' error will appear. | |||
</div> | |||
</div> | </div> | ||
<div class="toccolours mw-collapsible mw-collapsed"> | |||
<div style="font-weight:bold;line-height:1.0; color:red;"> | |||
Q2: Disks not detected after Raspberry Pi 5 Kernel upgrade? | |||
</div> | </div> | ||
<div class="mw-collapsible-content"> | |||
A: | |||
'''1. Root Cause''' | |||
:The problem is triggered by ''upstream Linux kernel code changes''. The '''JMicron JMB585 controller chip''' equipped on the SATA hat has potential data corruption risks when running under 64-bit DMA mode on certain platforms. Therefore, the kernel forces this chip to work with 32-bit DMA mode. Without matching configuration adjustment, the system cannot probe and identify SATA disks via AHCI protocol normally. | |||
'''2. Affected System & Kernel Versions''' | |||
:*Kernel 6.12.87 and above: Raspberry Pi OS Bookworm, OpenMediaVault 7 (OMV7) | |||
:*Kernel 6.18.29 and above: Raspberry Pi OS Trixie, OpenMediaVault 8 (OMV8) | |||
'''3. Configuration''' | |||
:3.1 Manual Configuration Fix <span style="color:red;">''(Solution 1 - Recommand)''</span> | |||
::Open the config file via terminal command: | |||
::<code>sudo nano /boot/firmware/config.txt</code> | |||
::Add the below overlay parameter on a new line, place it right under your existing PCIe setting: | |||
::<code>dtoverlay=pcie-32bit-dma-pi5</code> | |||
::*Put it below <code>dtparam=pciex1</code> for standard ''PCIe mode'' | |||
::*Put it below <code>dtparam=pciex1_gen=3</code> for ''PCIe Gen3 mode'' | |||
::Multiple dtoverlay entries are allowed, just write each on separate lines. | |||
::Save and exit the editor. | |||
:3.2 One-click Command to Add Configuration <span style="color:red;">''(Solution 2 - For reference, '''NOT''' tested by us)''</span> | |||
::Run this command directly in terminal to automatically insert the required setting: | |||
::<code>grep -qxF 'dtoverlay=pcie-32bit-dma-pi5' /boot/firmware/config.txt || sudo sed -i -zE 's/(.*\ndtparam=[^\n]*pciex1[^\n]*)/\1\ndtoverlay=pcie-32bit-dma-pi5/' /boot/firmware/config.txt</code> | |||
:<span style="color:red;">NOTE: Please select one from the two solutions.</span> | |||
'''4. Final Required Operation''' | |||
:Reboot your Raspberry Pi 5 device after modifying the configuration. The new setting will take effect during startup, and the SATA hat will detect disks properly again. | |||
'''5. Plus:''' | |||
:Please refer to the [https://forum.openmediavault.org/index.php?thread/59049-psa-rpi5-users-of-the-radxa-sata-hat-now-need-to-use-dtoverlay-pcie-32bit-dma-pi/ original link]. The chip equipped on X1009 is the same as that of the author's '''Radxa Penta SATA HAT''', both adopting JMicron JMB585. | |||
:Thanks to users who reported issues in the comments. Your feedback helps us improve and update product documents. | |||
</div> | |||
</div> | |||
<!--Add review function! --> | <!--Add review function! --> | ||
< | <comment-streams id="main" /> | ||
<!--Please choose the --> | <!--Please choose the --> | ||
Latest revision as of 14:44, 1 June 2026


Important Notes
- NOT include 7-pin SATA data cables, please prepare it yourself
- The X1009 is designed for data storage purposes and does not currently support booting from HDD/SSD with the existing firmware.
- Don't power the X1009 via DC powe jack and the Raspberry Pi5 via USB-C at the same time. Just power the X1009, and then the X1009 will power the Pi 5 via the GPIO.
- Older SATA drives with less efficient flash media may not perform as well as newer drives
- New SATA HDDs/SSDs are not partitioned and will need to be both partitioned and formatted when first connected to the Raspberry Pi before they will be accessed in the Explorer.
- Disks not detected after Raspberry Pi 5 Kernel upgrade, please refer to #FAQ-Q2.
Overview
The X1009 PCIe to 5-port SATA expansion board is designed to offer a high-capacity and high-speed storage solution for your Raspberry Pi 5. This board supports the simultaneous connection of 5pcs large-capacity SATA storage devices, with the SATA 3.0 interface reaching speeds of up to 5Gbps.
The X1009 features a 12V input via a standard DC jack and is equipped with high-efficiency DC/DC step-down converters to power both your Raspberry Pi 5 and PCIe devices concurrently, simplifying the power supply to a single source.
Ideal for creating a home media center or setting up a network-attached storage (NAS) system, the X1009 allows you to store and stream your videos, music, and digital photos within your home or even remotely around the world.
Raspberry pi 5 SATA Series
Caution:
- *The Matching Case section only indicates compatibility between the case, SATA HAT, Raspberry Pi Board, and excludes products in the Product Matching Reference section. Compatibility of these referenced products with the case is subject to their actual specifications.
- *In addition to voltage and current, ensure that the total power of the power supply meets or exceeds the recommended input power (Total Power = Voltage × Current).
| Model | Description | Supported HDD/SSD | Mounting Position | Power Input | Support NVMe Boot | Matching Case | Matching Cooler | Product Matching Reference |
|---|---|---|---|---|---|---|---|---|
| X1100 | USB to SATA | 2.5" SATA HDD / SSD | Bottom | 5 VDC ±5%, 1.3 A via USB 3.0 port | Yes | X1100-C1 | Official Cooler / Argon THRML Cooler / H501 / H505 / H509 / H510 |
|
| X1006 | PCIe to SATA | 2.5" SATA HDD + M.2 SATA Key-B 2280 SSD | Bottom | 5 VDC ±5%, ≥ 3 A via FFC & pogo pins | NO | NO Case yet | Official Cooler / Argon THRML Cooler / H501 / H505 / H509 / H510 |
|
| X1007 | PCIe to SATA | Dual SATA 2.5" HDD / SSD | Bottom | 5 VDC ±5%, ≥ 3 A via FFC & pogo pins | NO | NO Case yet | Official Cooler / Argon THRML Cooler / H501 / H505 / H509 / H510 |
|
| X1008 | PCIe to SATA | 2.5" SATA HDD / SSD + 3.5" SATA HDD Shield | Bottom | 12 VDC ±5%, ≥ 3 A via 5521 DC power jack | NO | NO Case yet | Official Cooler / Argon THRML Cooler / H501 / H505 / H509 / H510 |
|
| X1009 | PCIe to SATA | 5PCS 2.5" SATA HDD / SSD /3.5" SATA HDD | Top |
12 VDC ±5% via 5521 DC power jack
|
NO | NO Case yet | Official Cooler / Argon THRML Cooler / H501 / H505 / H509 / H510 |
|
Features
- Compatible with Raspberry Pi 5B
- Supports the connection of five SATA 3.0 devices to your Raspberry Pi 5 simultaneously
- Compliant with the Serial ATA 3.0 specification, with backward compatibility to SATA 2.0 and SATA 1.0
- Adheres to the PCI-Express v2.0 specification and is backward compatible with PCI-Express v1.0
- Supports communication speeds of 5.0 Gbit/s, 3.0 Gbit/s, and 1.5 Gbit/s
- Compatible with SATA 6G, 3G, and 1.5G hard drives
- Features plug-and-play installation for ease of setup
- Blue LED indicators display power and drive status
- Equipped with a high-efficiency DC/DC step-down converter to power both your Raspberry Pi 5 and SATA devices simultaneously
- Efficient power delivery to the Raspberry Pi 5 via a pin header, consolidating power sources
- Compatible with the official active cooler without compromising cooling performance
- Supports the HAT+ STANDBY power state, automatically turning off SATA devices when the Pi 5 is powered down
- Includes a power SATA splitter cable for connecting up to 5 Serial ATA devices
- PCB Size: 85mm x 57.2mm
How to Power
- 12Vdc +/-5% ≥3A for one 3.5" HDD or one 2.5" HDD,
- 12Vdc +/-5% ≥5A for two 3.5" HDDs, ≥7A for three 3.5" HDDs, ≥9A for four 3.5" HDDs, ≥11A for five 3.5" HDDs
- 12Vdc +/-5% ≥4A for two 2.5" HDDs, ≥5A for three 2.5" HDDs, ≥6A for four 2.5" HDDs, ≥7A for five 2.5" HDDs
- Your SATA drives can also be powered from a separate PSU.
- You need to calculate the total current required for all the HDDs you are using. Check the HDD nameplate to get the HDD startup current (the startup current will be larger than the operating current), and then add them together to get the total current required. This is basically the maximum output current of the power adapter you need.
PS: According to our actual test, the Geekworm 12V/5A power supply can load 3-5 2.5" sata SSDs, and final power requirements depend on the requirements of the SSD/HDD you are using
Ports & Connectors
- DC power jack x1 - 5.5x2.1mm
- PCIe connector x1 - 16-pin pitch0.5mm
- SATA connectors x5 - 7P
Test & Reviews
Test Conditions
- System board details: Raspberry Pi 5 Model B Rev 1.0 , 4G RAM
- Interface board details: X1009 v1.1 PCIe to 5 SATA Shield
- Operation system: Raspberry Pi OS with desktop (Debian12 (bookworm), 64bit, Release date: December 5th 2023)
- Storage details: Samsung EVO 750 SSD, Segate Barracuda ST3500410AS 500G
Testing disk drives read speed at PCIe2.0 with hdparm

Samsung EVO SSD: 430.72MB/s, Segate Barracuba HDD: 102.65MB/s
Packing List
- X1009 V1.1 PCIe to SATA shield x1
- SATA power spillter cable x1
- PCIe FFC 30mm x2
- Screw pack x1
NOTE: NOT include 7-pin SATA data cables, please prepare it yourself

User Manual
- Dimensions source file (DXF): File:X1009-V1.0.dxf - You can view it with Autodesk Viewer online
Hardware


Software
- X1009 software tutorials: X1009 Software
Video Guide
Thanks for the video from HG Software: https://youtu.be/zD5zkPcbtaw
Matching Case
There is no dedicated case for X1009 installation. However, you can use the 5-Layer 3.5-inch Hard Drive Mounting Rack Case with Cooling Fan for HDD/SSD mounting. Additionally, the X880-A3 acrylic plate can be used for HDD/SSD installation.
-
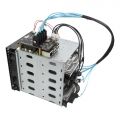 3.5 inch HDD Mounting Rack
 -
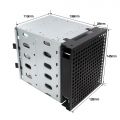 3.5 inch HDD Mounting Rack
 -
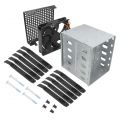 3.5 inch HDD Mounting Rack
 -
 X880-A3 Acrylic Plate
 -
 X880-A3 Acrylic Plate


FAQ
Q1: Display error message: ata1: SATA link down (SStatus 0 SControl 300)
A:

If the above error message appears, please check if the lspci command is running. If the PCIe device can be found, then check if the HDD is powered by X1009.
If there is a problem with the data cable and the power supply of the HDD, a LINK DOWN error will appear.
Q2: Disks not detected after Raspberry Pi 5 Kernel upgrade?
A:
1. Root Cause
- The problem is triggered by upstream Linux kernel code changes. The JMicron JMB585 controller chip equipped on the SATA hat has potential data corruption risks when running under 64-bit DMA mode on certain platforms. Therefore, the kernel forces this chip to work with 32-bit DMA mode. Without matching configuration adjustment, the system cannot probe and identify SATA disks via AHCI protocol normally.
2. Affected System & Kernel Versions
- Kernel 6.12.87 and above: Raspberry Pi OS Bookworm, OpenMediaVault 7 (OMV7)
- Kernel 6.18.29 and above: Raspberry Pi OS Trixie, OpenMediaVault 8 (OMV8)
3. Configuration
- 3.1 Manual Configuration Fix (Solution 1 - Recommand)
- Open the config file via terminal command:
sudo nano /boot/firmware/config.txt- Add the below overlay parameter on a new line, place it right under your existing PCIe setting:
dtoverlay=pcie-32bit-dma-pi5- Put it below
dtparam=pciex1for standard PCIe mode - Put it below
dtparam=pciex1_gen=3for PCIe Gen3 mode
- Put it below
- Multiple dtoverlay entries are allowed, just write each on separate lines.
- Save and exit the editor.
- 3.2 One-click Command to Add Configuration (Solution 2 - For reference, NOT tested by us)
- Run this command directly in terminal to automatically insert the required setting:
grep -qxF 'dtoverlay=pcie-32bit-dma-pi5' /boot/firmware/config.txt || sudo sed -i -zE 's/(.*\ndtparam=[^\n]*pciex1[^\n]*)/\1\ndtoverlay=pcie-32bit-dma-pi5/' /boot/firmware/config.txt
- NOTE: Please select one from the two solutions.
4. Final Required Operation
- Reboot your Raspberry Pi 5 device after modifying the configuration. The new setting will take effect during startup, and the SATA hat will detect disks properly again.
5. Plus:
- Please refer to the original link. The chip equipped on X1009 is the same as that of the author's Radxa Penta SATA HAT, both adopting JMicron JMB585.
- Thanks to users who reported issues in the comments. Your feedback helps us improve and update product documents.