Difference between revisions of "X630-Software"
| (59 intermediate revisions by 3 users not shown) | |||
| Line 1: | Line 1: | ||
{{GD Template Impl}} | {{GD Template Impl}} | ||
| − | This wiki describes how to use x630 on the Raspberry Pi OS, | + | This wiki describes how to use x630 on the Raspberry Pi OS. <span style="color:red;">Note: The software can currently be used directly on Raspberry Pi 4B, 3B+/3B/Zero series. Software support for Raspberry Pi 5 software is not available which need to be tested. |
| − | + | The Raspberry Pi Foundation has updated several versions recently; | |
| − | |||
| − | + | The use guide of X630 depends on the official Raspberry Pi OS version you are using. Different versions have different usage methods. If you have some questions, please contact us and attach the os version you are using.(<span style="color:red;">Email: support@geekworm.com</span>) | |
| − | + | ==For Raspberry Pi OS== | |
| − | + | '''NOTE:''' | |
| − | |||
| − | |||
| − | |||
| − | |||
| − | |||
| − | |||
| − | |||
| − | |||
| − | |||
| − | |||
| − | |||
| − | |||
| − | |||
| − | ''' | ||
| − | |||
| − | |||
| − | |||
| − | + | Since the X630 V1.5 version removes the software reset&hardware reset DIP switch, for the V1.5 version, please ignore the use of software reset or directly visit to [[X630-Hardware-Reset]] | |
| − | |||
| − | + | X630 v1.3 has two reset mode: '''Hardware reset''' and '''Software reset''' modes; | |
| − | |||
| − | |||
| − | |||
| − | |||
| − | |||
| − | |||
| − | + | You can use hardware reset mode if you use it on raspberry pi hardware or raspberry pi os, software reset uses GPIO 509 to reset operation through GPIO, which can prevent you from restarting the Raspberry Pi repeatedly, which is very convenient. | |
| − | |||
| − | |||
| − | + | The user guide of X630 is similar to [[HDMI TO CSI-2|C779]] when X630 is in hardware mode, but X630 supports audio when used with X630-A2, and [[HDMI TO CSI-2|C779]] does not support audio | |
| − | |||
| − | |||
| − | |||
| − | |||
| − | |||
| − | |||
| − | |||
| − | |||
| − | |||
| − | |||
| − | |||
| − | |||
| − | + | First, please confirm & select X630 work mode according the picture; After November 2021, the default factory mode is hardware mode; | |
| − | + | We found that some users prefer hardware mode, so our factory default settings have been changed to hardware mode | |
| − | |||
| − | |||
| − | |||
| − | |||
| − | |||
| − | |||
| − | |||
| − | + | [[File:Dip-switches.jpg|none|dip switch]] | |
| − | + | <span style="color:red;">Disconnect power to the Raspberry Pi before changing dip switch positions!!!</span> | |
| − | |||
| − | + | {| class="wikitable" | |
| + | ! SELECTION !! SWITCH SETTINGS !! | ||
| + | |- | ||
| + | | Hardware reset(Default) || HW = 1 || SW = 0 | ||
| + | |- | ||
| + | | Software reset || HW = 0 || SW = 1 | ||
| + | |} | ||
| − | + | [[File:X630-Reset-01.jpg|none|800px|X630 dip switch setting]] | |
| − | |||
| − | |||
| − | |||
| − | |||
| − | + | Explain: | |
| − | + | * Hardware reset: After starting RASPISTILL or RASPIVID <span style="color:red;">once</span> then you will need to reboot Raspberry Pi to restart it again (Please use when operating system cannot control the X630 module via GPIO509) | |
| − | + | * Software reset: Starting RASPISTILL or RASPIVID <span style="color:red;">multiple times</span> and don't need to reboot Raspberry Pi. | |
| − | + | * Default setting is 'Hardware reset'. | |
| − | + | * Please remove the yellow protective film before change dip switch. | |
| − | + | <hr/> | |
| − | |||
| − | |||
| − | |||
| − | |||
| − | |||
| − | |||
| − | |||
| − | |||
| − | |||
| − | |||
| − | |||
| − | ' | ||
| − | |||
| − | Please | ||
| − | |||
| − | |||
| − | |||
| − | + | '''For Hardware Reset''' refer to [[X630-Hardware-Reset]] | |
| − | |||
| − | + | '''For Software Reset''' refer to [[X630-Software-Reset]] | |
| − | |||
| − | |||
| − | |||
| − | |||
| − | + | Return to [[X630]] | |
| − | |||
| − | |||
| − | [[ | ||
<!--Add review function! --> | <!--Add review function! --> | ||
Latest revision as of 09:59, 12 March 2024
This wiki describes how to use x630 on the Raspberry Pi OS. Note: The software can currently be used directly on Raspberry Pi 4B, 3B+/3B/Zero series. Software support for Raspberry Pi 5 software is not available which need to be tested.
The Raspberry Pi Foundation has updated several versions recently;
The use guide of X630 depends on the official Raspberry Pi OS version you are using. Different versions have different usage methods. If you have some questions, please contact us and attach the os version you are using.(Email: support@geekworm.com)
For Raspberry Pi OS
NOTE:
Since the X630 V1.5 version removes the software reset&hardware reset DIP switch, for the V1.5 version, please ignore the use of software reset or directly visit to X630-Hardware-Reset
X630 v1.3 has two reset mode: Hardware reset and Software reset modes;
You can use hardware reset mode if you use it on raspberry pi hardware or raspberry pi os, software reset uses GPIO 509 to reset operation through GPIO, which can prevent you from restarting the Raspberry Pi repeatedly, which is very convenient.
The user guide of X630 is similar to C779 when X630 is in hardware mode, but X630 supports audio when used with X630-A2, and C779 does not support audio
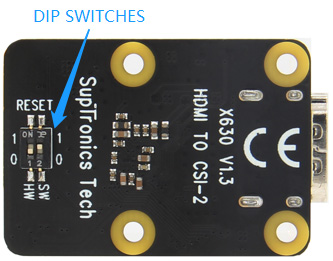
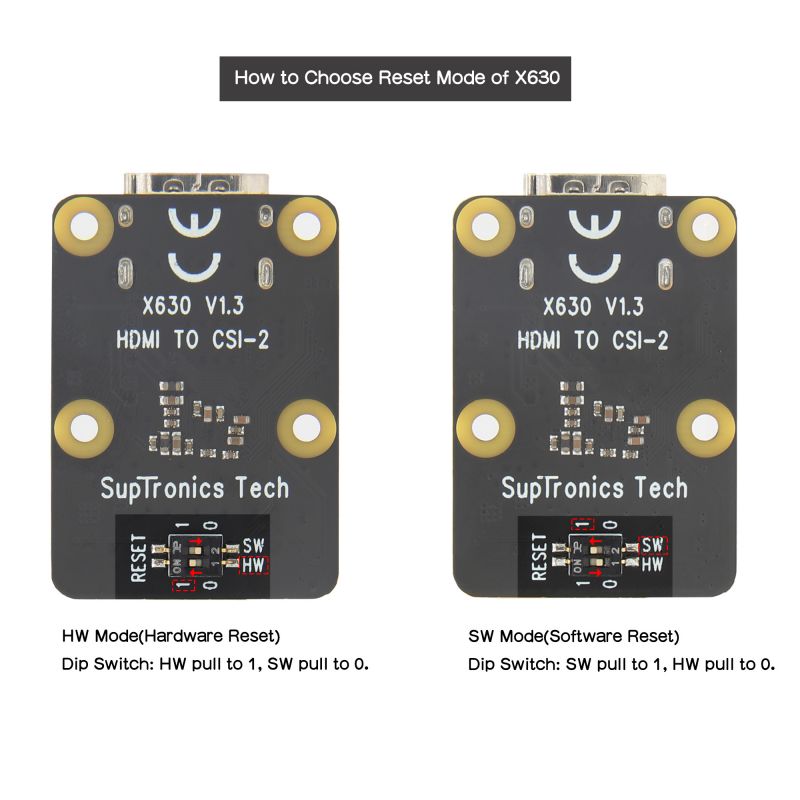
First, please confirm & select X630 work mode according the picture; After November 2021, the default factory mode is hardware mode;
We found that some users prefer hardware mode, so our factory default settings have been changed to hardware mode
Disconnect power to the Raspberry Pi before changing dip switch positions!!!
| SELECTION | SWITCH SETTINGS | |
|---|---|---|
| Hardware reset(Default) | HW = 1 | SW = 0 |
| Software reset | HW = 0 | SW = 1 |
Explain:
- Hardware reset: After starting RASPISTILL or RASPIVID once then you will need to reboot Raspberry Pi to restart it again (Please use when operating system cannot control the X630 module via GPIO509)
- Software reset: Starting RASPISTILL or RASPIVID multiple times and don't need to reboot Raspberry Pi.
- Default setting is 'Hardware reset'.
- Please remove the yellow protective film before change dip switch.
For Hardware Reset refer to X630-Hardware-Reset
For Software Reset refer to X630-Software-Reset
Return to X630


Enable comment auto-refresher