X750

From Geekworm Wiki
Revision as of 10:12, 16 May 2024 by Harry (talk | contribs)
(diff) ← Older revision | Latest revision (diff) | Newer revision → (diff)
Jump to navigation Jump to search
X750
X750
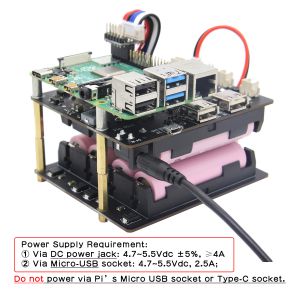
X750-power supply requirement
X750
X750
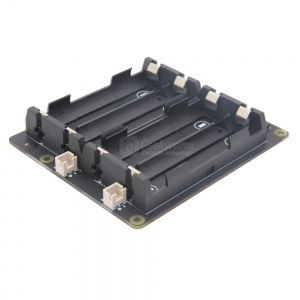
X750-A2
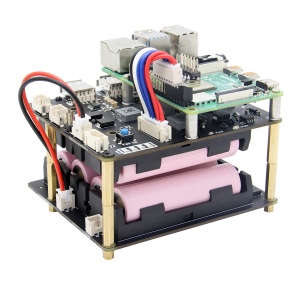
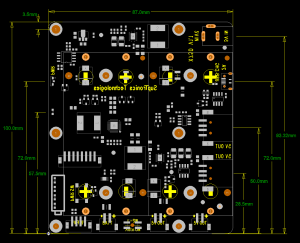
X750 PCB LAYOUT
X750 daughter board, read cable is pin 8

Overview

Note: Sold out and no longer in production. Please refer to X728

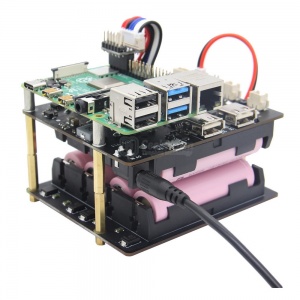
  • The X750 is a multi-functional expansion board for all current models of the Raspberry Pi using a 40 pin header. It provides intelligent and safe power management, safe shutdown, full power off through software and an advanced uninterruptible power supply.
  • The X750 reserves the 40-pin header that can be stacked with other Raspberry Pi accessory boards for enhanced applications, and it's the high-end product of the Geekworm UPS family.
  • ​Important Note: The X750-A2 must be use with X750 18650 UPS HAT Shield, it is no use if you just purchase the X750-A2 board.


SAFETY INSTRUCTIONS AND WARNINGS

  • You must read these safety instructions and warnings before charging your batteries.
  • Lithium Polymer and Li-ion batteries are volatile. Failure to read and follow the below instructions may result in fire, personal injury and damage to property if charged or used improperly.
  • Never make wrong polarity connection when charging and discharging battery packs. Always double check polarity of battery's connector to make sure "+" to "+" and "-" to "-".
  • Do not mix and use old batteries and new batteries, or batteries with different brand names.
  • Lithium batteries has it's cycle life, please replace old battery with new one when it reaches it's service life or when it is two year old, whichever comes first.
  • When charging Battery Pack, please put battery in a fire proof container. Please don't leave the X700 on the wood material or carpet and unattended.
  • Must keep the X700 away from children.
  • Please watch Main Video and Tutorial Video regarding 18650 batteries at: https://www.staysafebattery.com/en/

Features

ITEM DESCRIPTION
FOR USE WITH Raspberry Pi 4 Model B/3B+/3B/2B/A+/B+
OPERATING SYSTEM · Raspbian Stretch
· Safe shutdown function tested for Raspbian, other operating systems NOT to be tested and advised
KEY FEATURES

UPS Function
· Smart and powerful Uninterruptible Power Supply (UPS)
· Provides continuous operations for up to 10~30hours (depending on battery type and qty used)
· Max 5.1V 8000mA Power Backup for even the most demanding RPi set ups
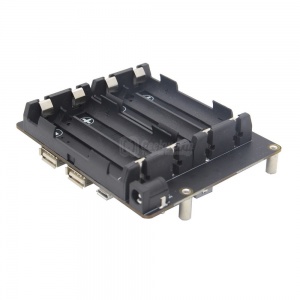
· Four 18650 Cells Lithium Ion Holder, can work with only two or three or four 18650 Lithium Ion batteries
· Can work with X750-A2 4-cell battery holder to increase battery capacity up to 38400mAh (12 18650 batteries)
· Supports 2A via micro-USB socket or 3A via DC jack fast charging
· Integrated battery protection circuit
· Integrated over current protection and over voltage protection
· Integrated Maxim's fuel-gauge systems (Reading battery voltage and percentage via i2c) - Cabling required
· Integrated 10-A fully-integrated synchronous boost converter
· Intelligent automatic charging and discharging
· On-board 4 green LEDs indicate battery charging and discharging levels of 25%, 50% , 75% and 100%
· On-board blue LED show the status of power on/off
Safe power management · Equipped with momentary button for easy power control
  Press the button to turn on
  Press the button and hold for 1~2seconds to reboot
  Press the button and hold for 3~7seconds to implement safe shutdown
 Press the button and hold for >8seconds to force shutdown
· Supports safe shutdown and full poweroff through software
· On-board blue LED shows the status of power on, reboot and shutdown
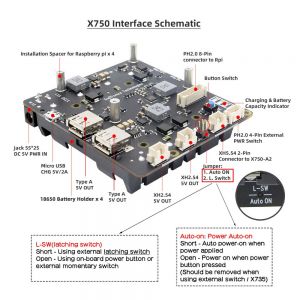
· On-board pin header to select auto power-on when power supplied or battery installed
· Ultra-low standby power consumption of μA to maximize battery life
· Operate in both charge mode and boost mode to allow full system management and battery power management
· Advanced system power path management avoids frequent charging and extend battery life
· Advanced system power path management allows 3A fast charging and powering Raspberry Pi at the same time
· Powers the Raspberry Pi via the 40-pin header - no additional cabling required
· On-board DC power jack (5.5*2.5mm) and XH2.54 connector convenient for power input
· On-board PH2.0 connector allows to connect external power switch and DIY your perfect case
· On-board XH2.54 power output connectors allow to  power other devices
· Mounting holes and standoffs provide mechanical stability of the Raspberry Pi and X750 assembly
X751-A2 · With four 18650 cells Lithium Ion holder
· Ideal solution to increase battery capacity (total battery capacity up to 38400mAh, 12 18650 batteries)
· Integrated battery protection circuit
· Mounting holes and standoffs provide mechanical stability of the Raspberry Pi, X750 and X750-A2 assembly
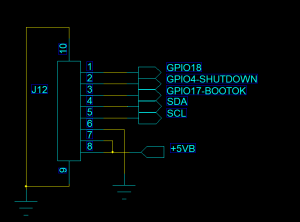
Pins and GPIO used Pin No.  Usage
2,4 +5V power supply
3,5 I2C for UPS battery voltage and percentage reading
6 Ground
7 GPIO4 for power management
11 GPIO17 for power management
12 GPIO18 for power management
POWER SUPPLY · Via Micro-USB socket: 4.7~5.5Vdc, 2.5A;
· Via DC power jack: 4.7~5.5Vdc ±5%, ≥4A
· UPS output : 5.1V ±5% Max 8A
· UPS charging current: 2A via Micro-USB socket, 3A via DC jack
· Terminal Battery Voltage : 4.2V
· Recharge Threshold : 4.1V
NOTE · Advanced power path management only enabled when applying power to the DC power jack
· Do not apply power to your Raspberry Pi via the Micro USB socket or Type-C socket.
· Do not use 18650 battery with built-in protection circuit

Packing List

  • 1 x X750 Expansion Board
  • 1 x GPIO and power daughterboard
  • 1 x 8-pin connection cable
  • 8 x Screw M2.5*5 mm
  • 2 x Spacer M/F M2.5*22+6 mm
  • 2 x Spacer F/F M2.5*22mm

X750-A2

With four 18650 cells Lithium Ion holder

  • Ideal solution to increase battery capacity (total battery capacity up to 38400mAh, 12 18650 batteries)
  • Integrated battery protection circuit
  • Mounting holes and standoffs provide mechanical stability of the Raspberry Pi, X750 and X750-A2 assembly

Packing List

  • 1 x X750-A2 Board
  • 1 x XH2.5 2Pin connector (Cable: 10cm/3.93inch)
  • 1 x Install Screws Pack

User Manual

Or How to read the battery capacity via I2C on X750&725 x750

This is the safe shutdown & reading Battery voltage and capacity script for x750

Customers often ask if we support automatic and safe shutdown at low battery capacity? Our suggestion is: You can refer to the A file and the B file to program this idea yourself: The idea is to read the current voltage or battery capacity cyclically, and then judge the program to execute the automatic shutdown command when it is low or low voltage, of course This low battery or low voltage value is an empirical value, and you can specify it yourself in the program.


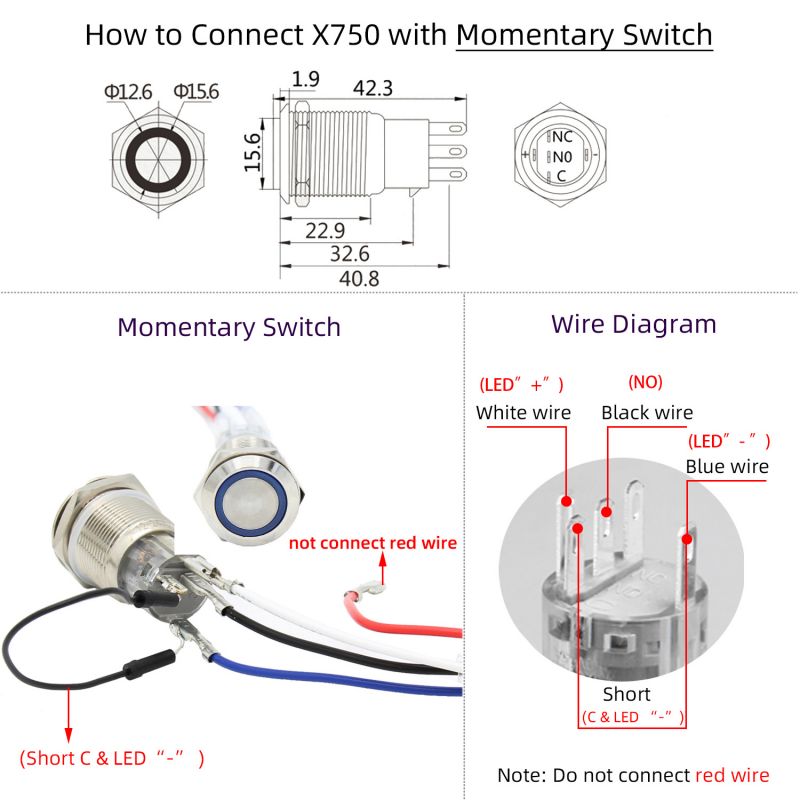
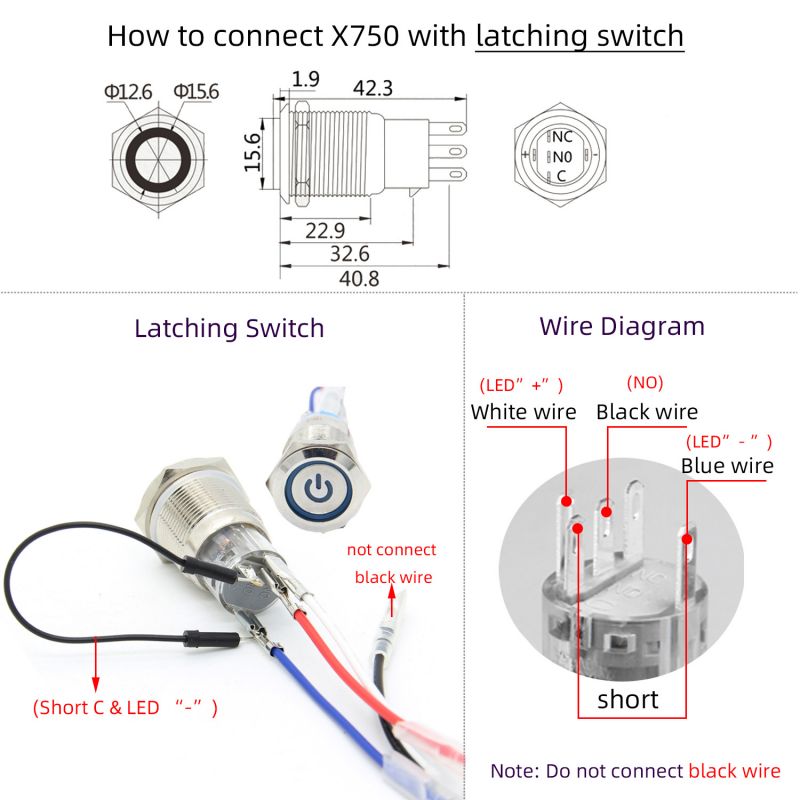
How to Connect the X750 with our Momentary Switch & Latching Switch

How to connect X750 with momentary switch How to connect X750 with latching switch

FAQ

Q: 1. Will the X750-A2 stackable? Can we double or triple or more X750-A2 to hold 12/16 batteries?

A: No limit to X750-A2,you can stack mutiple X750-A2 to hold and add more batteries. But please note that the charging current is only about 2.5A, so the charging speed will be become slow if you stack mutiple X750-A2.


Q: 2. Will X750 have an auto shutdown if the battery is low?

A: Sorry no, the X750 does not support an auto shutdown if the battery is low.


Q: 3. How many Amps can be used on each of the various XH2.54 5V Output connectors??

A: All 5v output connectors are connected together and they can deliver total 8A output.


Q: 4. What is the pinout for the PWR Switch?

A: Please refer to here: PH2.0 Conector Specification


Q: 5. Does the X725/X750 support to use with X735 together?

A: Sorry, no, the X725/X750 does not support to use with X735 power management board, please do not use them togehter.


Q: 6. Can X750 provide enough power supply when PI 4 is overclocked to 2.0ghz?

A: No problem, X750 can output current up to 8A


Q: 7.How to remove/unload the X750 script from your Pi?

A: Open the /etc/rc.local file (sudo nano /etc/rc.local or vim /etc/rc.local to open the /etc/rc.local file;), and seach x750, then comment out that line (add # on the begin of that line);


Q: 8.Does the X725/X750/X705 support power failure detection?

A: No, the X725/X750/X705 dose not support power failure detection.


Q: 9.Does the X750 support to use with X835?

A: No,not support. They requires different power supply voltage, can't use togehter.


Q: 10.X750 is not compatible with adafruit 3.5" touchscreen problem

A: Please refer to https://geekworm.com/community/forum/topic/12496/x750-pinout


Q: 11.Why do not use 18650 battery with built-in protection circuit for X750?

A: The X750 has an onboard fuse, if the battery can be installed, you can directly use the battery with protection circuit, but the output power may be affected.
Add your comment
Geekworm Wiki welcomes all comments. If you do not want to be anonymous, register or log in. It is free.


Anonymous user #25

36 months ago
Score 0++

When I'm detaching PSU my fully charged x750 provides only 3.75v output. What is wrong with my X750?

Setup: RPi4, X750, X750-A2

Lisa

36 months ago
Score 0++
Hi,could you please send us some pictures or a video by email<support@geekworm.com>;let us know more details,and please tell us your order NO. THANKS

Anonymous user #24

44 months ago
Score 0++

Hi! Can I use x750 with Argon 40 Fan HAT together?

Thank you for your support.

Anonymous user #23

45 months ago
Score 0++
Hi, we bought the X750 and when we try to charge using the DC 5V using and 5V source the X750 charge very slow, and only ask for 650mA to the DC source. We are using 12 18650 batteries (2200 mAH each one). At the documentation talks about 3A via DC jack fast charging. Could you help us?

Anonymous user #22

46 months ago
Score 0++

Hey, it seems, the volt percentage command doesn't work. This is my cli output (Tried on 2 different devices with 2 x750-a):

root@raspberrypi:/home/pi# python x750ups.py File "x750ups.py", line 30 print "******************" ^ SyntaxError: Missing parentheses in call to 'print'. Did you mean print("******************")?

please help.

oot@raspberrypi:/home/pi# python2 x750ups.py

Traceback (most recent call last): File "x750ups.py", line 31, in <module> print "Voltage:%5.2fV" % readVoltage(bus) File "x750ups.py", line 11, in readVoltage read = bus.read_word_data(address, 2) IOError: [Errno 110] Connection timed out

and: sudo i2cdetect -y 1 0 1 2 3 4 5 6 7 8 9 a b c d e f 00: -- -- -- -- -- -- -- -- -- -- -- -- -- 10: -- -- -- -- -- -- -- -- -- -- -- -- -- -- -- -- 20: -- -- -- -- -- -- -- -- -- -- -- -- -- -- -- -- 30: -- -- -- -- -- -- -- -- -- -- -- -- -- -- -- -- 40: -- -- -- -- -- -- -- -- -- -- -- -- -- -- -- -- 50: -- -- -- -- -- -- -- -- -- -- -- -- -- -- -- -- 60: -- -- -- -- -- -- -- -- -- -- -- -- -- -- -- -- 70: -- -- -- -- -- -- -- --

is the gpio port defect?


of course following is set in config.txt: dtparam=i2c_arm=on dtparam=i2c1=on


i2c activated in raspi-conf

lsmod |grep i2c i2c_bcm2835 16384 0 i2c_bcm2708 16384 0

i2c_dev 20480 0

Anonymous user #22

46 months ago
Score 0++
Got the same issue after reinstall. It worked at first though, but after installing a couple of things this error comes again.

Anonymous user #22

46 months ago
Score 0++
Please help me on this issue, still not working

Anonymous user #20

46 months ago
Score 0++
What is the casing for X750? Is it compatible with casing X857-C1?

Cindy

46 months ago
Score 0++

Hi friend,

Really sorry, there is no design case for X750, also X750 is not compatible with the X857-C1 case, please understand.

Anonymous user #19

47 months ago
Score 0++

I've been playing with random registers on the i2c-1 0x36 address and I have discovered that channel 0x14 seems to behave like a sort of power consumption meter, can anyone verify this?

While pulling around 7amps with 4 batteries, this addition to the x750ups.py script works perfectly and seems very accurate! (ymmv depending on battery quantity/quality/health and amperage you are pulling, you may need to play with the values):

def readStatus(bus):

address = 0x36 read = bus.read_word_data(address, 0x14) return struct.unpack("<H", struct.pack(">H", read))[0]

  1. ...

while True:

status = readStatus(bus)

  1. ...

print "Status:%6i" % status

  1. ...

if status < 512:

print "USB Power Connected 2A Charging"

elif status < 1024:

print "AC Power Connected 3A Charging"

Anonymous user #21

46 months ago
Score 0++
Awesome finding! Looks like it is working like you wrote. Now I can show a corresponding icon in the display and/or add a LED as charging indicator.

Anonymous user #18

50 months ago
Score 0++
The instructions say "Supports safe shutdown and full poweroff through software", but if I shut it down via Logout -> Shutdown the board itself won't turn off, just the Raspberry. Do i have to shut it down using x750off?

PatrickLille

52 months ago
Score 0++
Can we use software power off when using latching switch? What happens exactly when we latch off (immediately stops or safe power off? Can we launch a x750off script when latching off?)

Anonymous user #17

54 months ago
Score 0++
Will the X750-A2 power up & work if there are no batteries X750, But I have 12 batteries in the 3 A-2 boards?

Anonymous user #19

47 months ago
Score 0++

Can confirm you do not need any batteries physically connected to the x750 if you have batteries attached via the BATT input. If you are wiring the batteries yourself (save yourself the extra $25) you need to wire them in parallel. Might be smart to use protected batteries if you're wiring yourself.

I removed the battery slots on the x750 completely since space very limited and couldn't find the x708 anywhere and everything works flawlessly.

Anonymous user #15

54 months ago
Score 1++
I want to use a latching switch with the X750. Which one is the correct jumper position? The inner one (it's not that clear to me)? I tried to put a jumper to that inner jumper pins and placed a latching switch at pin 1 and 2 of the "External PWR switch". But the X750 doesn't power up if I switch the latch on. Did I something wrong?

Hansenw

56 months ago
Score 0++
I am charging the X750 and it is at 4.25v and 106%. What is the max charging voltage before I should be concerned?

Harry

56 months ago
Score 0++

Hi,bill. Please refer to File:IP5310-datasheet-en.pdf Page 6, '9. Electrical Characteristics' section. 'CV

charge voltage', MIN:4.21, TYP:4.24,MAX:4.27, that data is normal from you.

Anonymous user #16

54 months ago
Score 0++

Is there a way to manage power with some code instead of a switch to manage power? For example, Is there any way to safely shut down the Raspberry Pi when the power supply is interrupted?

How can I do this?

Anonymous user #19

47 months ago
Score 0++

In response to anon #16:

From my limited testing, it appears you can infact do this by reading the value of channel 0x14 on address 0x36 and testing if it close to 65535 (max unsigned 16bit int), testing > 60000 should more than suffice, my values while AC is connected never exceed 1000.

Refer to my previous comment for details

Hansenw

56 months ago
Score 0++
Anonymous user #13 is Bill

Anonymous user #13

56 months ago
Score 0++
I have just finished connecting the X750 to my Raspberry PI 4B and charging the batteries. (via the micro usb on the X750). The script to obtain the battery voltage and % capacity seemed to work fine. However at 100% the battery voltage was 4.24 v and the capacity continued to climb. I stopped it at 102%. Is this an approx. value and this is ok or do I have a problem. Also can I monitor the voltage going to the PI

Anonymous user #12

57 months ago
Score 0++

I think this is a problem:

Voltage: 4.23V Battery: 105%

Anonymous user #11

58 months ago
Score 0++
Your support email (support at geekworm.com) is rejecting email...

Abby

56 months ago
Score 0++

Hi friend, We receive emails from customers every day Could you please try again?

Regards,

Geekworm Team

Anonymous user #11

58 months ago
Score 0++

What is the pinout for the PWR Switch?

I want to start the board from an external button; please provide details.

Admin

57 months ago
Score 0++
Hi, please refer to here: http://www.r...Power_Switch

Anonymous user #14

56 months ago
Score 0++
Are you sure that PH2.0 connector power switch connector specification link you provided is correct? I metered out the connections and found the switch was on pin 3, not pin 1 as per your specification, can you check and confirm you connections please.

Cindy

56 months ago
Score 0++
Hi, it is right, we just check again and do some update about the photo, please check: https://www....pecification

Anonymous user #10

58 months ago
Score 0++

What are the 5V OUT capacities? FWIW, my application needs about 1.5A at 5V for peripherals to the RPi.

I presume that the USB ports are limited to 0.5A each, but what about the XH2.54 output connectors?

Admin

57 months ago
Score 0++

Hi, All 5v output connectors are connected together and they can deliver total 8A output. Best regards,

Cindy/Geekworm

Anonymous user #9

58 months ago
Score 0++
Can you give more details on the PH2.0 4-pin External PWR Switch connector please. What is the recommend wire to use this. Where is the information and description of the function of each of the pins?

Admin

57 months ago
Score 0++
Hi, please refer to here: http://www.r...Power_Switch

Anonymous user #9

58 months ago
Score 0++
What is the pin out for the Socket mark PWR SW?

Admin

57 months ago
Score 0++
Hi, please refer to here: http://www.r...Power_Switch

Anonymous user #8

59 months ago
Score 0++
Guys, would you please advise which ports needs to be connected between X750 & X750-A2 between 2 X750-A2. The picture is taken from an angle that does not allow the lateral sockets to be identified (in/out)

Admin

59 months ago
Score 0++

Hi friend,

We have updated the picture. Please refer to the 5th picture on the right of this page.

Anonymous user #7

59 months ago
Score 0++
Hi, I bought a x750. What is the meaning of the jumper? Auto-On? L-SW? Please can someone explain the function to me? Thank you

Anonymous user #6

59 months ago
Score 0++
Can anyone tell me how to implement this script? do I need to mv it to bin?

Anonymous user #5

60 months ago
Score 0++
Unknowingly, I ran my x750 & pi with a poor micro USB power supply plugged into the x750 overnight following some initial testing.Now the script is showing the voltage go up to an acceptable range (3.4v), but the issue is the capacity reading from the scrip is still showing 0% capacity, and the first battery indicator light is blinking still on the board. I removed all the power (the proper charger now plugged into the dc jack and batteries) and re-installed all of them, and the problem persists . Any thoughts?

Anonymous user #4

60 months ago
Score 0++
The x750ups.py script does provide a model for monitoring battery level, assuming it is accurate. Mine shows voltage at only 4.17v with eight batteries, but that might be the protection circuit causing a low reading. The charge level is shown as 98%. There is a test in the script for battery below 20%, so similar code might be used to shutdown the device.

Anonymous user #4

60 months ago
Score 0++
I notice the output format for the “date” command is different on my systems equipped with X750 and X735 boards. Is that a side effect of the GitHub software installation?

Anonymous user #4

60 months ago
Score 0++
The date difference seems Buster related, not X750 related.

Anonymous user #4

60 months ago
Score 0++
What is the issue with using 18650 batteries with the protection circuit? (" Do not use 18650 battery with built-in protection circuit") Is it that the board has the same circuit and the batteries won't work?

Anonymous user #3

61 months ago
Score 0++
Is there a chance that a STEP model can be released for the board?

Admin

60 months ago
Score 0++
Hi, there is no plan right now, please pay attention to geekworm.com, thanks!

Anonymous user #2

61 months ago
Score 0++

installed X750 hat on raspberri pi, installed new 18650 battery's powering via usb on X750 everything seems working ok, after loading batterys to full ( all four leds green lights up) the raspberry pi shuts down, whats going wrong??

have the same problems with unprotected as with protected new battery's 18650

Anonymous user #1

63 months ago
Score 0++

Just fyi,

Confirmed with seller that this does not have a low voltage cutoff. This will throw the devices attached to a boot loop. I just hope that this has low voltage battery protection to not destroy the battery.