Open main menu

AMPi
AMPi
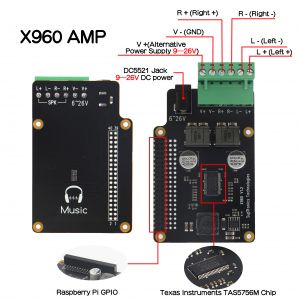
X960 AMP interface
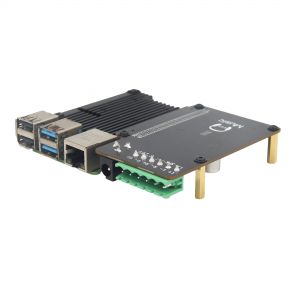
AMPi internal view
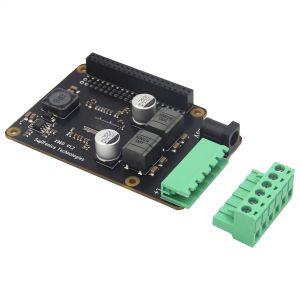
X960 AMP
AMPi

Contents

Overview

Geekworm AMPi is an ultra-thin desktop AMP kit based on Raspberry Pi 4, which is ideal to use in Raspberry Pi-based hi-fi systems. It composed of three parts: X960 AMP board, cooling system ( P165-B aluminum heatsink), and a NUC style aluminum case. Just simply assemble them with the Raspberry Pi 4 motherboard.

  • X960 V1.2 expansion board can turn your Raspberry Pi 4 into a ready-to-play high resolution network music player.
  • The case is made of all aluminum alloy, surface anodizing treatment.
  • Considering that the active cooling fan will interfere with the sound quality, we only use P165-B heatsink, which can provide enough heat dissipation if there is no overclocking. But P165-B may be a slight impact on WIFI,you can remove the heatsink also.

Features

  • Model: AMPi
  • Compatible with Raspberry Pi 4 Model B
  • NUC style aluminum alloy case
  • High resolution network music player
  • Use high quality TAS5756M chip
  • Full high definition 24-bit 192kHz Texas Instruments TAS5756M digital audio codec
  • Input power: 9–26V

For use with

Raspberry Pi 4 Model B Only
(X960 is compatible with Raspberry pi 3 also, but both AMPi case and P165-B are not compatible with Pi 3)

How to power

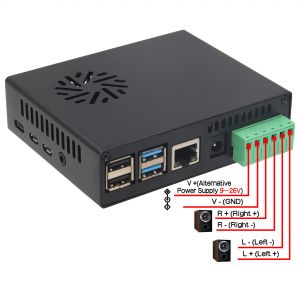
  • Powered by an external 9–26V DC power supply(via X960 DC Jack)

Recommended to use Geekworm 12V max.5A 60W power adapter PSU60

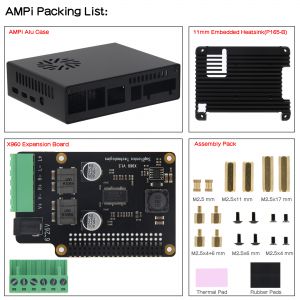
Packing List

  • 1x AMPi Aluminum Alloy Case
  • 1x X960 V1.2 AMP Expansion Board
  • 1x P165-B Heatsink
  • 1x screws pack

User Manual

The X960 use the same chip with Raspberry Pi DigiAMP+, about the software you can also refer to Raspberry Pi DigiAMP+.
Installation Guide

Installation Steps


FAQ

Add your comment
Geekworm Wiki welcomes all comments. If you do not want to be anonymous, register or log in. It is free.


Anonymous user #2

4 months ago
Score 0  
The card is not detected ... no sound... ho help available ....
 

Lisa

4 months ago
Score 0  
Hello, please refer to X950_software and set it.If your problem is not solved, please contact us by email (info@geekworm.com)and tell us more details: order number, operating OS, screenshots of executed commands, installation pictures or videos.
 

Anonymous user #2

3 months ago
Score 0  

Done this. aplay -l shows

card 1: IQaudIODAC [IQaudIODAC], device 0: IQaudIO DAC HiFi pcm512x-hifi-0 [IQaudIO DAC HiFi pcm512x-hifi-0] Subdevices: 1/1 Subdevice #0: subdevice #0

However, there are no sound through that device
 

Anonymous user #1

13 months ago
Score 0  
These are the most difficult to figure out and least intuitive instructions I have seen. First there are more parts then you need so you can get confused as to which part goes where. Second, there are not enough pictures to show the screw and spacer locations on the bottom of the board. Third, how about an installation video. I had to go to Amazon and watch a video about another board and case installation to try and figure some things out. I was expecting some pictures of the bottom and screws used. None there. Had to guess. Hope I have it right. Also, how about a legend outside the case for hooking up the speaker wires. Should I just guess once the board is in the case? Seriously, I have built many DIY kits but instructions are usually included. This is a joke. Videos, full pictures, legends....where????
 

Walker

13 months ago
Score 0  
Hello, we are sorry that there is currently no installation video for this AMPi. Have you seen the installation guide image? Are there any areas where we cannot describe clearly? We will continue to improve
 

Walker

13 months ago
Score 0  

Sorry for the unclear description. We have made modifications to the image. Please refer to the following figure for the speaker connection settings