-
X306: Difference between revisions
| (18 intermediate revisions by 4 users not shown) | |||
| Line 22: | Line 22: | ||
==Updated== | ==Updated== | ||
X306 is updated to | X306 is updated to {{Red|V1.5 version}} on August 21st 2025: A higher-quality 18650 battery holder is used, making battery installation and removal easier and more robust. | ||
X306 is updated to V1.3 on May 28th, 2024. | X306 is updated to V1.3 on May 28th, 2024. | ||
| Line 31: | Line 31: | ||
* Removed 4-pin header for external power swtich and always-on power option(Users have less need for this. Can can solder it yourself if needed) | * Removed 4-pin header for external power swtich and always-on power option(Users have less need for this. Can can solder it yourself if needed) | ||
* Smaller size, simplified use | * Smaller size, simplified use | ||
[[File:X306 | [[File:X306 IMG 8223 compare.jpg|700px|X306]] | ||
: | {| class="wikitable mw-collapsible mw-collapsed" | ||
! colspan="2" | <span style="font-size:1.2em; font-weight:bold; color:#2c3e50;"> X306 V1.3/V1.5 4-pin Header Interface (AL ON & PSW GND) Guide</span> | |||
|- | |||
| <div style="padding: 15px; background-color: #f8f9fa;"> | |||
The V1.3 & V1.5 version has a 4-pin reserved interface (AL ON & PSW GND) that can be used for the following functions: | |||
<span style="color: #c0392b; font-weight: bold;">⚠️ To use these expansion functions, you will need to prepare your own soldering tools, 4-pin header, jumper cap, and 2-pin momentary switch. These items are not included in the X306 package.</span> | |||
'''🔧 Preparation''' | |||
* Solder a 4-pin header to the reserved interface of X306. | |||
* If you don't need these functions, just use the board as is — no action required. | |||
: | [[File:X306 IMG 6998.JPG|700px|X306]] | ||
: | '''🔘 Function 1: AL & ON - Power Always On''' | ||
* '''Short''': Power always on, power button disabled. | |||
* '''Open''': Power button Press to switch on, Hold 3 seconds to switch off. | |||
'''🔘 Function 2: PSW & GND - External Power Switch''' | |||
* '''How to connect''': Prepare a momentary push switch and connect it '''between''' the GND and PSW pins. | |||
* '''Effect''': Same function as onboard Button. | |||
* '''⚠️ Note''': PSW GND are the two connection points for the switch. '''Do not short them directly.''' | |||
</div> | |||
|} | |||
==Overview== | ==Overview== | ||
| Line 55: | Line 73: | ||
* Integrated battery reverse polarity protection circuit | * Integrated battery reverse polarity protection circuit | ||
* Integrated over current protection and over voltage protection | * Integrated over current protection and over voltage protection | ||
* Intelligent automatic charging and discharging | * Intelligent automatic charging and discharging. '''When the battery discharges to 2.4V, the built-in protection chip will cut off the battery connection''' | ||
* 4 blue LEDs indicate battery charging and discharging levels of 25%, 50% , 75% and 100% | * 4 blue LEDs indicate battery charging and discharging levels of 25%, 50% , 75% and 100% | ||
* Red & green LEDs show the status of power on/off and charging status | * Red & green LEDs show the status of power on/off and charging status | ||
| Line 106: | Line 124: | ||
==Matching Case== | ==Matching Case== | ||
The Geekworm X306-C1 is a premium metal case specifically designed for use with the Raspberry Pi Zero 2W and Geekworm X306 V1.3 UPS board. Crafted with precision and durability in mind, this case provides a sleek and protective housing for your Raspberry Pi Zero 2W project. | The Geekworm X306-C1 is a premium metal case specifically designed for use with the Raspberry Pi Zero 2W and Geekworm X306 V1.3 / V1.5 UPS board. Crafted with precision and durability in mind, this case provides a sleek and protective housing for your Raspberry Pi Zero 2W project. | ||
[[File: X306-C1-IMG-9736-Packing-List.jpg|500px]] | [[File: X306-C1-IMG-9736-Packing-List.jpg|500px]] | ||
| Line 194: | Line 212: | ||
"PWR SW" enable, "AL ON" will be disable. | "PWR SW" enable, "AL ON" will be disable. | ||
==FAQ== | ==FAQ== | ||
| Line 259: | Line 251: | ||
</div> | </div> | ||
<div class="mw-collapsible-content"> | <div class="mw-collapsible-content"> | ||
A: There is a feedback from buyers that solved this problem. Please refer to go to:[[X306#comment- | A: There is a feedback from buyers that solved this problem. Please refer to go to:[[X306#cs-comment-8940]] | ||
in config.txt comment out: dtoverlay=dwc2 | in config.txt comment out: dtoverlay=dwc2 | ||
| Line 271: | Line 263: | ||
</div> | </div> | ||
<!--Add review function! --> | <!--Add review function! --> | ||
< | |||
<comment-streams id="main" /> | |||
[[Category:Product Manual]] | [[Category:Product Manual]] | ||
[[Category:Raspberry pi]] | [[Category:Raspberry pi]] | ||
Latest revision as of 17:36, 27 May 2026


Safety Instructions & Warnings
- The power adapter must with overvoltage and surge voltage protection; otherwise, it may easily damage the circuit board. Damage caused by a substandard power supply will not be covered under warranty.
- It is essential to read and understand these safety instructions and warnings before charging your batteries.
- Lithium Polymer and Li-ion batteries are volatile. Failure to read and follow the instructions below may result in fire, personal injury, and damage to property if charged or used improperly.
- Never make a wrong polarity connection when charging or discharging battery packs. Always double-check the polarity of the battery's connector to ensure that "+" is connected to "+" and "-" is connected to "-".
- Do not mix and use old batteries with new batteries, or batteries with different brand names.
- Lithium batteries have a limited cycle life. Please replace old batteries with new ones when they reach their service life or when they are two years old, whichever comes first.
- When charging the Battery Pack, please place the battery in a fireproof container. Do not leave the UPS shield on wood material or carpet unattended.
- Keep the UPS shield away from children to ensure their safety.
- Ensure your fingers do not touch the solder pads when inserting the battery into the battery holder, as this could cause a short circuit. This is extremely important!!!
- Make sure to insert the battery before turning on the UPS.
- Make sure to insert the battery before connecting the external charger to charge it.
- Please watch Main Video and Tutorial Video regarding 18650 batteries at: https://www.staysafebattery.com/en/
- Battery Recommend for Geekworm UPS board, please refer to: File:NCR18650B.pdf
Updated
X306 is updated to V1.5 version on August 21st 2025: A higher-quality 18650 battery holder is used, making battery installation and removal easier and more robust.
X306 is updated to V1.3 on May 28th, 2024.
Please check the information on the page on the sales platform to confirm the version you will get.
- Only compatible with Raspberry Pi Zero 2W now
- Removed 3 standard USB-A 2.0 ports (Users have less need for this. Can directly use OTG port on the Raspberry Pi motherboard)
- Removed 4-pin header for external power swtich and always-on power option(Users have less need for this. Can can solder it yourself if needed)
- Smaller size, simplified use

| X306 V1.3/V1.5 4-pin Header Interface (AL ON & PSW GND) Guide | |
|---|---|
The V1.3 & V1.5 version has a 4-pin reserved interface (AL ON & PSW GND) that can be used for the following functions: ⚠️ To use these expansion functions, you will need to prepare your own soldering tools, 4-pin header, jumper cap, and 2-pin momentary switch. These items are not included in the X306 package. 🔧 Preparation
🔘 Function 1: AL & ON - Power Always On
🔘 Function 2: PSW & GND - External Power Switch
| |

Overview
X306 is an ultra-thin one cell 18650 UPS shield designed for Raspberry Pi Zero 2W.
Features
| Key Features |
|
|---|---|
| Specification |
|
| Notes |
|
How to Power
Power Input: 5.1Vdc +/-5% , ≥3A (Power Via USB Type-C port of X306 NOT Pi zero 2W)

How to Cool
Aluminum Heatsink for raspberry pi zero 2 w, please refer to C296

Packing List
- 1 x X306 18650 UPS Shield
- 4 x M2.5 x 5mm Screws
-
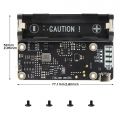 X306 V1.5 Packing List
 -
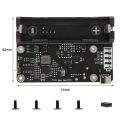 X306 V1.3 Packing List
 -
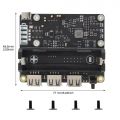 X306 V1.1 Packing List


Matching Case
The Geekworm X306-C1 is a premium metal case specifically designed for use with the Raspberry Pi Zero 2W and Geekworm X306 V1.3 / V1.5 UPS board. Crafted with precision and durability in mind, this case provides a sleek and protective housing for your Raspberry Pi Zero 2W project.

Test of the impact of the casing on WiFi signals
It should be noted that the metal shell will have a certain shielding effect on WiFi, and the farther the device is from the router, the greater the effect will be.
We tested the effect of metal casing on Wi-Fi signal, and the results are as follows:
Test Result:
| With X306-C1 metal case | Without X306-C1 metal case |
|---|---|
| 2025-07-31 12:49:34: signal: -49 dBm | 2025-07-31 14:39:41: signal: -48 dBm |
| 2025-07-31 12:50:04: signal: -50 dBm | 2025-07-31 14:40:11: signal: -42 dBm |
| 2025-07-31 12:50:34: signal: -48 dBm | 2025-07-31 14:40:41: signal: -42 dBm |
| 2025-07-31 12:51:04: signal: -49 dBm | 2025-07-31 14:41:11: signal: -42 dBm |
| 2025-07-31 12:51:34: signal: -51 dBm | 2025-07-31 14:41:41: signal: -45 dBm |
| 2025-07-31 12:52:04: signal: -48 dBm | 2025-07-31 14:42:11: signal: -42 dBm |
| 2025-07-31 12:52:34: signal: -49 dBm | 2025-07-31 14:42:41: signal: -41 dBm |
| 2025-07-31 12:53:04: signal: -49 dBm | 2025-07-31 14:43:12: signal: -42 dBm |
| 2025-07-31 12:53:34: signal: -48 dBm | 2025-07-31 14:43:42: signal: -43 dBm |
| 2025-07-31 12:54:04: signal: -48 dBm | 2025-07-31 14:44:12: signal: -47 dBm |
WiFi signal strength reference range
-30 dBm to -60 dBm: Very strong signal (close to the router).
-60 dBm to -70 dBm: Good signal (suitable for daily use).
-70 dBm to -85 dBm: Weak signal (may affect speed or stability).
<-85 dBm: Extremely poor signal (difficult to connect or frequently disconnects).
Test subjects: X306-C1 metal case
Test Method: We flashed the Raspberry Pi OS Legacy (6 May 2025) version and used the script File:Wifi-signal-monitor.zip (download and unzip it) to obtain the WiFi signal strength with and without the X306-C1 metal case.
Other notes: The Raspberry Pi Zero 2W motherboard is about 3.5 meters away from the router, with no obstructions in between. Use the script wifi_signal_monitor.sh to test
2.4GHz or 5GHz frequency band :Since the Raspberry Pi Zero 2W only supports the 2.4GHz IEEE 802.11b/g/n WiFi band, you can only access 2.4GHz SSID hotspots.
Based on the above test results, we can draw a conclusion: X306-C1 can meet the needs of devices using 2.4GHz Wi-Fi when close to the router, which should be attributed to the larger heat dissipation hole design on the surface of the X306-C1 shell.
User Manual
X306 V1.x Dimension Source File
- X306 V1.5 Dimensions source file (DXF): File:X306-pcb-V1.5.dxf - You can view it with Autodesk Viewer online
- X306 V1.3 Dimensions source file (DXF): File:X306-pcb-v1.3.dxf - You can view it with Autodesk Viewer online
- X306 V1.1 Dimensions source file (DXF): File:X306V1.1.dxf - You can view it with Autodesk Viewer online
Installation Guide
For X306 V1.3 and V1.5
Installation Video for X306 V1.3/V1.5: https://youtu.be/98fGopGILyQ
X306 V1.1 4Pin header function description

4 Pin header function description:
| Pin | Function |
|---|---|
| AL ON: Pin 1&2 | Short: Power always on, power button disabled; |
| AL ON: Pin 1&2 | Open: Power button Press to switch on, Hold 3 seconds to switch off |
| PWR SW: Pin 3&4 | for external 2-pin momentary switch |
"AL ON" enable, "PWR SW" will be disable.
"PWR SW" enable, "AL ON" will be disable.
FAQ
Q1. What 18650 battery is recommended?
A: 3.7V flat top 18650 battery is required. 18650 battery dimension is as follow
Please use high quality batteries from Samsung 35E 18650 lithium battery, Panasonic NCR18650B, Toshiba, etc. Do not use the battery with built-in protection circuit because it will limit the discharge current.
Q2. What is the power output for each usb port of X306 V1.1 Version?
A: It is 5V, all ports share 4A, not limited to 500mA.
Q3. Is there any way I can check from the raspberry pi if it's connected to the power or the battery from the UPS?
A: When connected to the power supply to X306, the power supply supplies power to the Raspberry Pi; remove the power supply, it is powered by the battery.
Q4. No data on the usb ports?
A: There is a feedback from buyers that solved this problem. Please refer to go to:X306#cs-comment-8940
in config.txt comment out: dtoverlay=dwc2
and in cmdline.txt remove: modules-load=dwc2,g_ether
reboot and it works!