Difference between revisions of "X306"
| (46 intermediate revisions by 3 users not shown) | |||
| Line 1: | Line 1: | ||
{{GD Template Impl}} | {{GD Template Impl}} | ||
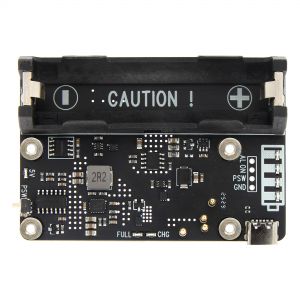
| + | [[File:X306 V1.5-IMG-9825.jpg|thumb|right|X306 V1.5 Front View]] | ||
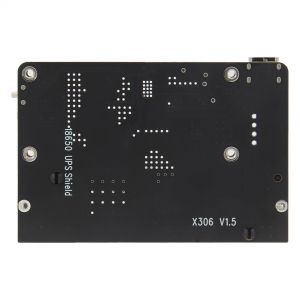
| + | [[File:X306 V1.5-IMG-9826.jpg|thumb|right|X306 V1.5 Rear View]] | ||
[[File:X306-V1.3-IMG-8230-interface.jpg|thumb|right|X306 V1.3 UPS Shield for Pi zero 2W]] | [[File:X306-V1.3-IMG-8230-interface.jpg|thumb|right|X306 V1.3 UPS Shield for Pi zero 2W]] | ||
| + | [[File:X306-V1.3-IMG-8231-pogo.jpg|thumb|right|Pogo Pins of X306 V1.3]] | ||
| + | [[File:X306-V1.3-IMG-8232-Overview.jpg|thumb|right|X306 V1.3]] | ||
[[File:IMG-4345.jpg|thumb|right|X306 UPS Shield for Pi zero W/2W]] | [[File:IMG-4345.jpg|thumb|right|X306 UPS Shield for Pi zero W/2W]] | ||
[[File:IMG-4354.jpg|thumb|right|X306 UPS Shield for Pi zero W/2W + C296]] | [[File:IMG-4354.jpg|thumb|right|X306 UPS Shield for Pi zero W/2W + C296]] | ||
| + | <!-- | ||
[[File:X306-IMG-4556.jpg|thumb|right|X306 V1.1]] | [[File:X306-IMG-4556.jpg|thumb|right|X306 V1.1]] | ||
[[File:IMG-4294.jpg|thumb|right|X306 V1.1 UPS Shield for Pi zero W/2W]] | [[File:IMG-4294.jpg|thumb|right|X306 V1.1 UPS Shield for Pi zero W/2W]] | ||
| + | [[File:IMG-4301.jpg|thumb|right|X306 V1.1 UPS Shield for Pi zero W/2W - Rear View]] | ||
| + | --> | ||
[[File:X306-IMG-4300-acce-size-1.jpg|thumb|right|X306 V1.1 UPS Shield Packing List]] | [[File:X306-IMG-4300-acce-size-1.jpg|thumb|right|X306 V1.1 UPS Shield Packing List]] | ||
| − | [[File:IMG- | + | [[File:X306-C1-IMG-9742.jpg|thumb|right|X306-C1 metal case for V1.3 / V1.5, NOT V1.1]] |
| + | [[File:X306-C1-IMG-9745-interface.jpg|thumb|right|Interface diagram of X306-C1 metal case]] | ||
| + | [[File:X306-C1-IMG-9759-Install-Guide.jpg|thumb|right|X306-C1 metal case installation guide]] | ||
| + | ==Updated== | ||
| + | X306 is updated to <span class="tb_red">V1.5 version</span> on August 21st 2025: A higher-quality 18650 battery holder is used, making battery installation and removal easier and more robust. | ||
| − | + | X306 is updated to V1.3 on May 28th, 2024. | |
| − | X306 is | ||
Please check the information on the page on the sales platform to confirm the version you will get. | Please check the information on the page on the sales platform to confirm the version you will get. | ||
| Line 17: | Line 27: | ||
* Removed 4-pin header for external power swtich and always-on power option(Users have less need for this. Can can solder it yourself if needed) | * Removed 4-pin header for external power swtich and always-on power option(Users have less need for this. Can can solder it yourself if needed) | ||
* Smaller size, simplified use | * Smaller size, simplified use | ||
| + | [[File:X306-V1.5-IMG-8223-compare.jpg|700px|X306]] | ||
[[File: X306-V1.3-IMG-8223-compare.jpg|700px]] | [[File: X306-V1.3-IMG-8223-compare.jpg|700px]] | ||
| Line 43: | Line 54: | ||
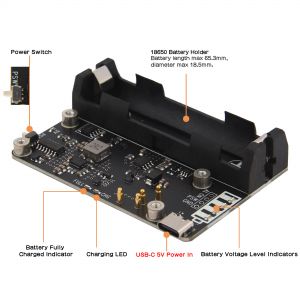
* 4 blue LEDs indicate battery charging and discharging levels of 25%, 50% , 75% and 100% | * 4 blue LEDs indicate battery charging and discharging levels of 25%, 50% , 75% and 100% | ||
* Red & green LEDs show the status of power on/off and charging status | * Red & green LEDs show the status of power on/off and charging status | ||
| − | * On-board push button to control power on /off (Press-ON, Hold the button pressed at least 3s -OFF) | + | * On-board push button to control power on /off (<span class="tb_red">'''Press-ON, Hold the button pressed at least 3s -OFF'''</span>) |
* Ultra-low standby power consumption of μA to maximize battery life | * Ultra-low standby power consumption of μA to maximize battery life | ||
* Advanced system power path management avoids frequent charging and extend battery life | * Advanced system power path management avoids frequent charging and extend battery life | ||
| Line 65: | Line 76: | ||
* <span class="tb_red">When use with X306 '''V1.1''', '''DO NOT''' connect any device to the Micro USB OTG port of Raspberry Pi Zero 2W</span>, or the USB2.0 ports of X306 is not available to use. | * <span class="tb_red">When use with X306 '''V1.1''', '''DO NOT''' connect any device to the Micro USB OTG port of Raspberry Pi Zero 2W</span>, or the USB2.0 ports of X306 is not available to use. | ||
|} | |} | ||
| + | |||
| + | <!-- | ||
| + | X306 battery holder material | ||
| + | Base Material:Heat Resistance Nyon 25% G/F or Equivalent,Black Color | ||
| + | Contacts:0.3mm Spring Steel Temper, Nickel Plated | ||
| + | --> | ||
==How to Power== | ==How to Power== | ||
| Line 78: | Line 95: | ||
* 1 x X306 18650 UPS Shield | * 1 x X306 18650 UPS Shield | ||
* 4 x M2.5 x 5mm Screws | * 4 x M2.5 x 5mm Screws | ||
| − | + | <gallery> | |
| + | File:X306-V1.5-IMG-8223-Packing List-1.jpg|X306 V1.5 Packing List | ||
| + | X306-V1.3-IMG-8223-Packing-List-2.jpg |X306 V1.3 Packing List | ||
| + | X306-IMG-4300-acce-size-1.jpg|X306 V1.1 Packing List | ||
| + | </gallery> | ||
| + | |||
| + | ==Matching Case== | ||
| + | The Geekworm X306-C1 is a premium metal case specifically designed for use with the Raspberry Pi Zero 2W and Geekworm X306 V1.3 UPS board. Crafted with precision and durability in mind, this case provides a sleek and protective housing for your Raspberry Pi Zero 2W project. | ||
| + | |||
| + | [[File: X306-C1-IMG-9736-Packing-List.jpg|500px]] | ||
| + | |||
| + | ===Test of the impact of the casing on WiFi signals=== | ||
| + | It should be noted that the metal shell will have a certain shielding effect on WiFi, and the farther the device is from the router, the greater the effect will be. | ||
| + | |||
| + | We tested the effect of metal casing on Wi-Fi signal, and the results are as follows: | ||
| + | |||
| + | '''Test Result:''' | ||
| + | {| class="wikitable" | ||
| + | ! With X306-C1 metal case !! Without X306-C1 metal case | ||
| + | |- | ||
| + | | 2025-07-31 12:49:34: signal: -49 dBm || 2025-07-31 14:39:41: signal: -48 dBm | ||
| + | |- | ||
| + | | 2025-07-31 12:50:04: signal: -50 dBm || 2025-07-31 14:40:11: signal: -42 dBm | ||
| + | |- | ||
| + | | 2025-07-31 12:50:34: signal: -48 dBm || 2025-07-31 14:40:41: signal: -42 dBm | ||
| + | |- | ||
| + | | 2025-07-31 12:51:04: signal: -49 dBm || 2025-07-31 14:41:11: signal: -42 dBm | ||
| + | |- | ||
| + | | 2025-07-31 12:51:34: signal: -51 dBm || 2025-07-31 14:41:41: signal: -45 dBm | ||
| + | |- | ||
| + | | 2025-07-31 12:52:04: signal: -48 dBm || 2025-07-31 14:42:11: signal: -42 dBm | ||
| + | |- | ||
| + | | 2025-07-31 12:52:34: signal: -49 dBm || 2025-07-31 14:42:41: signal: -41 dBm | ||
| + | |- | ||
| + | | 2025-07-31 12:53:04: signal: -49 dBm || 2025-07-31 14:43:12: signal: -42 dBm | ||
| + | |- | ||
| + | | 2025-07-31 12:53:34: signal: -48 dBm || 2025-07-31 14:43:42: signal: -43 dBm | ||
| + | |- | ||
| + | | 2025-07-31 12:54:04: signal: -48 dBm || 2025-07-31 14:44:12: signal: -47 dBm | ||
| + | |} | ||
| + | '''WiFi signal strength reference range''' | ||
| + | |||
| + | -30 dBm to -60 dBm: Very strong signal (close to the router). | ||
| + | |||
| + | -60 dBm to -70 dBm: Good signal (suitable for daily use). | ||
| + | |||
| + | -70 dBm to -85 dBm: Weak signal (may affect speed or stability). | ||
| + | |||
| + | <-85 dBm: Extremely poor signal (difficult to connect or frequently disconnects). | ||
| + | |||
| + | '''Test subjects''': X306-C1 metal case | ||
| + | |||
| + | '''Test Method''': We flashed the Raspberry Pi OS Legacy (6 May 2025) version and used the script [[File:Wifi-signal-monitor.zip]] (download and unzip it) to obtain the WiFi signal strength with and without the X306-C1 metal case. | ||
| + | |||
| + | '''Other notes''': The Raspberry Pi Zero 2W motherboard is about 3.5 meters away from the router, with no obstructions in between. Use the script wifi_signal_monitor.sh to test | ||
| + | |||
| + | '''2.4GHz or 5GHz frequency band''' :Since the Raspberry Pi Zero 2W only supports the 2.4GHz IEEE 802.11b/g/n WiFi band, you can only access 2.4GHz SSID hotspots. | ||
| + | |||
| + | Based on the above test results, we can draw a conclusion: X306-C1 can meet the needs of devices using 2.4GHz Wi-Fi '''when close to the router''', which should be attributed to the larger heat dissipation hole design on the surface of the X306-C1 shell. | ||
==User Manual== | ==User Manual== | ||
| − | ===X306 V1. | + | ===X306 V1.x Dimension Source File=== |
| − | X306 '''V1. | + | * X306 '''V1.5''' Dimensions source file (DXF): [[File:X306-pcb-V1.5.dxf]] - You can view it with [https://viewer.autodesk.com/ Autodesk Viewer] online |
| + | * X306 '''V1.3''' Dimensions source file (DXF): [[File:X306-pcb-v1.3.dxf]] - You can view it with [https://viewer.autodesk.com/ Autodesk Viewer] online | ||
| + | * X306 '''V1.1''' Dimensions source file (DXF): [[File:X306V1.1.dxf]] - You can view it with [https://viewer.autodesk.com/ Autodesk Viewer] online | ||
| + | |||
| + | ===Installation Guide=== | ||
| + | '''For X306 V1.3 and V1.5''' | ||
| + | |||
| + | [[File:X306-C1-IMG-9759-Install-Guide.jpg|700px]] | ||
| + | |||
| + | Installation Video for X306 V1.3/V1.5: https://youtu.be/98fGopGILyQ | ||
| + | {{#ev:youtube|https://youtu.be/98fGopGILyQ}} | ||
===X306 V1.1 4Pin header function description=== | ===X306 V1.1 4Pin header function description=== | ||
Latest revision as of 09:19, 29 August 2025
Contents
Updated
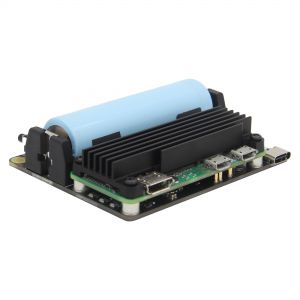
X306 is updated to V1.5 version on August 21st 2025: A higher-quality 18650 battery holder is used, making battery installation and removal easier and more robust.
X306 is updated to V1.3 on May 28th, 2024.
Please check the information on the page on the sales platform to confirm the version you will get.
- Only compatible with Raspberry Pi Zero 2W now
- Removed 3 standard USB-A 2.0 ports (Users have less need for this. Can directly use OTG port on the Raspberry Pi motherboard)
- Removed 4-pin header for external power swtich and always-on power option(Users have less need for this. Can can solder it yourself if needed)
- Smaller size, simplified use
- PS:
- 1. Shorting AL and ON will automatically power on
- 2. GND and PSW are pins for external reset/momentary switch
Overview
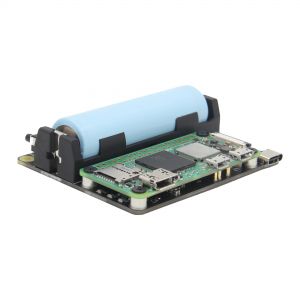
X306 is an ultra-thin one cell 18650 UPS shield designed for Raspberry Pi Zero 2W.
Features
| Key Features |
|
|---|---|
| Specification |
|
| Notes |
|
How to Power
Power Input: 5.1Vdc +/-5% , ≥3A (Power Via USB Type-C port of X306 NOT Pi zero 2W)
How to Cool
Aluminum Heatsink for raspberry pi zero 2 w, please refer to C296
Packing List
- 1 x X306 18650 UPS Shield
- 4 x M2.5 x 5mm Screws
Matching Case
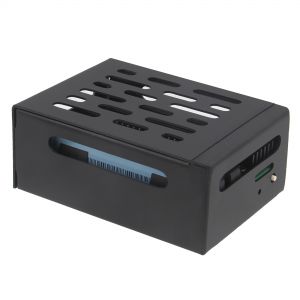
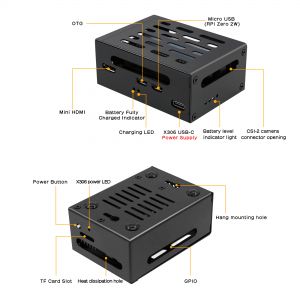
The Geekworm X306-C1 is a premium metal case specifically designed for use with the Raspberry Pi Zero 2W and Geekworm X306 V1.3 UPS board. Crafted with precision and durability in mind, this case provides a sleek and protective housing for your Raspberry Pi Zero 2W project.
Test of the impact of the casing on WiFi signals
It should be noted that the metal shell will have a certain shielding effect on WiFi, and the farther the device is from the router, the greater the effect will be.
We tested the effect of metal casing on Wi-Fi signal, and the results are as follows:
Test Result:
| With X306-C1 metal case | Without X306-C1 metal case |
|---|---|
| 2025-07-31 12:49:34: signal: -49 dBm | 2025-07-31 14:39:41: signal: -48 dBm |
| 2025-07-31 12:50:04: signal: -50 dBm | 2025-07-31 14:40:11: signal: -42 dBm |
| 2025-07-31 12:50:34: signal: -48 dBm | 2025-07-31 14:40:41: signal: -42 dBm |
| 2025-07-31 12:51:04: signal: -49 dBm | 2025-07-31 14:41:11: signal: -42 dBm |
| 2025-07-31 12:51:34: signal: -51 dBm | 2025-07-31 14:41:41: signal: -45 dBm |
| 2025-07-31 12:52:04: signal: -48 dBm | 2025-07-31 14:42:11: signal: -42 dBm |
| 2025-07-31 12:52:34: signal: -49 dBm | 2025-07-31 14:42:41: signal: -41 dBm |
| 2025-07-31 12:53:04: signal: -49 dBm | 2025-07-31 14:43:12: signal: -42 dBm |
| 2025-07-31 12:53:34: signal: -48 dBm | 2025-07-31 14:43:42: signal: -43 dBm |
| 2025-07-31 12:54:04: signal: -48 dBm | 2025-07-31 14:44:12: signal: -47 dBm |
WiFi signal strength reference range
-30 dBm to -60 dBm: Very strong signal (close to the router).
-60 dBm to -70 dBm: Good signal (suitable for daily use).
-70 dBm to -85 dBm: Weak signal (may affect speed or stability).
<-85 dBm: Extremely poor signal (difficult to connect or frequently disconnects).
Test subjects: X306-C1 metal case
Test Method: We flashed the Raspberry Pi OS Legacy (6 May 2025) version and used the script File:Wifi-signal-monitor.zip (download and unzip it) to obtain the WiFi signal strength with and without the X306-C1 metal case.
Other notes: The Raspberry Pi Zero 2W motherboard is about 3.5 meters away from the router, with no obstructions in between. Use the script wifi_signal_monitor.sh to test
2.4GHz or 5GHz frequency band :Since the Raspberry Pi Zero 2W only supports the 2.4GHz IEEE 802.11b/g/n WiFi band, you can only access 2.4GHz SSID hotspots.
Based on the above test results, we can draw a conclusion: X306-C1 can meet the needs of devices using 2.4GHz Wi-Fi when close to the router, which should be attributed to the larger heat dissipation hole design on the surface of the X306-C1 shell.
User Manual
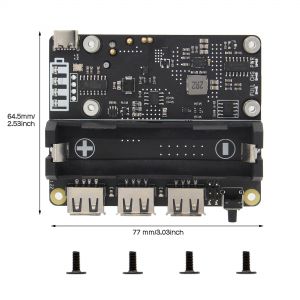
X306 V1.x Dimension Source File
- X306 V1.5 Dimensions source file (DXF): File:X306-pcb-V1.5.dxf - You can view it with Autodesk Viewer online
- X306 V1.3 Dimensions source file (DXF): File:X306-pcb-v1.3.dxf - You can view it with Autodesk Viewer online
- X306 V1.1 Dimensions source file (DXF): File:X306V1.1.dxf - You can view it with Autodesk Viewer online
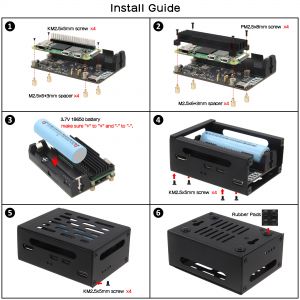
Installation Guide
For X306 V1.3 and V1.5
Installation Video for X306 V1.3/V1.5: https://youtu.be/98fGopGILyQ
X306 V1.1 4Pin header function description
4 Pin header function description:
| Pin | Function |
|---|---|
| AL ON: Pin 1&2 | Short: Power always on, power button disabled; |
| AL ON: Pin 1&2 | Open: Power button Press to switch on, Hold 3 seconds to switch off |
| PWR SW: Pin 3&4 | for external 2-pin momentary switch |
"AL ON" enable, "PWR SW" will be disable.
"PWR SW" enable, "AL ON" will be disable.
FAQ
Q1. What 18650 battery is recommended?
Q2. What is the power output for each usb port of X306 V1.1 Version?
A: It is 5V, all ports share 4A, not limited to 500mA.
Q3. Is there any way I can check from the raspberry pi if it's connected to the power or the battery from the UPS?
A: When connected to the power supply to X306, the power supply supplies power to the Raspberry Pi; remove the power supply, it is powered by the battery.
Q4. No data on the usb ports?
A: There is a feedback from buyers that solved this problem. Please refer to go to:X306#comment-4545
in config.txt comment out: dtoverlay=dwc2
and in cmdline.txt remove: modules-load=dwc2,g_ether
reboot and it works!


Enable comment auto-refresher
Anonymous user #30
Permalink |
Anonymous user #30
Permalink |
Ruby
Anonymous user #30
Permalink |
Anonymous user #29
Permalink |
Ruby
Anonymous user #28
Permalink |
Lisa
Anonymous user #27
Permalink |
Anonymous user #27
Permalink |
Lisa
Anonymous user #26
Permalink |
Lisa
Anonymous user #25
Permalink |
Lisa
Anonymous user #24
Permalink |
Lisa
Anonymous user #23
Permalink |
Lisa
Anonymous user #22
Permalink |
Lisa
Anonymous user #22
Permalink |
Lisa
Anonymous user #22
Permalink |
Lisa
Anonymous user #14
Permalink |
Lisa
Anonymous user #21
Permalink |
Lisa
Anonymous user #21
Anonymous user #21
Lisa
Anonymous user #21
Lisa
Anonymous user #20
Permalink |
Lisa
Anonymous user #19
Permalink |
Lisa
Anonymous user #18
Permalink |
Lisa
Anonymous user #16
Permalink |
Lisa
Anonymous user #17
Lisa
Anonymous user #17
Lisa
Anonymous user #15
Permalink |
Anonymous user #14
Permalink |
Lisa
Anonymous user #13
Permalink |
Anonymous user #11
Permalink |
Walker
Anonymous user #9
Permalink |
Anonymous user #10
Anonymous user #12
Anonymous user #8
Permalink |
Anonymous user #7
Permalink |
Walker
Anonymous user #6
Permalink |
Walker
Anonymous user #5
Permalink |
Walker
Anonymous user #3
Permalink |
Anonymous user #4
Anonymous user #2
Permalink |
Lisa
Anonymous user #1
Permalink |
Lisa