X885
Contents
Overview
This X885 SuperSpeed USB to dual SATA Gen3 ports shield makes it easy to add high-capacity, high-performance external data storage to your Raspberry Pi 4.The dual SATA shield supports two 3.5” SATA hard drives with ultra-fast data transfer speeds and configurable RAID modes. This dual SATA shield delivers fast file transfer rates up to 5Gbps with USB 3.1 Gen 1 performance. It supports SATA I, II and III and is enhanced with UASP to maximize the performance and speed of your SATA III drives. The dual SATA shield provides an effective solution for Raspberry Pi4 to store, access, back up, and protect important files.
Features
- Ideal storage solution for Raspberry Pi 4 - Dual SATA Gen3 ports Shield
- Create high performance storage with a dual SATA HDD RAID array through USB 3.1 (5Gbps)
- Supports Standard Desktop 3.5" SATA Hard Drives or SSD
- Supports hard drives up to 10TB(In theory, the HDD capacity is no limit but related with the operating system)
- Supports SATA I, II and III and is enhanced with UASP to maximize the performance and speed of your SATA III drives
- Supports Transfer Speeds up to 5Gbps (USB 3.0),480Mbps (USB 2.0), 12Mbps (USB 1.1)
- Supports hardware JBOD, RAID0(striping), RAID1(mirror), Normal mode
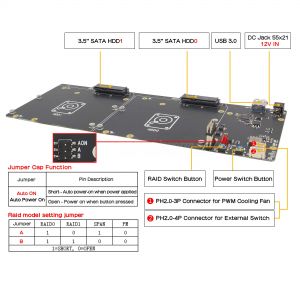
- Supports mode select via jumper setting
- Plugandplay, no drivers needed
- LED blue indicator indicates each drive status
- Onboard push button to control power on, safe shutdown, reboot and force shutdown
- Supports full poweroff from software
- Onboard red LED shows the status of power on, reboot and shutdown
- Powers the Raspberry Pi via the 40pin header - no additional cabling required
- Speciallymade USB3.1 jumper to connect with RaspberryPi - no additional cables needed
- Onboard PH2.0 connectors for external switch and PWM cooling fan
- Mounting holes and standoffs provide mechanicalstability of the Raspberry Pi 4 and X885 assembly
How to Power
- Power supply: 12Vdc +/-5% , ≥5A, via DC 12V IN Port of X885, recommend to Geekworm DC5521 12V/5A Power adapter US/EU plug
- Ports & Connectors: DC jack - 5.5x2.1mm
Important Note: Please use high quality power adapter, the low quality PSU may damage the X885 board and not recognized the HDD.
Packing List
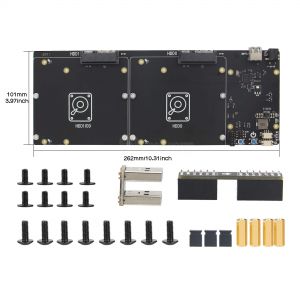
- 1 x X885 V1.1 Dual 3.5" SATA HDD Shield
- 1 x X885 A1 V1.0 Adapter
- 1 x USB3 Connector
- 3 x Jumper link Pitch 2.54mm
- 4 x M2.5 *11mm F/F Spacers
- 8 x M2.5 * 6mm Screws
- 8 x M3 * 8mm Spacers
User Manual
- How install safe shutdown & pwm fan script : X885-software
About SSD/HDD
- Do not recommend using Samsung hard drives, please use hard drives of other brands.
- As with all SSDs, new SSD/HDD must be formatted before use.
- Older SSD/HDD drives with less efficient flash media may not perform as well as newer drives.
- A microSD card is required for forceing the Raspbian OS to use the HDD/SSD for its "root" partition
Raid Setting
Please read Raid Instruction firstly. You can freely choose the four RAID modes supported by NASPi Gemini by setting the jumper cap. Strongly recommend to use the same brand and capacity HDDs when use RAID Mode.
*Warning : Please backup your data before setup and switch, otherwise you maybe lost your data.
1. Inert HDDs to X885 shield and fix it.
2. Please connect the X885 to your PC or Raspberry Pi board and keep power on.
3. Switch RAID mode
- Set the switch button to your preferred RAID mode(PM/RAID 0/RAID 1/SPAN) as per the RAID illustration table.
- Press the SET button for about 5 seconds, and release it till the blue LED indicators starts flashing.
- After RAID mode changed, please confirm that the PC can recognize the disk(s) properly and shows the right capacity.
or you can run the fdisk -l command to view the hard drive on raspberry pi OS when you connect X885 to raspberry pi board:
fdisk -l
You can found two hard drives if you select 'clear raid mode'(this is PM model)
or
You found only one hard drive if you select the RAID0/RAID1 model
4. Set CLEAR RAID mode (PM, factory default setup)
- Press the SET button for about 5 seconds then and release it till blue LED indicators starts flashing.
- After above processes, the setup for CLEAR RAID is done.
[NOTE] Once you set the RAID mode successfully, you need to partition&format&mount the hdd/ssd, so that it can be recognized by your Raspberry Pi OS. please refer to How to View/Partition/Format/Mount HDD/SSD
Some tutorials
- How to Run Raspberry Pi 4 or 3 Off an SSD or Flash Drive: Does the X825/X855 support USB boot
- Tutorial – How to Initialize, Partition and Format a Brand New SSD in Windows: File:Tutorial Initalize New SSD.pdf
- How to set up OpenMediaVault on Raspberry Pi 4
- Properly Mount USB Storage on Raspberry Pi
- Auto Mount an NTFS USB Drive on Raspberry Pi
- Difficulty booting from SSD drive
- How to build a Raspberry Pi NAS: https://youtu.be/gyMpI8csWis
- How to View/Partition/Format/Mount HDD/SSD
- How to Use rc.local on Ubuntu


Enable comment auto-refresher