Difference between revisions of "X1001"

From Geekworm Wiki
Jump to navigation Jump to search
Line 61: Line 61:
 
==Packing List==
 
==Packing List==
 
* 1 x X1001 V1.1 NVMe SSD Shield
 
* 1 x X1001 V1.1 NVMe SSD Shield
* 1 x PCIe FPC Cable(30mm length)
+
* 1 x PCIe FFC Cable(30mm length)
 
* 3 x M2.5x17mm F/F Spacers
 
* 3 x M2.5x17mm F/F Spacers
 
* 6 x M2.5x5mm Screws
 
* 6 x M2.5x5mm Screws

Revision as of 11:20, 11 December 2023

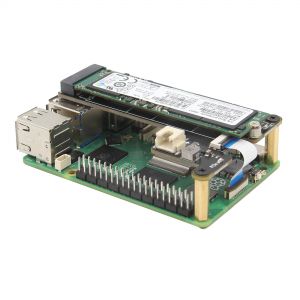
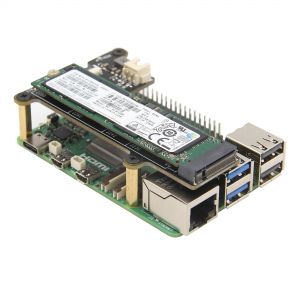
X1001 V1.1 NVME M2 SSD Shield for Raspberry Pi 5
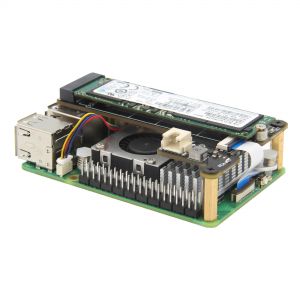
X1001 V1.1, supports installation of official active coolers

Overview

The X1001 V1.1 shield is an NVME M2 SSD PIP (PCIe Peripheral Board) for the Raspberry Pi 5 that uses the new PCIE interface of the Raspberry Pi 5 to utilise the NVME M2 SSDs for fast data transfers and ultra-fast booting.

Features

  • Minimalist design, easy to install
  • Compatible with other HAT shield;
  • FFC is only 30mm length.
  • Supports installation of official active coolers;
  • With M.2 SSD ACT LED Indicators;
  • Supports 2232/2240/2260/2280 NVME M2 ssd.
  • Can Power the X1001 shield directly from the FFC PCIe ribbon (providing maximum 5W of continuous power)
  • Integrated with XH2.54 5V power connector, just use it if you are using a ultra large capacity SSD if the current is not enough;

PS:

Maximum current for pcie wire is 1A, and voltage is 5V

If you find that the SSD is not working properly, it is possible that the power supply of SSD is not enough, then you need to check the current requirement of your SSD to decide whether power the SSD separately.

Test & Reviews

By default the PCIe connector is not enabled. To enable it you should add the following option into /boot/firmware/config.txt and reboot:

sudo nano /boot/config.txt

Then add the following comment;

# Enable the PCIe External connector.
dtparam=pciex1
# This line is an alias for above (you can use either/or to enable the port).
dtparam=nvme

Press Ctrl-O, then enter, to write the change to the file.

Press Ctrl-X to exit nano (the editor).


And the connection is certified for Gen 2.0 speed (5 GT/sec), but you can force it to Gen 3.0 (10 GT/sec) if you add the following line after:

dtparam=pciex1_gen=3

You also can refer to official documentatio:Enabling PCIe


After I forced Gen 3.0 speeds, in my many tests I found that some NVMEs were able to run stably, but some NVMEs caused some problems: such as slow startup and running laggy, really really laggy. As the official statement says:

The Raspberry Pi 5 is not certified for Gen 3.0 speeds, and connections to PCIe devices at these speeds may be unstable.


Run the following command on Teminal window to test:

dd if=/dev/zero of=./Testingfile bs=100M count=10 oflag=direct
dd if=./Testingfile of=/dev/zero bs=100M count=10 oflag=dsync

Nomral PCIE 2.0 test data with dd command;

Nvme-test(pcie2).png

Forced Gen 3.0 speeds test data with dd command:

Nvme-test(pcie3).png

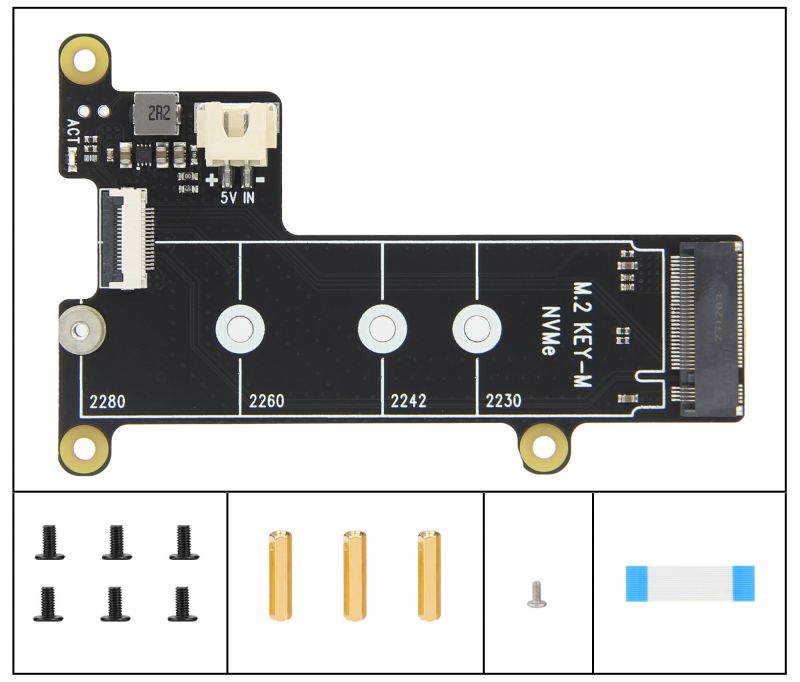
Packing List

  • 1 x X1001 V1.1 NVMe SSD Shield
  • 1 x PCIe FFC Cable(30mm length)
  • 3 x M2.5x17mm F/F Spacers
  • 6 x M2.5x5mm Screws
  • 1 x M2x4mm Screws (to fix M2 SSD)

X1001-V1.1-IMG-6870-Packing-List.jpg

NOTE:

The M2*4 screw is to fix M2 SSD;

User Manual

Add your comment
Geekworm Wiki welcomes all comments. If you do not want to be anonymous, register or log in. It is free.


Anonymous user #17

2 days ago
Score 0++
Integrated with XH2.54 5V power connector. It is, but what is not supplied or offered is a short cable to connect to the Pi5 board. And yes, my Pi5 is working great with the X1001 and a 1TB 2280 SDD. The dtparam=pciex1_gen=3 has been set and the microSD has been removed. So I don't really need the extra power connector, but it should have been included anyways just to be on the safe side.

Lisa

2 days ago
Score 0++
Hello,There is no 2pin cable in the packaging list because the XH2.54 5V IN port for powering the SSD when the power supply is insufficient.Generally, the SSD power supply demand can be met by the FFC cable.hope to get your understanding.

Anonymous user #16

5 days ago
Score 0++
Is there a way to disable the LED light, its so annoying.

Lisa

4 days ago
Score 0++
Hello,It doesn't support disable the LED light, you can cover it with something

Anonymous user #15

5 days ago
Score 0++

I've installed the X1001 with a 128GB Silicon Power P24A60 (Model A60), and it has booted and ran fine for at least an hour or so, then everything just stops responding and basic commands like sudo and ls are no longer found. It behaves as though the drive has being disconnected, but the blue light is still on when this happens.

I have re-seated the FCC cable on both ends a few times. It seems to be seated fully and securely. Also, the drive is typically recognized (at least momentarily) after rebooting. Could this be a power problem? If so, how can I remedy that? If not, should I try a new cable, maybe?

Anonymous user #15

5 days ago
Score 0++

I posted as anon user #15 earlier. I think I got the problem resolved by routing the cable a little differently. I noticed I did not have the problem if the device was outside of the case (Geekworm P579-V2-K). I tried adding some electrical tape to the inside of the case (per Q4), but that didn't make a difference.

However, I noticed that, when the pi was installed in the case, the FCC cable was being pressed against the inside of case, which caused it to bend some and appeared to cause some upward pressure on the connection to the X1001 hat. So, I removed it from the case again and poked the cable in toward the heat sink of the active cooler. This caused the FCC cable to assume an S shape, which appears to have relieved the upward pressure on the connection to the hat. It's been back up for about 46 mins now with no further problems. Even with gen3 enabled, it seems okay now.

I'll add another update if fails again, but I think this might be the trick.

Anonymous user #14

12 days ago
Score 0++
I purchased the Pimoroni NVMe Base and a Sabrent Rocket 4 Plus NVMe which Pimoroni have benchmarked. It worked fine even with PCIe 3. The Rocket 4 has a Phison controller. I wanted a suitable case so bought the X1001 and one of the Geekworm cases. The Rocket 4 works fine on the X1001. My Pi5 has firmware 2024-02-16T15:28:41 Maybe newer Pi firmware has fixed the Phison controller issues. It would help if this WiKi said what issues have been experienced with the Phison controller.

Harry

10 days ago
Score 0++
Thank you very much.

Anonymous user #13

25 days ago
Score 0++
Im installing a x1001 with a samsung ssd 980. Can you point me to instructions for partitioning & formatting on the x1001? Or should I mount it on USB and try to partition/format there?

Lisa

23 days ago
Score 0++
Hello,Partition and format the new ssd, you can find more information on Google.

Anonymous user #12

one month ago
Score 0++

i have installed a x1001 and Transcend 128 Go PCIe™ Gen3 x4 TS128GMTE110S

when i run bench i have good stats like 300 (and 800 in gen3)

but everything else is slower and wifi is super slow

any way to fix that ?

Lisa

one month ago
Score 0++
Please try to remove [dtparam=pciex1_gen=3]

Anonymous user #11

one month ago
Score 0++
I tried the Geekworm x1001 with a Fanxiang S660 500gb Nvme. While I was able to get it to boot a few times with Raspberry Pi OS and also Recalbox, I have not been able to get it to boot successfully since with anything I've tried. I currently would not recommend this combination.

Anonymous user #10

one month ago
Score 0++
and of course I get an SSD that is specifically on the incapable list. Whoops.

Anonymous user #9

one month ago
Score 0++
I am one very happy customer with the X1001. Like the way it provides just enough clearance for the CPU fan. I would recomend fitting a heatsink to the SSD. Amazon "ELUTENG M.2 SSD NVME Heatsink 2280" is recomended, it fully encases the SSD keeping it nice and cool. Fits on the X1001 perfectly

Anonymous user #9

one month ago
Score 0++

I have the same hardware X1001 and a Crucial P3, which works perfectlty.

Most likely reason for problem, you must format the SSD (EXT4) before installing on the X1001 in the PI.

Anonymous user #8

one month ago
Score 0++
I got the X1001 and a Crucial P3 nvme but Raspberry Pi does not see it. Is the Crucial SDD compatible and how do I troubleshoot?

Lisa

one month ago
Score 0++

Anonymous user #7

2 months ago
Score 0++

I ordered a X1001 board and as soon as I connect an SSD to it, it makes a high pitched noise similar to coil whine. Is there something I can do about it?

Otherwise it works fine.

Anonymous user #6

2 months ago
Score 0++
It works, but performance is awful. I have double the speed on my RPi4 in Argon40 NVME case and that is only using USB bridge and not PCIe. I'm deeply disappointed by the X1001...

Lisa

one month ago
Score 0++
Hi,It is difficult to determine the reason for the very slow speeds. It may be an issue with the FFC cable or a compatibility issue. Thanks for your feedback.We will continue to monitor this issue to find the best solution.

Anonymous user #5

2 months ago
Score 0++
I'm able to crimp my own JST-to-DuPont cables. Could I just power the X1001 via the GPIO pins with such a cable?

Lisa

one month ago
Score 0++
Hi,Normally there is no need to power X1001 separately. SSD power supply needs can be met through FFC cables. If you want to power X1001 separately, you can use a 2pin wire to power it through 5V IN of X1001.

Anonymous user #4

2 months ago
Score 0++
First attempt failed. Had to use the Raspberry Pi eeprom fix and retry. Solution: Make eeprom changes after copying the OS to the SSD. First try would not boot from SD if no OS existed on SSD.

Walker

2 months ago
Score 0++
Thanks for sharing!

Anonymous user #1

2 months ago
Score 0++
I reinserted the zif cable and now the WD_Black SN770 shows up on my desktop. However, I don't believe the test is using that drive, it is still terribly slow, like 60 MB/sec. So I think it is using the microSD.

Anonymous user #6

2 months ago
Score 0++
Same here, I get about 60MB/sec. Not what I would expect from PCIe. In my old case with USB bridge I get more than 110 MB/sec with the same drive.

Anonymous user #1

2 months ago
Score 0++
I thought maybe I had just the wrong SSD, but I spent some more money and bought a WD_Black SN770 and though the test in both PCIE 2 and 3 modes give an answer, they are terribly slow and I suspect it is running the test on the microSD card and not the SSD. I don't think this is working at all.

Nahumb

3 months ago
Score 0++

Hello,

Can you please provide any 3D model file of the X1001?

Thank you,

Nahum Budin.

Anonymous user #3

3 months ago
Score 0++

This doesn't look right.

morey@rpi5:~ $ dd if=/dev/zero of=./Testingfile bs=100M count=10 oflag=direct dd if=./Testingfile of=/dev/zero bs=100M count=10 oflag=dsync 10+0 records in 10+0 records out 1048576000 bytes (1.0 GB, 1000 MiB) copied, 2.72273 s, 385 MB/s 10+0 records in 10+0 records out 1048576000 bytes (1.0 GB, 1000 MiB) copied, 2.61485 s, 401 MB/s

Any ideas on what is wrong?

Walker

3 months ago
Score 0++
Hello, you can contact our technical support at support@geekworm.com , By the way, provide your order number

Anonymous user #1

3 months ago
Score 0++
It says that New NVMe SSDs are not partitioned and will need to be both partitioned and formatted when first connected to the Raspberry Pi before they will be accessed in the Explorer. But does not give instructions or links as to how to do that. I have installed a 1TB drive and gotten it to give me the speeds using the test, but it doesn't show up as a drive to choose. The drive is a crucial PD PCIe 3.0 NVMe M.2 SSD

Anonymous user #2

3 months ago
Score 0++
Same here. Get results for the speed test, but unable to mount SSD. WD_Black SN770 (Sandisk controller)

Anonymous user #2

3 months ago
Score 0++
Since the Pi passed the Gen 3 test, I went back and enabled the gen 3 (dtparam=pciex1_gen=3) in the config.txt file. Rebooted and it now mounts the SSD. Hope this helps.

Walker

3 months ago
Score 0++
Thank you very much for your advice, we are sure it will help others!