Difference between revisions of "NVMe SSD boot with the Raspberry Pi 5"
| Line 107: | Line 107: | ||
POWER_OFF_ON_HALT=1 | POWER_OFF_ON_HALT=1 | ||
BOOT_ORDER=0xf416 | BOOT_ORDER=0xf416 | ||
| − | + | Then reboot the device with <mark>'''''sudo reboot'''''</mark>, this should drop the power consumption when powered down to around 0.01W. | |
==FAQ== | ==FAQ== | ||
Revision as of 15:07, 5 February 2024
Most of the content of this tutorial comes from Jeff's blog: NVMe SSD boot with the Raspberry Pi 5, Thanks fo Jeff
Contents
READ ME before Starting
1. Enable PCIe: Must make sure to enable PCIe in the OS on the NVME SSD you are booting, instead of the OS on SD card. Too people just enable PCIe in the OS on the SD CARD.
2. Update eeprom firmware: Check and upgrade the bootloader firmware to the latest version;
3. Set NVME boot order;
4. DON'T enable PCIe 3.0, ONLY PCIe 2.0 is supported by Raspberry Pi fundation.
5. If your SSD is OLD and has a DOS partition, delete the DOS partition and repartition the SSD (feedback from buyer)
6. Please visit the guide below for specific operations.
[PS]: The official Raspberry Pi firmware is frequently upgraded and the OS is not stable enough. It is also a challenge for us.
Important Notes
NVMe SSD Incompatibility List
We recommend avoiding the following NVMe SSD drives which is equipped with a Phison controller due to their proven incompatibility:
- WD Blue SN550 series (Solved! Refer to New rpi-eeprom-update 2024-01-24 WD Blue SN550 nvme works now.)
- WD Green SN580 series (Solved! Refer to NVMe_SSD_boot_with_the_Raspberry_Pi_5#comment-4708)
- WD Green SN350 series (Solved! Refer to NVMe_SSD_boot_with_the_Raspberry_Pi_5#comment-4602)
- WD Black SN850 series
- WD Black SN770
- Inland tn446 nvme drive
- Corsair MP600 SSD
- Micron 2450 SSD (Can be recognised but not support boot from NVME)
- Other NVMe SSD drivers equipped with the same Phison controller
These specific models have demonstrated compatibility issues, and it is advisable to avoid them when considering NVMe SSD options for the X10xx series NVMe shield. You can run "lspci" command to check the controller brand of the SSD.
Also note:
- Compatible with M.2 NVMe SSDs only, Not compatible with M.2 SATA SSDs, M.2 PCIe AHCI SSDs, or other M.2 non-NVMe devices
- Older NVMe drives with less efficient flash media may not perform as well as newer drives
- New NVMe SSDs are not partitioned and will need to be both partitioned and formatted when first connected to the Raspberry Pi before they will be accessed in the Explorer.
- We get feedback from customers that Polaris Controller will also have compatibility problems. Please replace the other SSD test if it not work, whether it is compatible with the Raspberry Pi 5 does not depend on the X100X series boards
- NVMEs using the MAP1202 controller may not support PCIe Gen 2, and must be forced to enable PCIe Gen 3 in order to be recognised. This is due to the fact that the controller is not backward compatible with PCIe Gen 2, and NVMEs using this controller will have compatibility issues, and are not recommended for use. Can refer to https://zhuanlan.zhihu.com/p/644984347
PS: There is also feedback from buyers that even NVME SSDs with Phison controller are supported after updating the latest firmware. Please refer to go to: X1001#comment-4638
Enable PCIe
By default the PCIe connector is not enabled. To enable it you should add the following option into /boot/firmware/config.txt and reboot:
#/boot/config.txt is a link to /boot/firmware/config.txt, they are the same file
sudo nano /boot/config.txt
Then add the following comment;
# Enable the PCIe External connector.
dtparam=pciex1
# This line is an alias for above (you can use either/or to enable the port).
dtparam=nvme
Press Ctrl-O, then enter, to write the change to the file.
Press Ctrl-X to exit nano (the editor).
And the connection is certified for Gen 2.0 speed (5 GT/sec), but you can force it to Gen 3.0 (10 GT/sec) if you add the following line after:
dtparam=pciex1_gen=3
However, we DON'T recommend you to use Gen 3.0 as it is not officially supported and may not work stably.
Then DON'T forgot to reboot
sudo reboot
You also can refer to official documentatio:Enabling PCIe
Flash OS onto NVME SSD
To get the NVMe SSD to boot your Pi, it needs to have an OS, so the Raspberry Pi OS needs to be flashed onto NVME SSDs, this is very important!
Only support Raspberry Pi OS (Bookworm) version, Raspberry Pi OS bullseye is NOT supported, rfer to https://www.raspberrypi.com/software/operating-systems/
Here are a few ways to flash the OS to an NVME SSD:
1. Use SD Card Copier tool to flash OS onto the NVME SSD On Raspberry Pi OS(recommended)
- This method works if you have an SD card and have booted the device successfully
Cick Applications =>Accessories =>SD Card Copier on the main screen, run the SD Card Copier program, and copy the OS to the NVME ssd as shown in the figure below.

Click Start to run. Then shut down, unplug the SD card, and restart the device.
This is a visual operation and we highly recommend it!
2. Flash the SSD with Raspberry Pi Imager
You can also directly use the Raspberry Pi Imager tool on a MAC computer or windows computer to flash a fresh Pi OS to NVME SSD, but you will need an additional USB to nvme adapter.
- Install Pi Imager and open it
- Plug your NVMe SSD into your computer using a USB to NVMe adapter
- Choose an OS to install
- Choose the drive (connected through your adapter) to flash
- Click write (and set any options you'd like)
- Once you have finished flashing the OS, DON'T remove the nvme SSD. You need to change the config.txt in the root directory of the NVME SSD drive to enable pcie (edit config.txt and add 'dtparam=pciex1' on the end of file), this is very important and too many people forget this.
Then pull the NVMe drive, attach it to your Pi 5, and it should boot off it (with or without a microSD card inserted)—assuming you have the bootloader up to date and set the BOOT_ORDER appropriately!
NOTE:
If you are flashing a fresh Pi OS to NVME ssd, you must #Enable PCIe; if you are COPY or CLONE an old Pi OS from SD card to NVME ssd, and you have already enabled pcie in the old Pi OS in advance, then you don't need to do enable pcie again!
Set NVMe early in the boot order
The PCIe connection should work after a reboot, but your Pi won't try booting off an NVMe SSD yet. For that, you need to change the BOOT_ORDER in the Raspberry Pi's bootloader configuration:
Run the following command to edit the EEPROM on the Raspberry Pi 5.
sudo rpi-eeprom-config --edit
Then change the BOOT_ORDER line to the following:
BOOT_ORDER=0xf416
- Press Ctrl-O, then enter, to write the change to the file.
- Press Ctrl-X to exit nano (the editor).
Read Raspberry Pi's documentation on BOOT_ORDER for all the details. For now, the pertinent bit is the 6 at the end: that is what tells the Pi to attempt NVMe boot first!
Reboot your Raspberry Pi 5 to make the change take effect.
Decrease wattage when turned off
By default, the Raspberry Pi 5 consumes around 1W to 1.4W of power when turned off. This can be decreased by manually editing the EEPROM configuration with sudo rpi-eeprom-config -e. Change the settings to the following:
BOOT_UART=1
POWER_OFF_ON_HALT=1
BOOT_ORDER=0xf416
Then reboot the device with sudo reboot, this should drop the power consumption when powered down to around 0.01W.
FAQ
Q1: Don't recognize / boot from NVME SSD?
A: If you have enabled pcie and find that you still cannot boot from NVME SSD, please perform the following actions
1. Follow the picture below to check the version of X1001 or X1000

2. If it is an Old Version, refer to How to update eeprom firmware to update the firmware with pieeprom-2023-10-30.bin file.
3. If it is an New Version, refer to How to update eeprom firmware to update the firmware to lasted version.
4. If you still have not solved the problem, please refer to the next FAQ:Q2
Q2: Can't boot/recognize from NVMe SSD?
A: Here are a few steps to help you troubleshoot some issues:
- Firstly, you can read this post to get some help;
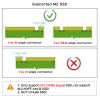
- Make sure the SSD type you use is correct, only support M.2 NVME Key-M SSD NOT support M.2 NGFF Key-B SSD. Refer to the following diagram (click it to zoom out):
- Make sure all hardware connections are properly connected and coupled.
- Only Raspberry Pi OS (Bookworm) supports PCIe, Raspberry Pi OS bullseye is NOT supported, refer to https://www.raspberrypi.com/software/operating-systems/
- Although you can also boot from a SD card, Pi OS is required for the NVMe SSD to boot, DON'T forget Flash OS onto NVMe SSD.
- If you're flashing a fresh Pi OS , DON'T forget to ENABLE PCIe.
- Run the lspci or lsblk command to check the NVMe SSD is recognized.
- Add PCIE_PROBE=1 to the eeprom, (Run 'sudo rpi-eeprom-config --edit' command, then add this line, then press CTRL+O to write change to file, press CTRL+X to exit, then reboot)
- Update the firmware to the last verson, refer to How to update eeprom firmware, this is very important!!!
- If your SSD is old and has a DOS partition, delete the DOS partition and repartition the SSD (feedback from buyer)
- Refer to the issue solved by customer: https://geekworm.com/community/forum/topic/120764/geekworm-x1001-for-raspberry-pi-5
- Contact us at email: support@geekworm.com

Enable comment auto-refresher
Anonymous user #13
Permalink |
Anonymous user #12
Permalink |
Anonymous user #11
Permalink |
Anonymous user #8
Permalink |
Anonymous user #6
Permalink |
Anonymous user #9
Anonymous user #10
Anonymous user #5
Permalink |
Anonymous user #7
Anonymous user #4
Permalink |
Anonymous user #4
Anonymous user #3
Permalink |
Anonymous user #2
Permalink |
Harry
Anonymous user #1
Permalink |
Walker