Difference between revisions of "X630-Software"
Jump to navigation
Jump to search
| Line 23: | Line 23: | ||
[[File:Raspi-config-1.jpg]] | [[File:Raspi-config-1.jpg]] | ||
| − | 3. Navigate to ' | + | 3. Navigate to ''''Interfacing Options'''' and hit Enter. Now select the ''''Camera'''' option, and hit the Enter key to enable it. Select “Finish” and select to '''reboot''' your Raspberry Pi. |
| + | [[File:Raspi-config-2.jpg]] | ||
sudo reboot | sudo reboot | ||
| − | |||
| − | |||
4. Once rebooted, you need to make sure that the ‘/dev/video0’ device is available. Use this command to check in a terminal window: | 4. Once rebooted, you need to make sure that the ‘/dev/video0’ device is available. Use this command to check in a terminal window: | ||
ls /dev/video0 | ls /dev/video0 | ||
Revision as of 11:53, 20 September 2021
For Raspberry Pi OS
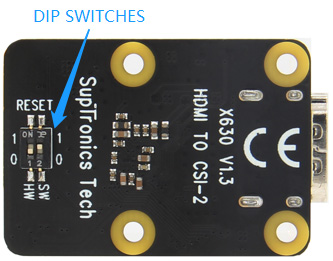
Disconnect power supply to the Raspberry Pi before changing dip switch positions.

| SELECTION | SWITCH SETTINGS | |
|---|---|---|
| Hardware reset | HW = 1 | SW = 0 |
| Software reset | HW = 0 | SW = 1 |
- Hardware reset: After starting RASPISTILL or RASPIVID once then you will need to reboot Raspberry Pi to restart it again
- Software reset: Starting RASPISTILL or RASPIVID multiple times and don't need to reboot Raspberry Pi (Recommend)
1. Once booted, update your Raspberry Pi by running the following commands in a terminal window:
sudo apt-get update
sudo apt-get upgrade
2. Run the following command to go into the Raspberry Pi configuration tool
sudo raspi-config

3. Navigate to 'Interfacing Options' and hit Enter. Now select the 'Camera' option, and hit the Enter key to enable it. Select “Finish” and select to reboot your Raspberry Pi.

sudo reboot
4. Once rebooted, you need to make sure that the ‘/dev/video0’ device is available. Use this command to check in a terminal window:
ls /dev/video0
If you see anything other than ‘file not found‘, then it’s available.
Enable comment auto-refresher