Difference between revisions of "Template:X120x-FAQ"
| (30 intermediate revisions by 5 users not shown) | |||
| Line 1: | Line 1: | ||
<div class="toccolours mw-collapsible mw-collapsed"> | <div class="toccolours mw-collapsible mw-collapsed"> | ||
<div style="font-weight:bold;line-height:1.0;"> | <div style="font-weight:bold;line-height:1.0;"> | ||
| − | + | <span style="color:red">Q1: Why does the message "This power supply is not capable of supplying 5A" appear??</span> | |
</div> | </div> | ||
<div class="mw-collapsible-content"> | <div class="mw-collapsible-content"> | ||
| Line 21: | Line 21: | ||
'''Note:''' If you are using other OS like Ubuntu, please flash '''Raspberry Pi OS''' first, and then re-flash other OS such as Ubuntu etc after completing the above settings. | '''Note:''' If you are using other OS like Ubuntu, please flash '''Raspberry Pi OS''' first, and then re-flash other OS such as Ubuntu etc after completing the above settings. | ||
| + | |||
| + | |||
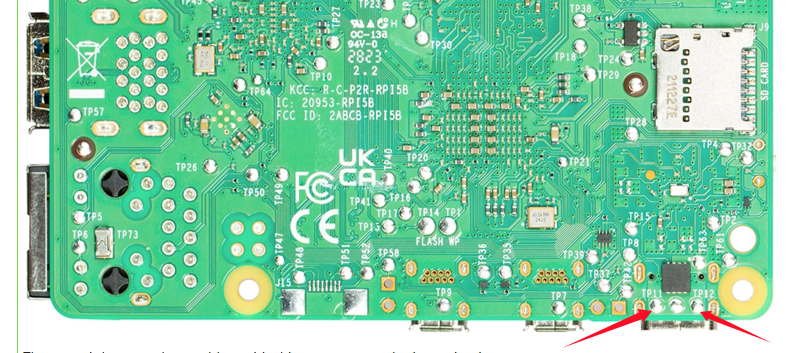
| + | If you are using '''USB peripherals''' that need to be powered from the RPi5's USB port, '''don't forget''' to enable the following settings to ensure that the RPi5's USB port's current output is not limited: | ||
| + | |||
| + | Add <code>usb_max_current_enable=1</code> in the <code>/boot/firmware/config.txt</code> file. | ||
</div> | </div> | ||
</div> | </div> | ||
| Line 26: | Line 31: | ||
<div class="toccolours mw-collapsible mw-collapsed"> | <div class="toccolours mw-collapsible mw-collapsed"> | ||
<div style="font-weight:bold;line-height:1.0;"> | <div style="font-weight:bold;line-height:1.0;"> | ||
| − | + | <span style="color:red">Q2. Why am I seeing an "Undervoltage Detected" warning?</span> | |
| + | </div> | ||
| + | <div class="mw-collapsible-content"> | ||
| + | A:Regarding the low voltage warning issue(Please refer to Q1 to check whether the connection is installed correctly): | ||
| + | * Please carefully check whether your hardware installation is secure and if the pogo pins are making proper contact. We have had cases where customers found that loose brass standoffs caused poor contact with the pogo pins, leading to the low voltage warning. | ||
| + | * It may be caused by an OS update. Please confirm whether you have recently updated the OS or if your OS system updates automatically. | ||
| + | * Please run the command:<code>vcgencmd pmic_read_adc</code> and provide us with the result. Alternatively, use a multimeter to measure the voltage value of '''PIN2'''. As shown in the figure | ||
| + | [[File:X120x.png|700px]] | ||
| + | <pre> | ||
| + | pi@geekworm:~ $ vcgencmd pmic_read_adc | ||
| + | 3V7_WL_SW_A current(0)=0.00097593A | ||
| + | 3V3_SYS_A current(1)=0.13955800A | ||
| + | 1V8_SYS_A current(2)=0.25374180A | ||
| + | DDR_VDD2_A current(3)=0.01854267A | ||
| + | DDR_VDDQ_A current(4)=0.00049020A | ||
| + | 1V1_SYS_A current(5)=0.25276590A | ||
| + | 0V8_SW_A current(6)=0.34547920A | ||
| + | VDD_CORE_A current(7)=0.87514000A | ||
| + | 3V3_DAC_A current(17)=0.00024420A | ||
| + | 3V3_ADC_A current(18)=0.00024420A | ||
| + | 0V8_AON_A current(16)=0.00341880A | ||
| + | HDMI_A current(22)=0.02063490A | ||
| + | 3V7_WL_SW_V volt(8)=3.70534400V | ||
| + | 3V3_SYS_V volt(9)=3.31467300V | ||
| + | 1V8_SYS_V volt(10)=1.80024200V | ||
| + | DDR_VDD2_V volt(11)=1.11355200V | ||
| + | DDR_VDDQ_V volt(12)=0.60109830V | ||
| + | 1V1_SYS_V volt(13)=1.10622600V | ||
| + | 0V8_SW_V volt(14)=0.80109810V | ||
| + | VDD_CORE_V volt(15)=0.72017020V | ||
| + | 3V3_DAC_V volt(20)=3.31318300V | ||
| + | 3V3_ADC_V volt(21)=3.31684600V | ||
| + | 0V8_AON_V volt(19)=0.80029220V | ||
| + | HDMI_V volt(23)=5.19920000V | ||
| + | EXT5V_V volt(24)=5.20322000V | ||
| + | BATT_V volt(25)=0.00000000V | ||
| + | </pre> | ||
| + | Please check the voltage value of <mark>EXT5V_V</mark> line | ||
| + | </div> | ||
| + | </div> | ||
| + | |||
| + | <div class="toccolours mw-collapsible mw-collapsed"> | ||
| + | <div style="font-weight:bold;line-height:1.0;"> | ||
| + | Q3. How to disable/enable the 5V output of the UPS when the RPi 5 is turned off? | ||
| + | </div> | ||
| + | <div class="mw-collapsible-content"> | ||
| + | A: Editing the EEPROM configuration | ||
| + | |||
| + | From the command line or Terminal window start by running the following command : | ||
| + | |||
| + | <pre> | ||
| + | sudo rpi-eeprom-config -e | ||
| + | </pre> | ||
| + | |||
| + | Set <code>POWER_OFF_ON_HALT</code> to <code>0</code> or <code>1</code> like this: | ||
| + | |||
| + | [[File:X1012-setting.png|700px]] | ||
| + | |||
| + | <code>1</code>: disable 5v outputs | ||
| + | |||
| + | <code>0</code>: enable 5v outputs | ||
| + | |||
| + | Press '''Ctrl-O''', then enter, to write the change to the file. | ||
| + | |||
| + | Press '''Ctrl-X''' to exit nano (the editor). | ||
| + | |||
| + | '''Reboot''' your Raspberry Pi 5 to make the change take effect. | ||
| + | </div> | ||
| + | </div> | ||
| + | |||
| + | <div class="toccolours mw-collapsible mw-collapsed"> | ||
| + | <div style="font-weight:bold;line-height:1.0;"> | ||
| + | Q4: How to disable '''auto power on''' feature on [[X1200]]? | ||
</div> | </div> | ||
<div class="mw-collapsible-content"> | <div class="mw-collapsible-content"> | ||
| Line 45: | Line 122: | ||
<div class="toccolours mw-collapsible mw-collapsed"> | <div class="toccolours mw-collapsible mw-collapsed"> | ||
<div style="font-weight:bold;line-height:1.0;"> | <div style="font-weight:bold;line-height:1.0;"> | ||
| − | + | Q5: How to disable '''auto power on''' feature on [[X1201]]? | |
</div> | </div> | ||
<div class="mw-collapsible-content"> | <div class="mw-collapsible-content"> | ||
| Line 64: | Line 141: | ||
<div class="toccolours mw-collapsible mw-collapsed"> | <div class="toccolours mw-collapsible mw-collapsed"> | ||
<div style="font-weight:bold;line-height:1.0;"> | <div style="font-weight:bold;line-height:1.0;"> | ||
| − | + | Q6: How to disable '''auto power on''' feature on [[X1202]]? | |
</div> | </div> | ||
<div class="mw-collapsible-content"> | <div class="mw-collapsible-content"> | ||
| Line 83: | Line 160: | ||
<div class="toccolours mw-collapsible mw-collapsed"> | <div class="toccolours mw-collapsible mw-collapsed"> | ||
<div style="font-weight:bold;line-height:1.0;"> | <div style="font-weight:bold;line-height:1.0;"> | ||
| − | + | Q7: How to disable '''auto power on''' feature on [[X1203]]? | |
</div> | </div> | ||
<div class="mw-collapsible-content"> | <div class="mw-collapsible-content"> | ||
| Line 102: | Line 179: | ||
<div class="toccolours mw-collapsible mw-collapsed"> | <div class="toccolours mw-collapsible mw-collapsed"> | ||
<div style="font-weight:bold;line-height:1.0;"> | <div style="font-weight:bold;line-height:1.0;"> | ||
| − | + | Q8: Why is the RPi5 LED still on and red after the UPS is turned off? | |
</div> | </div> | ||
<div class="mw-collapsible-content"> | <div class="mw-collapsible-content"> | ||
| Line 124: | Line 201: | ||
<div class="toccolours mw-collapsible mw-collapsed"> | <div class="toccolours mw-collapsible mw-collapsed"> | ||
<div style="font-weight:bold;line-height:1.0;"> | <div style="font-weight:bold;line-height:1.0;"> | ||
| − | + | Q9: What battery is recommended for this UPS shield? | |
</div> | </div> | ||
<div class="mw-collapsible-content"> | <div class="mw-collapsible-content"> | ||
| Line 133: | Line 210: | ||
If using a lithium battery, the required voltage is 3.7V; | If using a lithium battery, the required voltage is 3.7V; | ||
| − | + | If using a battery pack or battery holder, please make sure it is a parallel battery pack. '''Please use a high-quality battery holder with thick and durable connection cables. Using a low-quality battery holder with thin or poorly connected wires may cause the X1203 to malfunction or fail to operate as expected.''' | |
| + | |||
There are 2 XH2.54-2P battery connectors on board, it is recommended to use the same type of battery. | There are 2 XH2.54-2P battery connectors on board, it is recommended to use the same type of battery. | ||
| Line 143: | Line 221: | ||
<div class="toccolours mw-collapsible mw-collapsed"> | <div class="toccolours mw-collapsible mw-collapsed"> | ||
<div style="font-weight:bold;line-height:1.0;"> | <div style="font-weight:bold;line-height:1.0;"> | ||
| − | + | Q10: Run <code>sudo i2cdetect -y 1</code>, can't find I2C address 0x36? | |
</div> | </div> | ||
<div class="mw-collapsible-content"> | <div class="mw-collapsible-content"> | ||
| Line 162: | Line 240: | ||
<div class="toccolours mw-collapsible mw-collapsed"> | <div class="toccolours mw-collapsible mw-collapsed"> | ||
<div style="font-weight:bold;line-height:1.0;"> | <div style="font-weight:bold;line-height:1.0;"> | ||
| − | + | Q11. How do you disable the X1202 auto-shutdown when you use it standalone (not installed on a RPi5)? | |
</div> | </div> | ||
<div class="mw-collapsible-content"> | <div class="mw-collapsible-content"> | ||
| Line 172: | Line 250: | ||
<div class="toccolours mw-collapsible mw-collapsed"> | <div class="toccolours mw-collapsible mw-collapsed"> | ||
<div style="font-weight:bold;line-height:1.0;"> | <div style="font-weight:bold;line-height:1.0;"> | ||
| − | + | Q12. X1203 UPS voltage drops / low voltage warning appears? | |
</div> | </div> | ||
<div class="mw-collapsible-content"> | <div class="mw-collapsible-content"> | ||
| Line 182: | Line 260: | ||
[[File:Test pad on the Pi's PCB.png|800px]] | [[File:Test pad on the Pi's PCB.png|800px]] | ||
| + | </div> | ||
| + | </div> | ||
| + | |||
| + | <div class="toccolours mw-collapsible mw-collapsed"> | ||
| + | <div style="font-weight:bold;line-height:1.0;"> | ||
| + | Q13. Documentation about the I2C registers: | ||
| + | </div> | ||
| + | <div class="mw-collapsible-content"> | ||
| + | A: | ||
| + | |||
| + | [https://www.analog.com/media/en/technical-documentation/data-sheets/MAX17040-MAX17041.pdf MAX17040G+] | ||
| + | </div> | ||
| + | </div> | ||
| + | |||
| + | <div class="toccolours mw-collapsible mw-collapsed"> | ||
| + | <div style="font-weight:bold;line-height:1.0;"> | ||
| + | Q14. Why does the RPI 5 lose power within a few seconds after pressing the power button on the X120x UPS? | ||
| + | </div> | ||
| + | <div class="mw-collapsible-content"> | ||
| + | A: | ||
| + | |||
| + | '''Please note: If the UPS does not detect the RPi5, it will automatically shut down within 3 seconds. So you need to install the RPi 5 on the UPS and make sure that the RPi5 has good contact with the UPS's pogo pins.''' | ||
| + | |||
</div> | </div> | ||
</div> | </div> | ||
Latest revision as of 14:20, 12 November 2025
Q1: Why does the message "This power supply is not capable of supplying 5A" appear??
X120X series UPS shield can provide enough 5A power supply capacity;
Please set as follows:
Open the Teminal window based on Raspberry Pi OS and execute the following command:
sudo rpi-eeprom-config -e
Add PSU_MAX_CURRENT=5000 at the end of the file that reads like this:
Press Ctrl-O, then enter, to write the change to the file.
Press Ctrl-X to exit nano (the editor).
Reboot your Raspberry Pi 5 to make the change take effect.
Note: If you are using other OS like Ubuntu, please flash Raspberry Pi OS first, and then re-flash other OS such as Ubuntu etc after completing the above settings.
If you are using USB peripherals that need to be powered from the RPi5's USB port, don't forget to enable the following settings to ensure that the RPi5's USB port's current output is not limited:
Add usb_max_current_enable=1 in the /boot/firmware/config.txt file.
Q2. Why am I seeing an "Undervoltage Detected" warning?
A:Regarding the low voltage warning issue(Please refer to Q1 to check whether the connection is installed correctly):
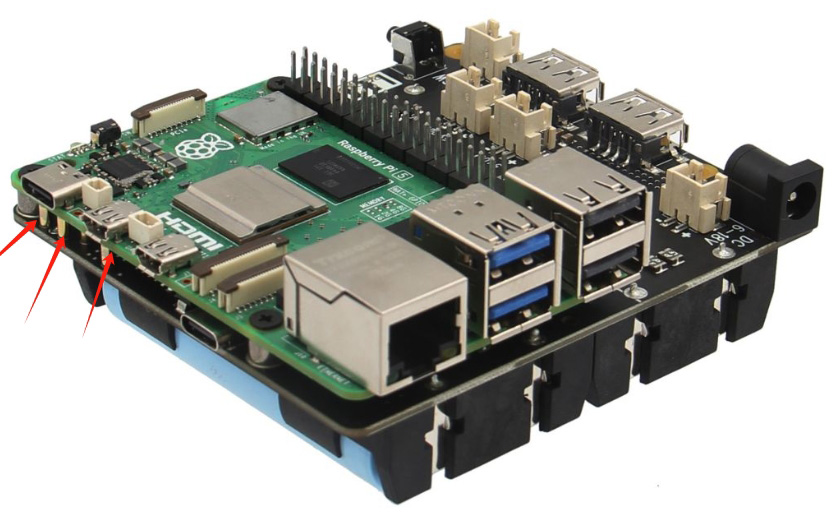
- Please carefully check whether your hardware installation is secure and if the pogo pins are making proper contact. We have had cases where customers found that loose brass standoffs caused poor contact with the pogo pins, leading to the low voltage warning.
- It may be caused by an OS update. Please confirm whether you have recently updated the OS or if your OS system updates automatically.
- Please run the command:
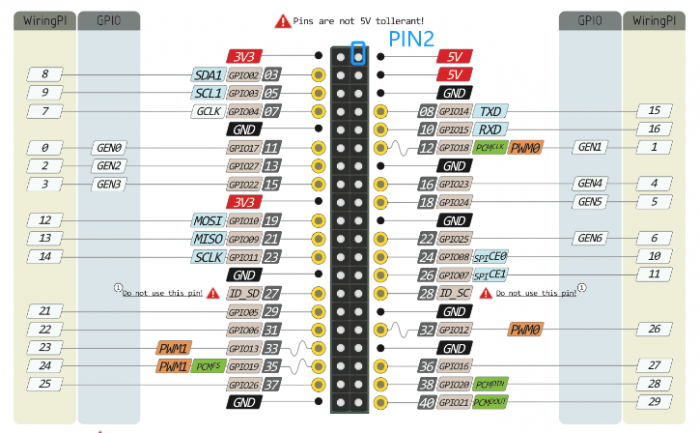
vcgencmd pmic_read_adcand provide us with the result. Alternatively, use a multimeter to measure the voltage value of PIN2. As shown in the figure
pi@geekworm:~ $ vcgencmd pmic_read_adc
 3V7_WL_SW_A current(0)=0.00097593A
   3V3_SYS_A current(1)=0.13955800A
   1V8_SYS_A current(2)=0.25374180A
  DDR_VDD2_A current(3)=0.01854267A
  DDR_VDDQ_A current(4)=0.00049020A
   1V1_SYS_A current(5)=0.25276590A
    0V8_SW_A current(6)=0.34547920A
  VDD_CORE_A current(7)=0.87514000A
   3V3_DAC_A current(17)=0.00024420A
   3V3_ADC_A current(18)=0.00024420A
   0V8_AON_A current(16)=0.00341880A
      HDMI_A current(22)=0.02063490A
 3V7_WL_SW_V volt(8)=3.70534400V
   3V3_SYS_V volt(9)=3.31467300V
   1V8_SYS_V volt(10)=1.80024200V
  DDR_VDD2_V volt(11)=1.11355200V
  DDR_VDDQ_V volt(12)=0.60109830V
   1V1_SYS_V volt(13)=1.10622600V
    0V8_SW_V volt(14)=0.80109810V
  VDD_CORE_V volt(15)=0.72017020V
   3V3_DAC_V volt(20)=3.31318300V
   3V3_ADC_V volt(21)=3.31684600V
   0V8_AON_V volt(19)=0.80029220V
      HDMI_V volt(23)=5.19920000V
     EXT5V_V volt(24)=5.20322000V
      BATT_V volt(25)=0.00000000V
Please check the voltage value of EXT5V_V line
Q3. How to disable/enable the 5V output of the UPS when the RPi 5 is turned off?
A: Editing the EEPROM configuration
From the command line or Terminal window start by running the following command :
sudo rpi-eeprom-config -e
Set POWER_OFF_ON_HALT to 0 or 1 like this:
1: disable 5v outputs
0: enable 5v outputs
Press Ctrl-O, then enter, to write the change to the file.
Press Ctrl-X to exit nano (the editor).
Reboot your Raspberry Pi 5 to make the change take effect.
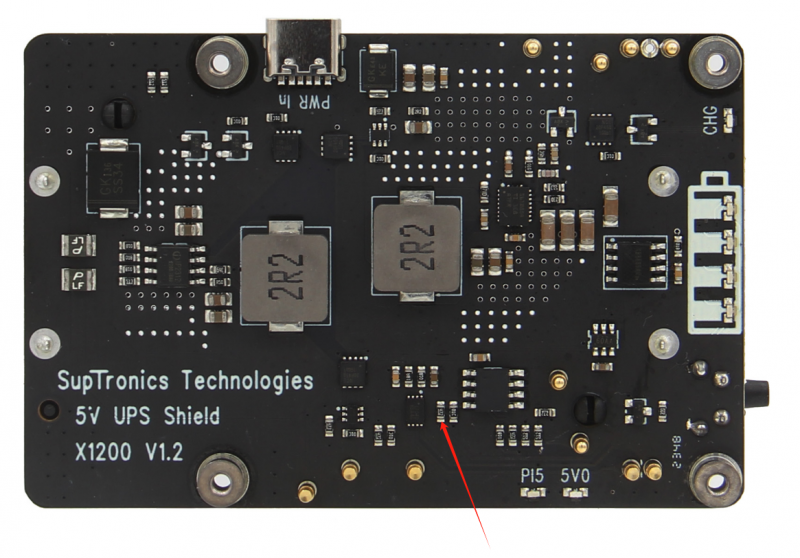
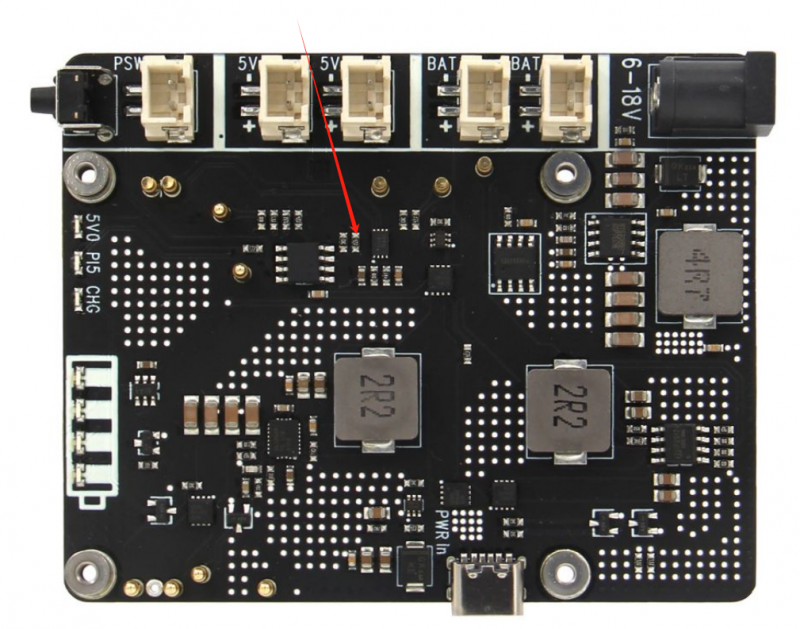
Q4: How to disable auto power on feature on X1200?
A: When you connect an external power supply, the UPS board will automatically power on the Pi 5 motherboard while it starts charging, this feature is called auto power on, considering that some customers need to disable this feature, so we have also disclosed the following solution to disable it: please use a soldering iron to remove the resistor indicated by the arrow in the illustration.
PS: We don't think you need to remove the resistor to disable 'AUTO ON' function. Since there is an onboard switch, if you don't want AUTO ON, just press the switch to completely cut off the power.
WARNING: Please consider the following risks before removing this resistor:
- Do not operate if you are not a professional user
- The removal operation may damage the MCU, so please be careful with the operation.
- Once you remove this resistor by yourself, you will lose the warranty of this product. We no longer offer any warranty for this product.
- Once you remove this resistor, you can only turn on the power output by pressing the on-board switch.
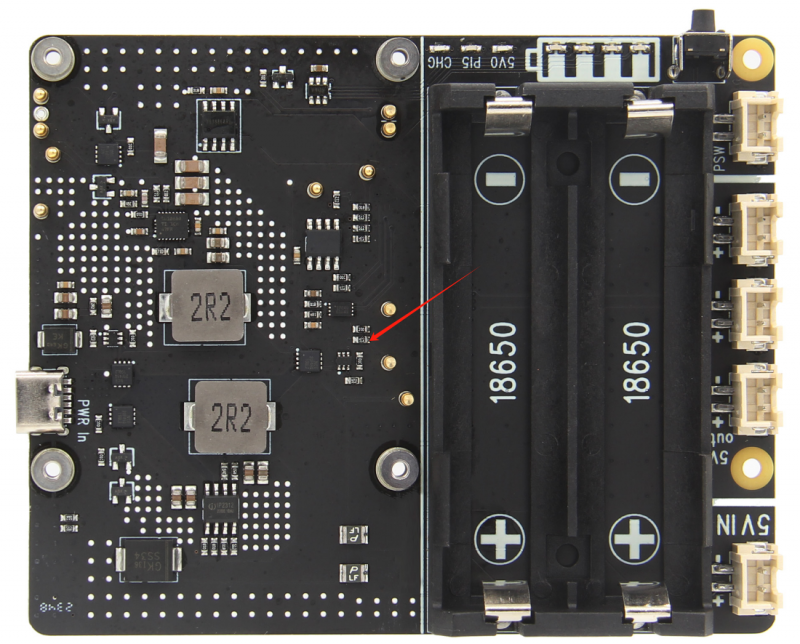
Q5: How to disable auto power on feature on X1201?
A: When you connect an external power supply, the UPS board will automatically power on the Pi 5 motherboard while it starts charging, this feature is called auto power on, considering that some customers need to disable this feature, so we have also disclosed the following solution to disable it: please use a soldering iron to remove the resistor indicated by the arrow in the illustration.
PS: We don't think you need to remove the resistor to disable 'AUTO ON' function. Since there is an onboard switch, if you don't want AUTO ON, just press the switch to completely cut off the power.
WARNING: Please consider the following risks before removing this resistor:
- Do not operate if you are not a professional user
- The removal operation may damage the MCU, so please be careful with the operation.
- Once you remove this resistor by yourself, you will lose the warranty of this product. We no longer offer any warranty for this product.
- Once you remove this resistor, you can only turn on the power output by pressing the on-board switch.
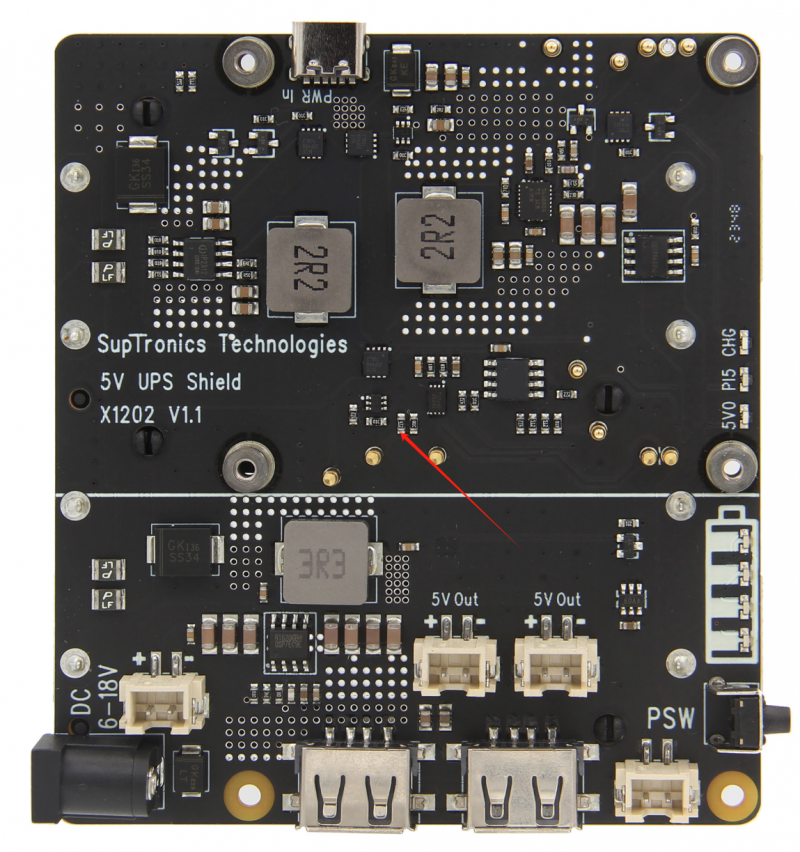
Q6: How to disable auto power on feature on X1202?
A: When you connect an external power supply, the UPS board will automatically power on the Pi 5 motherboard while it starts charging, this feature is called auto power on, considering that some customers need to disable this feature, so we have also disclosed the following solution to disable it: please use a soldering iron to remove the resistor indicated by the arrow in the illustration.
PS: We don't think you need to remove the resistor to disable 'AUTO ON' function. Since there is an onboard switch, if you don't want AUTO ON, just press the switch to completely cut off the power.
WARNING: Please consider the following risks before removing this resistor:
- Do not operate if you are not a professional user
- The removal operation may damage the MCU, so please be careful with the operation.
- Once you remove this resistor by yourself, you will lose the warranty of this product. We no longer offer any warranty for this product.
- Once you remove this resistor, you can only turn on the power output by pressing the on-board switch or external power switch.
Q7: How to disable auto power on feature on X1203?
A: When you connect an external power supply, the UPS board will automatically power on the Pi 5 motherboard while it starts charging, this feature is called auto power on, considering that some customers need to disable this feature, so we have also disclosed the following solution to disable it: please use a soldering iron to remove the resistor indicated by the arrow in the illustration.
PS: We don't think you need to remove the resistor to disable 'AUTO ON' function. Since there is an onboard switch, if you don't want AUTO ON, just press the switch to completely cut off the power.
WARNING: Please consider the following risks before removing this resistor:
- Do not operate if you are not a professional user
- The removal operation may damage the MCU, so please be careful with the operation.
- Once you remove this resistor by yourself, you will lose the warranty of this product. We no longer offer any warranty for this product.
- Once you remove this resistor, you can only turn on the power output by pressing the on-board switch or external power switch.
Q8: Why is the RPi5 LED still on and red after the UPS is turned off?
A: Please set as follows:
Open the Teminal window based on Raspberry Pi OS and execute the following command:
sudo rpi-eeprom-config -e
Change the setting of POWER_OFF_ON_HALT from 0 to 1
Press Ctrl-O, then enter, to write the change to the file.
Press Ctrl-X to exit nano (the editor).
Reboot your Raspberry Pi 5 to make the change take effect.
Q9: What battery is recommended for this UPS shield?
A: Please use high quality batteries from Samsung 35E 18650 lithium battery, Panasonic NCR18650B, Toshiba, etc. Do not use the battery with built-in protection circuit because it will limit the discharge current.
For the X1203 shield:
If using a lithium battery, the required voltage is 3.7V;
If using a battery pack or battery holder, please make sure it is a parallel battery pack. Please use a high-quality battery holder with thick and durable connection cables. Using a low-quality battery holder with thin or poorly connected wires may cause the X1203 to malfunction or fail to operate as expected.
There are 2 XH2.54-2P battery connectors on board, it is recommended to use the same type of battery.
Q10: Run sudo i2cdetect -y 1, can't find I2C address 0x36?
A:
1. Make sure you enable i2c interface, refer to How to enable I2C
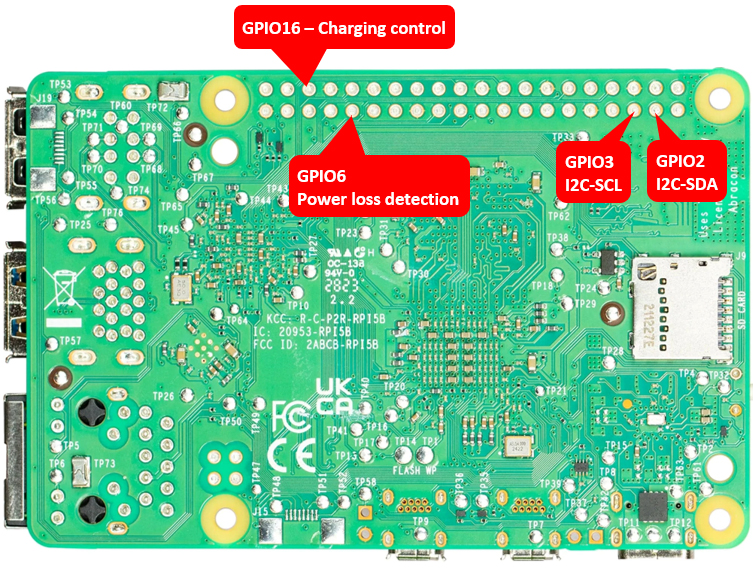
2. The UPS connects to the Pi GPIO via pogo pins, If the I2C address (0x36) is not detected, Please clear the leads of pin 3 and pin 5 on the GPIO header from the bottom of the Raspberry Pi PCB and install again, and also check if the pogo pin of ups shield is in close contact with the pad position of PI 5(you can adjust the [pogo pin] position).
There won't be any other problems, it's this poor contact that's causing it.
Q11. How do you disable the X1202 auto-shutdown when you use it standalone (not installed on a RPi5)?
Q12. X1203 UPS voltage drops / low voltage warning appears?
Q13. Documentation about the I2C registers:
A:
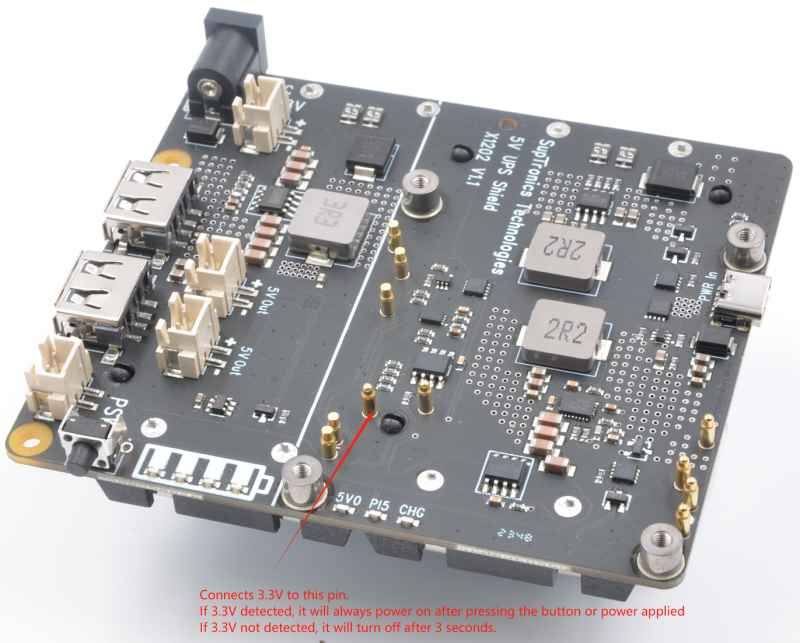
Q14. Why does the RPI 5 lose power within a few seconds after pressing the power button on the X120x UPS?
A:
Please note: If the UPS does not detect the RPi5, it will automatically shut down within 3 seconds. So you need to install the RPi 5 on the UPS and make sure that the RPi5 has good contact with the UPS's pogo pins.

