Difference between revisions of "CSI Manual on Pi 5"
| Line 8: | Line 8: | ||
:If your modules [[C790]] support audio, add the following content to enable audio support. If you use [[C779]], please ignore this step | :If your modules [[C790]] support audio, add the following content to enable audio support. If you use [[C779]], please ignore this step | ||
: dtoverlay=tc358743-audio | : dtoverlay=tc358743-audio | ||
| + | |||
: Then reboot the raspberry Pi. | : Then reboot the raspberry Pi. | ||
| Line 15: | Line 16: | ||
3. Locate the node corresponding to tc358743 as v4l-subdev2, and the pad0 of rp1-cfe-csi2_ch0 as video0: | 3. Locate the node corresponding to tc358743 as v4l-subdev2, and the pad0 of rp1-cfe-csi2_ch0 as video0: | ||
| − | <pre> | + | :<pre> |
blikvm@blikvm:~ $ media-ctl -d /dev/media0 -p | blikvm@blikvm:~ $ media-ctl -d /dev/media0 -p | ||
Media controller API version 6.1.63 | Media controller API version 6.1.63 | ||
Revision as of 18:14, 9 September 2024
This tutorial is only for C790 and C779. It should be noted that C790 supports audio and supports resolution up to 1080P@60HZ, but C779 does not support audio and the resolution is only 1080P@50HZ
1. Edit /boot/config.txt (sudo permission required).
- sudo nano /boot/config.txt
- Add the following content:
- dtoverlay=tc358743
- If your modules C790 support audio, add the following content to enable audio support. If you use C779, please ignore this step
- dtoverlay=tc358743-audio
- Then reboot the raspberry Pi.
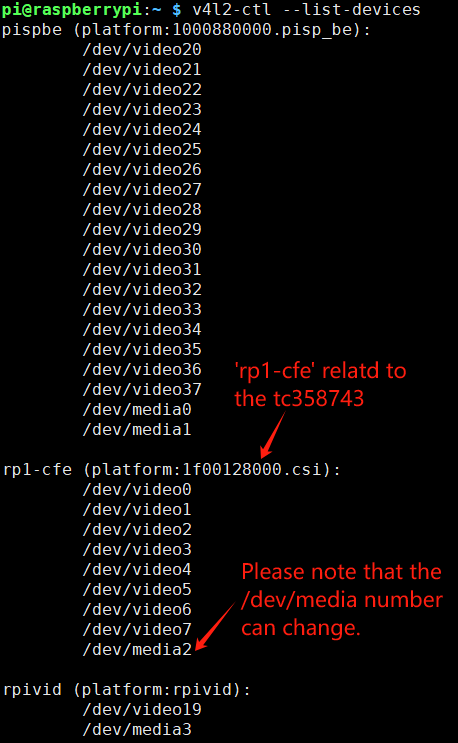
2. Execute the following command to find the media node corresponding to the CSI as media0, under the rp1-cfe (platform: 1f00128000.csi) field:
- v4l2-ctl --list-devices

3. Locate the node corresponding to tc358743 as v4l-subdev2, and the pad0 of rp1-cfe-csi2_ch0 as video0:
blikvm@blikvm:~ $ media-ctl -d /dev/media0 -p
Media controller API version 6.1.63
Media device information
------------------------
driver          rp1-cfe
model           rp1-cfe
serial
bus info        platform:1f00128000.csi
hw revision     0x114666
driver version  6.1.63
Device topology
- entity 1: csi2 (8 pads, 8 links)
            type V4L2 subdev subtype Unknown flags 0
            device node name /dev/v4l-subdev0
        pad0: Sink
                [fmt:SRGGB10_1X10/640x480 field:none colorspace:raw xfer:none ycbcr:601 quantization:full-range]
                <- "tc358743 4-000f":0 [ENABLED,IMMUTABLE]
        pad1: Sink
                [fmt:unknown/8192x1 field:none]
        pad2: Sink
                [fmt:SRGGB10_1X10/640x480 field:none colorspace:raw xfer:none ycbcr:601 quantization:full-range]
        pad3: Sink
                [fmt:SRGGB10_1X10/640x480 field:none colorspace:raw xfer:none ycbcr:601 quantization:full-range]
        pad4: Source
                [fmt:SRGGB10_1X10/640x480 field:none colorspace:raw xfer:none ycbcr:601 quantization:full-range]
                -> "rp1-cfe-csi2_ch0":0 []
                -> "pisp-fe":0 []
        pad5: Source
                [fmt:unknown/8192x1 field:none]
                -> "rp1-cfe-embedded":0 []
        pad6: Source
                [fmt:SRGGB10_1X10/640x480 field:none colorspace:raw xfer:none ycbcr:601 quantization:full-range]
                -> "rp1-cfe-csi2_ch2":0 []
                -> "pisp-fe":0 []
        pad7: Source
                [fmt:SRGGB10_1X10/640x480 field:none colorspace:raw xfer:none ycbcr:601 quantization:full-range]
                -> "rp1-cfe-csi2_ch3":0 []
                -> "pisp-fe":0 []
- entity 10: pisp-fe (5 pads, 7 links)
            type V4L2 subdev subtype Unknown flags 0
            device node name /dev/v4l-subdev1
        pad0: Sink
                [fmt:SRGGB16_1X16/640x480 field:none colorspace:raw xfer:none ycbcr:601 quantization:full-range]
                <- "csi2":4 []
                <- "csi2":6 []
                <- "csi2":7 []
        pad1: Sink
                [fmt:FIXED/8192x1 field:none]
                <- "rp1-cfe-fe_config":0 []
        pad2: Source
                [fmt:SRGGB16_1X16/640x480 field:none colorspace:raw xfer:none ycbcr:601 quantization:full-range]
                -> "rp1-cfe-fe_image0":0 []
        pad3: Source
                [fmt:SRGGB16_1X16/640x480 field:none colorspace:raw xfer:none ycbcr:601 quantization:full-range]
                -> "rp1-cfe-fe_image1":0 []
        pad4: Source
                [fmt:FIXED/8192x1 field:none]
                -> "rp1-cfe-fe_stats":0 []
- entity 16: tc358743 4-000f (1 pad, 1 link)
            type V4L2 subdev subtype Unknown flags 0
            device node name /dev/v4l-subdev2
        pad0: Source
                [fmt:RGB888_1X24/640x480 field:none colorspace:srgb]
                [dv.caps:BT.656/1120 min:640x350@13000000 max:1920x1200@165000000 stds:CEA-861,DMT,CVT,GTF caps:progressive,reduced-blanking,custom]
                [dv.detect:BT.656/1120 1920x1080p24 (2750x1125) stds: flags:]
                [dv.current:BT.656/1120 640x480p59 (800x525) stds:CEA-861,DMT flags:has-cea861-vic]
                -> "csi2":0 [ENABLED,IMMUTABLE]
- entity 18: rp1-cfe-csi2_ch0 (1 pad, 1 link)
            type Node subtype V4L flags 0
            device node name /dev/video0
        pad0: Sink
                <- "csi2":4 []
- entity 22: rp1-cfe-embedded (1 pad, 1 link)
            type Node subtype V4L flags 0
            device node name /dev/video1
        pad0: Sink
                <- "csi2":5 []
- entity 26: rp1-cfe-csi2_ch2 (1 pad, 1 link)
            type Node subtype V4L flags 0
            device node name /dev/video2
        pad0: Sink
                <- "csi2":6 []
- entity 30: rp1-cfe-csi2_ch3 (1 pad, 1 link)
            type Node subtype V4L flags 0
            device node name /dev/video3
        pad0: Sink
                <- "csi2":7 []
- entity 34: rp1-cfe-fe_image0 (1 pad, 1 link)
            type Node subtype V4L flags 1
            device node name /dev/video4
        pad0: Sink
                <- "pisp-fe":2 []
- entity 38: rp1-cfe-fe_image1 (1 pad, 1 link)
            type Node subtype V4L flags 0
            device node name /dev/video5
        pad0: Sink
                <- "pisp-fe":3 []
- entity 42: rp1-cfe-fe_stats (1 pad, 1 link)
            type Node subtype V4L flags 0
            device node name /dev/video6
        pad0: Sink
                <- "pisp-fe":4 []
- entity 46: rp1-cfe-fe_config (1 pad, 1 link)
            type Node subtype V4L flags 0
            device node name /dev/video7
        pad0: Source
                -> "pisp-fe":1 []
4. To query the current input source information, if the resolution displays as 0, it indicates that no input source signal has been detected. In this case, you should check the hardware connections and follow the steps mentioned above to troubleshoot.
 blikvm@blikvm:~ $ v4l2-ctl -d /dev/v4l-subdev2 --query-dv-timings
     Active width: 1920
     Active height: 1080
     Total width: 2750
     Total height: 1125
     Frame format: progressive
     Polarities: -vsync -hsync
     Pixelclock: 74250000 Hz (24.00 frames per second)
     Horizontal frontporch: 0
     Horizontal sync: 830
     Horizontal backporch: 0
     Vertical frontporch: 0
     Vertical sync: 45
     Vertical backporch: 0
     Standards:
     Flags:
Confirm the current input source information.
v4l2-ctl -d /dev/v4l-subdev2 --set-dv-bt-timings query
![]()
Initialize media0.
media-ctl -d /dev/media0 -r
Connect CSI2's pad4 to rp1-cfe-csi2_ch0's pad0.
media-ctl -d /dev/media0 -l \csi2'\:4 -> '\rp1-cfe-csi2_ch0'\:0 [1]'
Configure the media node.
media-ctl -d /dev/media0 -V \csi2'\:0 [fmt:RGB888_1X24/1920x1080 field:none colorspace:srgb]'
media-ctl -d /dev/media0 -V \csi2'\:4 [fmt:RGB888_1X24/1920x1080 field:none colorspace:srgb]'
Set the output format.
v4l2-ctl -v width=1920,height=1080,pixelformat=RGB3
Capture two frames for testing to verify if tc358743 is functioning properly. Other methods, such as using GStreamer, are not currently available.
v4l2-ctl --verbose -d /dev/video0 --set-fmt-video=width=1920,height=1080,pixelformat='RGB3' --stream-mmap=4 --stream-skip=3 --stream-count=2 --stream-to=hdmiin.yuv --stream-poll
If you have installed a desktop version of Raspberry Pi, you can use ffplay to directly play YUV files.
ffplay -f rawvideo -video_size 1920x1080 -pixel_format bgr24 hdmiin.yuv
On a Windows computer, you can use software like 7yuv to view .yuv files. For the tutorial with an input format of 19201080, you should select BGR888 in the top right corner of 7yuv and set the resolution to 19201080 to view the two frames you just captured.
Enable comment auto-refresher
Anonymous user #1
Permalink |