Difference between revisions of "How to Configure RAID Setting"
(No difference)
|
Revision as of 15:38, 5 March 2024
This guide describes how to do RAID setting, and it only applies to X882,X885,NASPi Gemini 3.5 or NASPi Gemini 2.5
- X882 is the storage shield of NASPi Gemini 2.5
- X885 is the storage shield of NASPi Gemini 3.5
Warning : Please backup your data before setup and switch, otherwise you maybe lost your data.
Please read Raid Instruction firstly. You can freely choose the four RAID modes supported by this device by setting the jumper cap.
Start your setup, please strictly follow the steps below;
1. Assemble your device,refer to the installation video of the corresponding device to assemble, only the top cover is not installed, because you need to use the onboard buttons^_^.
- PS: USB connector must be insert
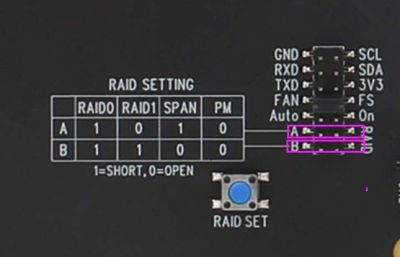
2. Disconnect power supply, and choose your Raid setting, insert or remove jumper by the following jumper instruction:
- For RAID0 setting, Both A and B jumpers need to be shorted
- For RAID1 setting, Only the B jumper needs to be shorted
- For PM setting, No jumpers need to be shorted
and so on
3. Power on the this kit with the 12V 5A power adapter, wait for the Raspberry Pi OS to boot up
4. Press the RAID SET button for about 5 seconds , and release it till the blue LED indicators starts flashing, and it means the RAID setting is complete.
5. Remove power supply then connect again, then turn on the device;
6. How to check if your RAID setting is successful?
After your device is reboot, then type the following command:
lsusb
The result is as follows
Bus 002 Device 002: ID 152d:0561 JMicron Technology Corp. / JMicron USA Technology Corp. JMS551 - Sharkoon SATA QuickPort Duo
Bus 002 Device 001: ID 1d6b:0003 Linux Foundation 3.0 root hub
Bus 001 Device 003: ID 046d:c52b Logitech, Inc. Unifying Receiver
Bus 001 Device 002: ID 2109:3431 VIA Labs, Inc. Hub
Bus 001 Device 001: ID 1d6b:0002 Linux Foundation 2.0 root hub
The first line indicates that the USB device has been correctly recognized by the OS. (JMicron is the USB storage chip supplier)
lsblk -p
The result is as follows
NAME             MAJ:MIN RM   SIZE RO TYPE MOUNTPOINT
/dev/sda           8:0    0 298.1G  0 disk
└─/dev/sda1        8:1    0 298.1G  0 part
/dev/sdb           8:16   0  74.5G  0 disk
└─/dev/sdb1        8:17   0  74.5G  0 part
/dev/mmcblk0     179:0    0   7.4G  0 disk
├─/dev/mmcblk0p1 179:1    0   256M  0 part /boot
└─/dev/mmcblk0p2 179:2    0   7.1G  0 part /
There are two HDDs/SSDs devices were found. (/dev/sda and /dev/sdb) to PM model;
Or
NAME             MAJ:MIN RM   SIZE RO TYPE MOUNTPOINT
/dev/sda           8:0    0 298.1G  0 disk
└─/dev/sda        8:1    0 298.1G  0 part
/dev/mmcblk0     179:0    0   7.4G  0 disk
├─/dev/mmcblk0p1 179:1    0   256M  0 part /boot
└─/dev/mmcblk0p2 179:2    0   7.1G  0 part /
There is ONLY one HDD/SSD devices is found. (/dev/sda) to RAID1 or RAID0 model;
[NOTE]:
1. Once you set the RAID mode successfully, you need to partition&format&mount the hdd/ssd, so that it can be recognized by your Raspberry Pi OS. please refer to How to View/Partition/Format/Mount HDD/SSD
2. If you always think that the setup fails, please strictly follow the steps above. We have tested many times.
3. Or run lsusb and lsblk, and then send us the results to email: support@geekworm.com
Introduction to LED flashing when setting raid on X882 / X885 shield
https://www.youtube.com/shorts/ZoNHahaMqXs
FAQ

Enable comment auto-refresher
Anonymous user #5
Permalink |
Lisa
Anonymous user #4
Permalink |
Harry
Harry
Anonymous user #3
Permalink |
Lisa
Anonymous user #2
Permalink |
Lisa
Anonymous user #1
Permalink |
Walker