Difference between revisions of "How to enable OLED display"
| Line 2: | Line 2: | ||
How to enable OLED display on Raspbian: <ref>Adafruit Python SSD1306 library: https://github.com/adafruit/Adafruit_Python_SSD1306</ref> | How to enable OLED display on Raspbian: <ref>Adafruit Python SSD1306 library: https://github.com/adafruit/Adafruit_Python_SSD1306</ref> | ||
| − | 1. Update your Pi and Install the required dependencies | + | '''1. Update your Pi and Install the required dependencies''' |
<pre> | <pre> | ||
sudo apt-get update | sudo apt-get update | ||
| Line 16: | Line 16: | ||
| − | 2. Run the following command to check the oled i2c port | + | '''2. Run the following command to check the oled i2c port''' |
sudo i2cdetect -y 1 | sudo i2cdetect -y 1 | ||
for X729, the I2C address is 0x3c | for X729, the I2C address is 0x3c | ||
| Line 22: | Line 22: | ||
Please sure teh I2C is enable before this step, please refer to [[How to enable I2C]] | Please sure teh I2C is enable before this step, please refer to [[How to enable I2C]] | ||
| − | 3. Installation | + | |
| + | '''3. Installation''' | ||
3.1 Download the required scripts | 3.1 Download the required scripts | ||
Revision as of 14:42, 21 July 2023
How to enable OLED display on Raspbian: [1]
1. Update your Pi and Install the required dependencies
sudo apt-get update
sudo apt-get -y upgrade
sudo apt-get -y install i2c-tools python3-smbus python-smbus
sudo apt-get -y install python3-pip python3-pil
sudo pip3 install --upgrade setuptools
sudo pip3 install --upgrade adafruit-python-shell
sudo pip3 install adafruit-circuitpython-ssd1306
sudo pip3 install pi-ina219
sudo pip3 show pi-ina219
2. Run the following command to check the oled i2c port
sudo i2cdetect -y 1
for X729, the I2C address is 0x3c
Please sure teh I2C is enable before this step, please refer to How to enable I2C
3. Installation
3.1 Download the required scripts
cd ~
git clone https://github.com/suptronics/oled.git
cd oled
3.2 Install the Adafruit CircuitPython library
sudo python3 raspi-blinka.py
3.3 Answering Y and hitting Enter when reboot prompted. Then renavigate to the oled directly by entering:
cd oled
3.4 Run the script to test the display
sudo python3 x729.py
3.5 Run the script at Raspberry Pi boot
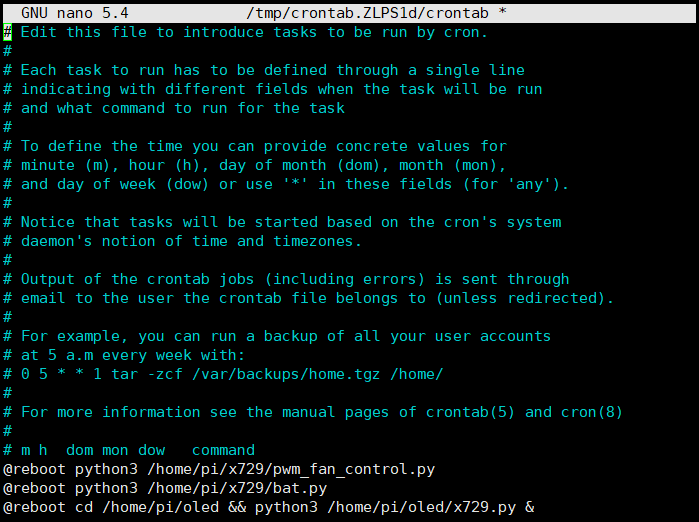
sudo crontab -e
3.6 Add a line at the end of the file that reads like this:
PS: we must toogle to the /home/pi/oled directory because .ttf files is required to locate in current directory,you can refer to x729.py source file, or you can also remove the 'cd /home/pi/oled &&' if you use the absolute path of the ttf file in the source code.
@reboot cd /home/pi/oled && python3 /home/pi/oled/x729.py &
Save and exit. In nano, you do that by hitting CTRL + X, answering Y and hitting Enter when prompted.
References
- ↑ Adafruit Python SSD1306 library: https://github.com/adafruit/Adafruit_Python_SSD1306

Enable comment auto-refresher
Anonymous user #1
Permalink |
Harry