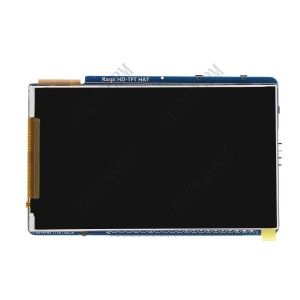
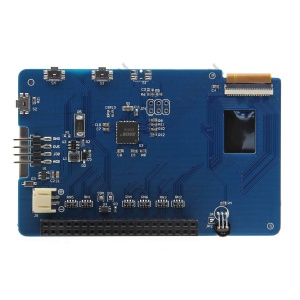
3.5 inch TFT 800x480@60fps
Overview
3.5 inch HD-TFT Display shield for Raspberry pi 3B/2B/B+ With Keyboards and Remote IR
[update]:This LCD supports raspberry pi 4 computer model b, you only need to modified the config.txt to use this lcd. please refer to 3.5 inch TFT 800x480@60fps#How to use this screen on Pi 4B
Video
Features
- Demensions: 85mm×56.5mm;
- Resolution: 800 x 480, 3.5 inch;
- 267ppi High PPI display screen;
- 11ms High Response Time(more than 60 fps);
- 160° Wide Viewing Angle;
- 900:1 High Contrast Ratio;
- Sunlight Readable;
- Backlight can change;
- With 2 keyboards;
- With IR function;
- With I2C Master;
- Without touch
- DC 5V, 80~120mA
How to use this screen on Pi 4B
[Update]:You can use this script tool to use this LCD now: https://github.com/geekworm-com/22LCD-script
or download this File:Config.zip, then unzip it, and move it to /boot/
How to use this screen for PI 3B+/3B/2B
We update the user method for the old raspberry pi board such as 3B+/3B/2B etc. Only append the following comment to the end of config.txt file;
We test it on the official Rasdpbian 2018-11-13-raspbian-stretch verson.
#for raspberry pi 3b+/3b/2b+/b+
dtoverlay=dpi18
overscan_left=0
overscan_right=0
overscan_top=0
overscan_bottom=0
framebuffer_width=800
framebuffer_height=480
enable_dpi_lcd=1
display_default_lcd=1
dpi_group=2
dpi_mode=87
dpi_output_format=0x6f005
hdmi_timings=480 0 16 16 24 800 0 4 2 2 0 0 0 60 0 32000000 6
display_rotate=3
How to change the backlight, push the button
How to use 2 keys,like gpio
How to use the I2C master(I2C_3)
you can use this module by the following step
step 1. Download the official firmware, then upgrade to the latest kernel
sudo rpi-update
step 2. Config file to enable i2c_3
sudo nano /boot/config.txt
Add the following line:
dtoverlay=i2c-gpio,i2c_gpio_scl=24,i2c_gpio_sda=23framebuffer_height=480
step 3. Make and install the pigpio
sudo git clone git://github.com/joan2937/pigpio
cd pigpio
sudo python setup.py install
sudo make
sudo make install
step 4. install the I2C tools
sudo apt-get install i2c-tools python-smbus
step 5. Config file to /etc/modules
sudo nano /etc/modules
Add the following line:
i2c-bcm2708
i2c-dev
step 6. Config file to /etc/ rc.loacl
sudo nano /etc/ rc.loacl
Add the following line:
raspi-gpio set 23 pu
raspi-gpio set 24 pu
step 7. Save then restart;
How to use the IR function
Description: IR receiver function:
- Operating frequency: 38K HZ
- Receiving distance: 18-20m
- Reception angle: +/- 45 degrees
The infrared transmitter function
- Wavelength: 940nm
- Transmitting distance: 7-8m
Preparation: Burn into raspbian system;
1. Start the Raspberry Pi, login Raspberry Pi through SSH, the user name: pi, default password: raspberry
2. Update and install lirc software, run the following command:
sudo apt-get update
sudo apt-get install lirc
3. Edit the config.txt, and add configuration. use GPIO PIN 26;
sudo nano /boot/config.txt
Add the following line into the config.txt file:
dtoverlay=lirc-rpi, gpio_in_pin=26
4. Edit LRIC config file to enable infrared function; sudo nano /etc/lirc/hardware.conf
Modify the following lines:
LIRCD_ARGS=”--uinput”
DRIVER=”default”
DEVICE=”/dev/lirc0″
MODULES=”lirc_rpi”
5. Run "sudo reboot" to restart the Raspberry Pi, then run "ls / dev / l *" to view the infrared device is enabled
It's enabled if you can view the above red mark;
6. Record Button
sudo  /etc/init.d/lirc stop
sudo irrecord -n -d /dev/lirc0 ~/lircd.conf
Record your IR remote control Follow the prompts, such as “pause”,“nextsong”,“prevsong”,“stop”,“volumeup”,“volumedown” etc.
then you can get a lircd.conf file; override the old lircd.conf file;
sudo cp ~/lircd.conf /etc/lirc/lircd.conf
7. Startup lirc software;
sudo /etc/init.d/lirc start
8. Run the following command to view & check record result
sudo irw
Then press those record button;
9. You can view those button name to run irsend command;
irsend LIST /home/pi/lircd.conf “”
maybe it's following content:
irsend: 000000000000c837 pause
irsend: 00000000000048b7 nextsong
10. Now you can use the infrared transmitter, recorded before launching the remote control key coding, use that will extend the board as a rotary tool.Launch the command reference command:
irsend SEND_ONCE /home/pi/lircd.confpause
irsend SEND_ONCE /home/pi/lircd.confnextsong
irsend SEND_ONCE /home/pi/lircd.conf KEY_VOLUMEDOWN
irsend SEND_ONCE /home/pi/lircd.conf KEY_VOLUMEUP
Appendix
Packing List
1 x HD 3.5 inch TFT screen
GPIO Pin
Download
Matching CNC Case
1. Support camera module(official original camera), with a camera acrylic box.
2. Reserve interface of battery compartment(soon coming).
3. Excellent heat sink to ensure heat dissipation.


Enable comment auto-refresher
Anonymous user #11
Permalink |
Anonymous user #10
Permalink |
Anonymous user #9
Permalink |
Anonymous user #8
Permalink |
Anonymous user #7
Permalink |
Anonymous user #6
Permalink |
Anonymous user #5
Permalink |
Admin
Anonymous user #5
Permalink |
Admin
Anonymous user #3
Permalink |
Anonymous user #2
Permalink |
Admin
Anonymous user #1
Permalink |
Anonymous user #4