Difference between revisions of "Template:KVM-FAQ"
| (32 intermediate revisions by 2 users not shown) | |||
| Line 1: | Line 1: | ||
| + | '''PiKVM''' is first and foremost a '''trademark''', which is controlled by https://pikvm.org, and it '''does not''' belong to Geekworm. | ||
| + | |||
| + | '''PiKVM''' is Free and Open Source Software released under the [https://github.com/pikvm/pikvm?tab=GPL-3.0-1-ov-file#readme GPLv3]. | ||
| + | |||
| + | <span style="color:#f012be;">Geekworm's KVM products use the open source pikvm software developed by [https://pikvm.org pikvm.org] under the GPLv3 without any modification. Geekworm will regularly donate to pikvm.org</span> | ||
| + | |||
| + | |||
| + | <span class="tb_red">About '''after-sales service''' of Geekworm KVM Products:</span> | ||
| + | |||
| + | The after-sales service of all products sold by Geekworm should be the responsibility of our Geekworm team (email: '''support@geekworm.com'''), please <span class="tb_red">DO NOT</span> disturb the official PiKVM support team. | ||
| + | |||
* First of all, we recommend you to get more FAQ information on the official website: [https://docs.pikvm.org/faq/ official FAQ], or check the following FAQ; | * First of all, we recommend you to get more FAQ information on the official website: [https://docs.pikvm.org/faq/ official FAQ], or check the following FAQ; | ||
| + | |||
* You can post a issue ticket at [https://geekworm.com/community/forum/topic/78220/pikvm-faq Geekworm forum] or email to us (support@geekworm.com) and attached your installation pictures or videos to get some help. | * You can post a issue ticket at [https://geekworm.com/community/forum/topic/78220/pikvm-faq Geekworm forum] or email to us (support@geekworm.com) and attached your installation pictures or videos to get some help. | ||
| + | |||
* Blog sharing for reference: https://www.andysblog.de/kvm-over-ip-pikvm-als-bausatz | * Blog sharing for reference: https://www.andysblog.de/kvm-over-ip-pikvm-als-bausatz | ||
<div class="toccolours mw-collapsible mw-collapsed"> | <div class="toccolours mw-collapsible mw-collapsed"> | ||
| − | <div style="font-weight:bold;line-height:1.0; | + | <div style="font-weight:bold;line-height:1.0;"> |
| − | + | Q: How to enable oled display on [[KVM-A4]]? | |
| + | </div> | ||
| + | <div class="mw-collapsible-content"> | ||
| + | A. Refer to https://geekworm.com/community/forum/topic/85024/enable-oled-on-geekworm-pikvm-a4-kit | ||
| + | </div> | ||
| + | </div> | ||
| + | |||
| + | <div class="toccolours mw-collapsible mw-collapsed"> | ||
| + | <div style="font-weight:bold;line-height:1.0; "> | ||
| + | Q: Why [[KVM-A3]]/[[KVM-A4]]/[[KVM-A8]]/[[X680]] does not show the video only display No Signals? | ||
</div> | </div> | ||
<div class="mw-collapsible-content"> | <div class="mw-collapsible-content"> | ||
A: | A: | ||
| + | * First refer to the [https://docs.pikvm.org/faq/#video-problems Video problems] to troubleshoot | ||
| + | * Please check the hardware connection. Double-check that the video capture device is connected correctly and tightly. | ||
| + | * Make sure you use the original HDMI port. If your desktop only has a VGA display port, there may be no video signal when you use <b>VGA to HDMI adapter</b>, and there is no way to solve this; However, you can try to lower the resolution and restart the PC to test, but the probability of success is very low. | ||
| + | * Change the HDMI cable to test. | ||
| + | * Test the X630 separately to check if there is HDMI output.(run the <code>ls /dev/video0</code> command, if you see anything such as '''/dev/video0''' other than file not found, then it’s available ) | ||
| + | * Some laptops do not output any signal until you switch the output (usually via the FN + and an F5 key on the keyboard). | ||
| + | * Your computer maybe enter sleep mode, please exit sleep mode. | ||
| + | * '''Feedback from users:''' If you're using something like '''NGINX Proxy Manager''', you must have '''Websockets Support enabled''' for it to work correctly – screenshots below: | ||
| + | :[[File:Pikvm-websocket-enable.png]] | ||
| + | * '''Feedback from users:''' Multiple Network IPs. if you'll have similar thing in the future: janus is using stun servers for determining public ip address, if the network has several public IP addresses and route traffic through multiple of those, janus via stun will detect the change of the network and restart the stream each time | ||
| + | :Solution: either lock traffic from pikvm through one gateway (one public IP address) or configure some sort of session persistence (sticky connection) | ||
| + | * Run the command <code>systemctl status kvmd-tc358743</code> to check whether the video service is working properly. | ||
| + | </div> | ||
| + | </div> | ||
| − | + | <div class="toccolours mw-collapsible mw-collapsed"> | |
| − | + | <div style="font-weight:bold;line-height:1.0;"> | |
| − | + | Q: Which pins are available on the KVM-A3? | |
| − | + | </div> | |
| − | + | <div class="mw-collapsible-content"> | |
| − | + | A: You only can use GPIO16, 26, 11, 17, 25, 9, 10 pins on [[KVM-A3]] | |
| + | </div> | ||
| + | </div> | ||
| + | |||
| + | <div class="toccolours mw-collapsible mw-collapsed"> | ||
| + | <div style="font-weight:bold;line-height:1.0;"> | ||
| + | Q: I want to control several pc power. Is it possible with one [[KVM-A3]] and several [[X630-A5]]? | ||
| + | </div> | ||
| + | <div class="mw-collapsible-content"> | ||
| + | A. No, one kit can only control one pc, you can refer to [[X680]] to control up to 4 PCs. | ||
</div> | </div> | ||
</div> | </div> | ||
| Line 21: | Line 66: | ||
<div class="toccolours mw-collapsible mw-collapsed"> | <div class="toccolours mw-collapsible mw-collapsed"> | ||
<div style="font-weight:bold;line-height:1.0;"> | <div style="font-weight:bold;line-height:1.0;"> | ||
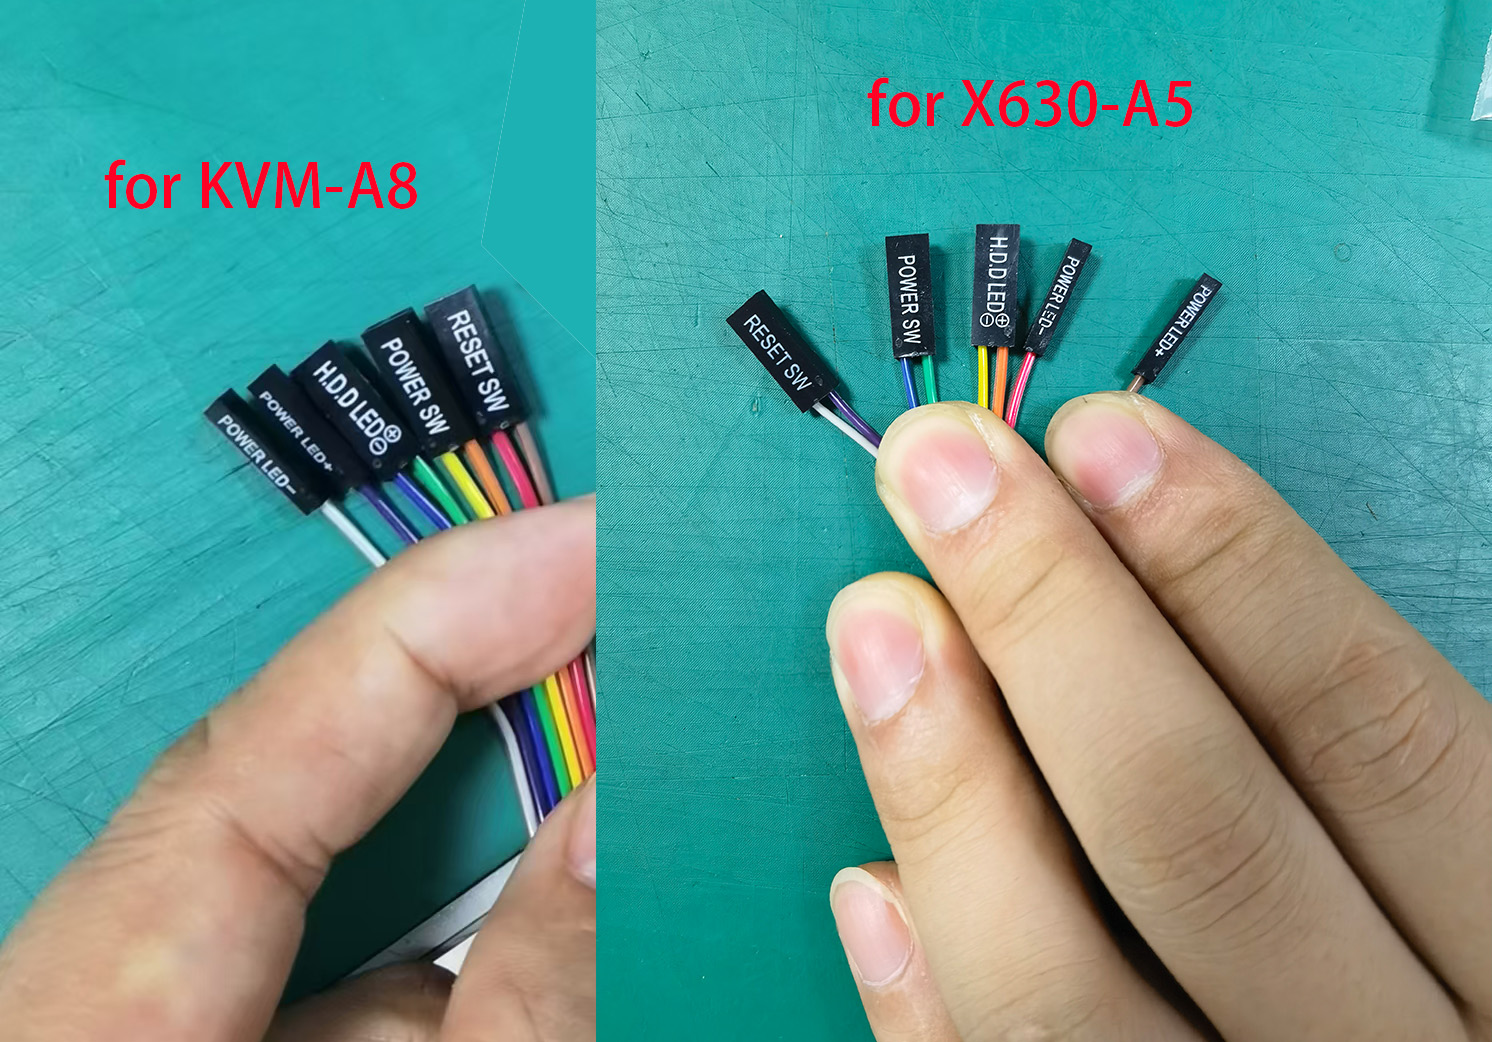
| − | + | Q: How to do if [[KVM-A8]] hangs up or reboot or has to be started manually? | |
</div> | </div> | ||
<div class="mw-collapsible-content"> | <div class="mw-collapsible-content"> | ||
| Line 44: | Line 89: | ||
<div class="toccolours mw-collapsible mw-collapsed"> | <div class="toccolours mw-collapsible mw-collapsed"> | ||
<div style="font-weight:bold;line-height:1.0;"> | <div style="font-weight:bold;line-height:1.0;"> | ||
| − | + | Q. I want to control several pc power. Is it possible with one [[KVM-A8]] | |
</div> | </div> | ||
<div class="mw-collapsible-content"> | <div class="mw-collapsible-content"> | ||
| Line 53: | Line 98: | ||
<div class="toccolours mw-collapsible mw-collapsed"> | <div class="toccolours mw-collapsible mw-collapsed"> | ||
<div style="font-weight:bold;line-height:1.0;"> | <div style="font-weight:bold;line-height:1.0;"> | ||
| − | + | Q. How to login pikvm os? | |
</div> | </div> | ||
<div class="mw-collapsible-content"> | <div class="mw-collapsible-content"> | ||
A: Input the XX.XX.XX.XX ip address on the explorer, then input user: admin, the default password is 'admin' also. | A: Input the XX.XX.XX.XX ip address on the explorer, then input user: admin, the default password is 'admin' also. | ||
| + | |||
| + | Or refer to [https://docs.pikvm.org/webui/#getting-to-know-the-interface GETTING TO KNOW THE INTERFACE] | ||
</div> | </div> | ||
</div> | </div> | ||
| Line 62: | Line 109: | ||
<div class="toccolours mw-collapsible mw-collapsed"> | <div class="toccolours mw-collapsible mw-collapsed"> | ||
<div style="font-weight:bold;line-height:1.0;"> | <div style="font-weight:bold;line-height:1.0;"> | ||
| − | + | Q: How to connect to wifi? | |
| + | </div> | ||
| + | <div class="mw-collapsible-content"> | ||
| + | A: Refer to [https://docs.pikvm.org/first_steps/ | Optional setting up Wi-Fi] | ||
| + | |||
| + | If you want to connect KVM to a Wi-Fi network, you need to tell the device ESSID and password before first boot. To do this, mount the first partition of the memory card (FAT32) and edit or make the pikvm.txt file there. Do not remove line FIRSTBOOT=1 or FIRST_BOOT-1 for first time booting, just add your wifi settings like this: | ||
| + | <pre> | ||
| + | FIRSTBOOT=1 | ||
| + | WIFI_ESSID='mynet' | ||
| + | WIFI_PASSWD='your password' | ||
| + | </pre> | ||
| + | There is a possibility that, in countries that support CH13, the device will not connect. You will need to configure your router to disable channels 12-14 or disable Auto scan mode so it will connect. | ||
| + | |||
| + | Save, unmount and follow the next step. | ||
| + | </div> | ||
| + | </div> | ||
| + | |||
| + | <div class="toccolours mw-collapsible mw-collapsed"> | ||
| + | <div style="font-weight:bold;line-height:1.0;"> | ||
| + | Q. How to switch root user? | ||
</div> | </div> | ||
<div class="mw-collapsible-content"> | <div class="mw-collapsible-content"> | ||
| Line 73: | Line 139: | ||
<div class="toccolours mw-collapsible mw-collapsed"> | <div class="toccolours mw-collapsible mw-collapsed"> | ||
<div style="font-weight:bold;line-height:1.0;"> | <div style="font-weight:bold;line-height:1.0;"> | ||
| − | + | Q: Will there will be a case for [[KVM-A4]]? | |
| + | </div> | ||
| + | <div class="mw-collapsible-content"> | ||
| + | A: No, there is no plan to make a case for [[KVM-A4]], the [[KVM-A4]] kit can only use WiFi NOT ethernet, the match metal case will block the WiFi singal. | ||
| + | </div> | ||
| + | </div> | ||
| + | |||
| + | <div class="toccolours mw-collapsible mw-collapsed"> | ||
| + | <div style="font-weight:bold;line-height:1.0;"> | ||
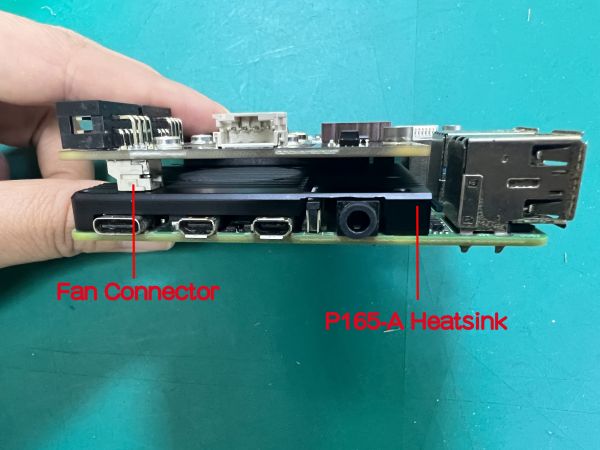
| + | Q. Does [[KVM-A8]] support passive heatsink such as (P165-A or P165-B etc) instead of fan? | ||
</div> | </div> | ||
<div class="mw-collapsible-content"> | <div class="mw-collapsible-content"> | ||
| − | A: You can use the [[P165]] aluminium heatsink or the [[H402]] pure copper heatsink, but must remove the X630-A8 fan and fan connector. | + | A: You can use the [[P165]] aluminium heatsink or the [[H402]] pure copper heatsink, but must remove the [[X630-A8]] fan and fan connector. |
①If use '''P165-A'''(thickness 7mm), you can use '''M2.5*5mm''' spacer instead of '''M2.5*12mm''' spacer to fix it; | ①If use '''P165-A'''(thickness 7mm), you can use '''M2.5*5mm''' spacer instead of '''M2.5*12mm''' spacer to fix it; | ||
| Line 90: | Line 165: | ||
</div> | </div> | ||
| + | <div class="toccolours mw-collapsible mw-collapsed"> | ||
| + | <div style="font-weight:bold;line-height:1.0;"> | ||
| + | <span class="tb_red">Q: Why is the X680 not working?</span> | ||
| + | </div> | ||
| + | <div class="mw-collapsible-content"> | ||
| + | A: | ||
| + | |||
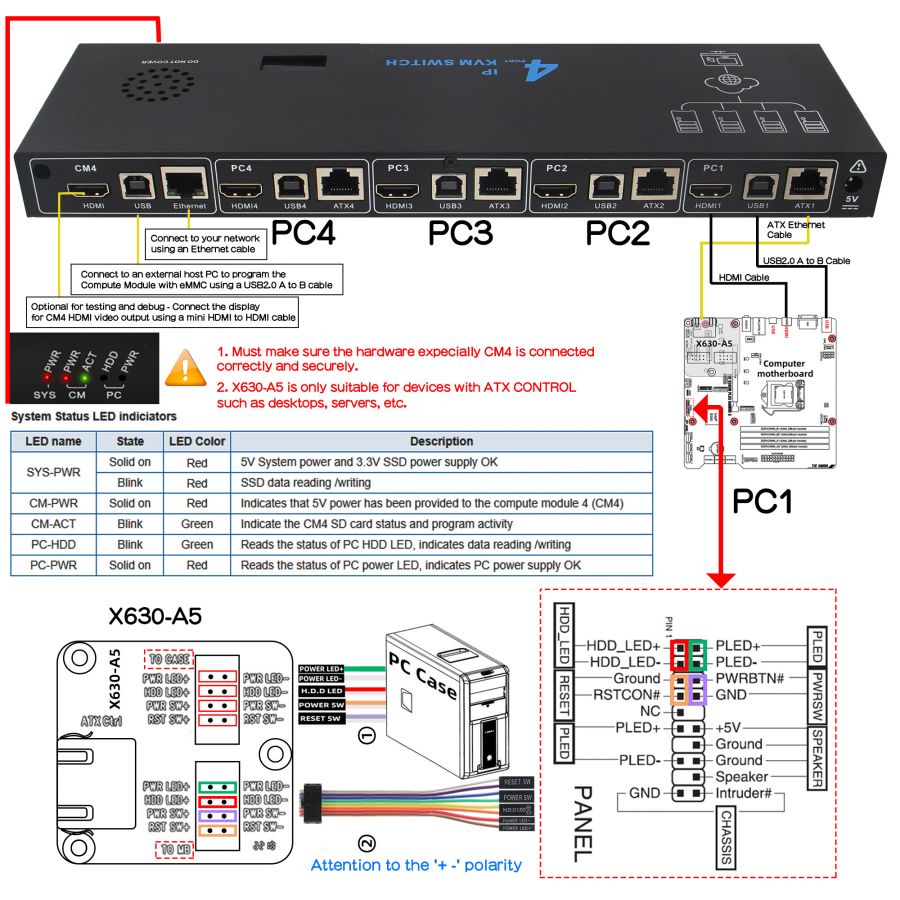
| + | 1. '''Firstly, must make sure the hardware expecially CM4 is connected correctly and securely. | ||
| + | * Check if the X680's onboard SYS-PWR, CM-PWR, CM-ACT LEDs are lit. | ||
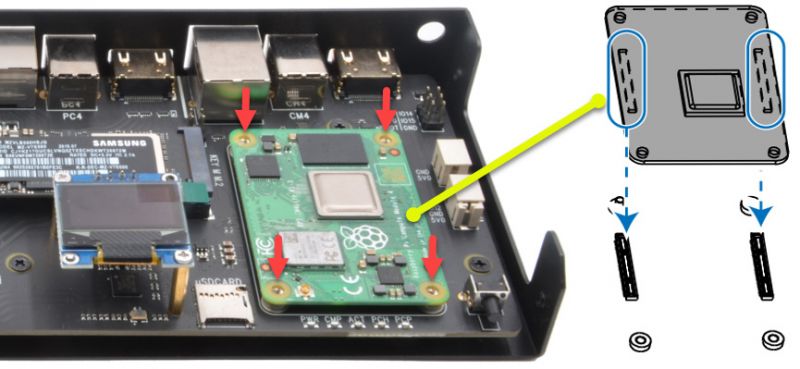
| + | * If SYS-PWR LED is not lit, that means no power to X680; '''If the CM-PWR and CM-ACT LEDs are not lit, that means that the CM4 is not installed properly. Please recheck the CM4 installation, or check if the CM4 / X680 installation slot is damaged.(This is important! Many problems are caused by poor contact of CM4)''' | ||
| + | * If the X680's SYS-PWR, CM-PWR, CM-ACT LEDs are lit, then check the wiring connection. | ||
| + | |||
| + | Please refer to the following picture for the wiring connection and LED description. | ||
| + | |||
| + | [[File:X680-IMG-5523-Connection-Diagram-New.jpg|900px]] | ||
| + | |||
| + | [[File: X680-CM4-install1.jpg|800px]] | ||
| + | |||
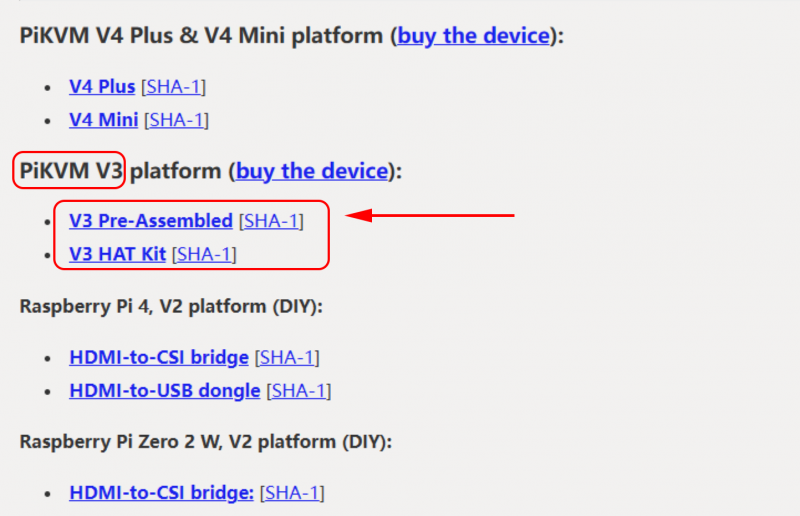
| + | 2. '''Make sure to use the right pikvm OS. Only PiKVM V3 is supported'''. | ||
| + | |||
| + | V3 Pre-Assembled version already includes OLED display configuration, while V3 HAT Kit version need to configuring OLED yourself. | ||
| + | |||
| + | [[File:Pi4-V3-HAT.png|800px]] | ||
| + | |||
| + | 3. <span class="tb_red">Important: Remove the USB cable after programming is complete. </span> | ||
| + | |||
| + | 4. Please email us at <span class="tb_blue">support@geekworm.com</span> if you have further questions. | ||
| + | </div> | ||
| + | </div> | ||
| + | |||
| + | <div class="toccolours mw-collapsible mw-collapsed"> | ||
| + | <div style="font-weight:bold;line-height:1.0;"> | ||
| + | Q: Why is USB mass driver not recognized on X680? | ||
| + | </div> | ||
| + | <div class="mw-collapsible-content"> | ||
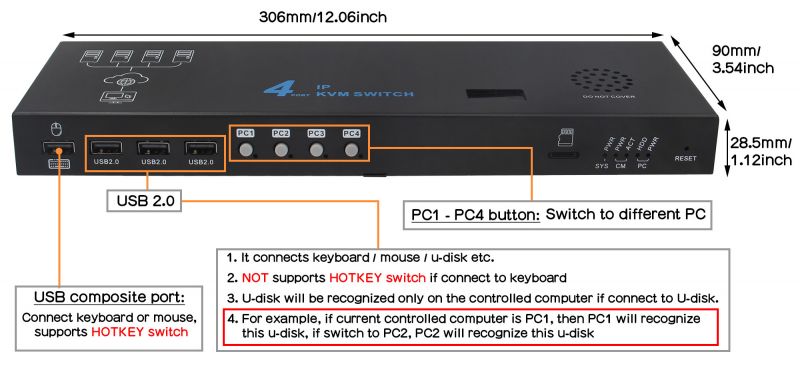
| + | A: Please refer to the description in the red rectangle in the picture below; | ||
| + | |||
| + | [[File:X680-usb-not-detected-faq.jpg|800px]] | ||
| + | |||
| + | The USB mass is not recognized in PIKVM OS, you can understand USB mass as a local USB HUB in PIKVM OS. | ||
| + | |||
| + | These 3 USB ports are used for local switching between target PC1-PC4, e.g. a USB disk with the OS image can be used to install the os in PC1, if switching to PC2, then the os can be installed in PC2, and so on. | ||
| + | </div> | ||
| + | </div> | ||
| + | |||
| + | <div class="toccolours mw-collapsible mw-collapsed"> | ||
| + | <div style="font-weight:bold;line-height:1.0;"> | ||
| + | Q: Does the x680 support audio? | ||
| + | </div> | ||
| + | <div class="mw-collapsible-content"> | ||
| + | A: Yes. Refer to [[Enable pikvm hdmi audio]]</div> | ||
| + | </div> | ||
| + | |||
| + | <div class="toccolours mw-collapsible mw-collapsed"> | ||
| + | <div style="font-weight:bold;line-height:1.0;"> | ||
| + | Q: Does the X680 support PoE power? How to enable PoE Power? | ||
| + | </div> | ||
| + | <div class="mw-collapsible-content"> | ||
| + | A: The X680 doesn't support POE, but you can use something similar to the [[PD3005G-3A]] | ||
| + | </div> | ||
| + | </div> | ||
| + | |||
| + | <div class="toccolours mw-collapsible mw-collapsed"> | ||
| + | <div style="font-weight:bold;line-height:1.0;"> | ||
| + | Q: Why can't I switch to another PC on X680?' | ||
| + | </div> | ||
| + | <div class="mw-collapsible-content"> | ||
| + | A: You need to make sure that your target computer is not in '''sleep''', because when the computer is sleep, the USB port will stop supplying power | ||
| + | </div> | ||
| + | </div> | ||
| + | |||
| + | <div class="toccolours mw-collapsible mw-collapsed"> | ||
| + | <div style="font-weight:bold;line-height:1.0;"> | ||
| + | Q: Why NVME SSD cannot be recognized on X680? | ||
| + | </div> | ||
| + | <div class="mw-collapsible-content"> | ||
| + | A: Login the pikvm web teminal, then type the following command: | ||
| + | lspci | ||
| + | The result of the command should look similar to the following, if you can't find something similar to the following, your NVME SSD is not compatible | ||
| + | </div> | ||
| + | </div> | ||
| + | |||
| + | <div class="toccolours mw-collapsible mw-collapsed"> | ||
| + | <div style="font-weight:bold;line-height:1.0;"> | ||
| + | Q: How to boot from NVMe SSD on X680? | ||
| + | </div> | ||
| + | <div class="mw-collapsible-content"> | ||
| + | A: Refer to the following third-party tutorials: | ||
| + | * https://www.jeffgeerling.com/blog/2021/raspberry-pi-can-boot-nvme-ssds-now | ||
| + | * https://hagensieker.com/2022/04/17/booting- a-raspberry-pi-cm4-from-an-nvme/ | ||
| + | * https://dphacks.com/2021/11/21/how-to-boot-a-pi-cm4-from-nvme-ssd/ | ||
| + | You can also check out the official guide of the Raspberry Pi Foundation on how to boot CM4 from NVMe devices | ||
| + | * https://github.com/raspberrypi/documentation/blob/develop/documentation/asciidoc/computers/raspberry-pi/boot-nvme.adoc | ||
| + | </div> | ||
| + | </div> | ||
| + | |||
| + | <div class="toccolours mw-collapsible mw-collapsed"> | ||
| + | <div style="font-weight:bold;line-height:1.0;"> | ||
| + | Q: Why OLED is not display? | ||
| + | </div> | ||
| + | <div class="mw-collapsible-content"> | ||
| + | A: Please follow the steps below to check | ||
| + | |||
| + | 1. Please confirm that your OS is right: | ||
| + | |||
| + | Due to downloading the wrong firmware, the OLED cannot be displayed. We ALSO made such mistakes during testing | ||
| + | |||
| + | [[File:Pi4-V3-HAT.png|800px]] | ||
| + | |||
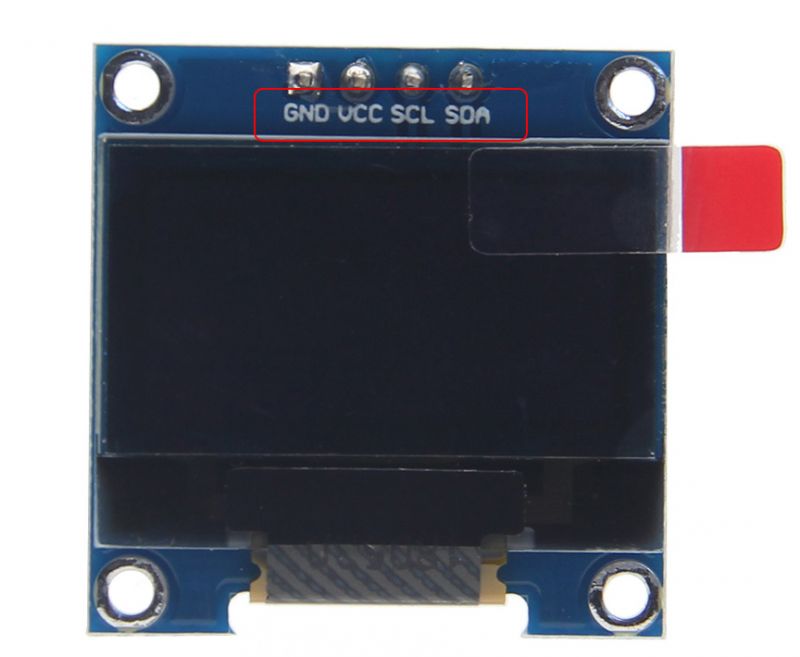
| + | 2. Please check if the order of OLED screen pins is correct, please email to support@geekworm.com if it's a wrong pin order; | ||
| + | |||
| + | [[File:OLED-IMG-4373-1.jpg|800px]] | ||
| + | |||
| + | The run the following command to check the I2C address | ||
| + | sudo i2cdetect -y 1 | ||
| + | <pre> | ||
| + | 0 1 2 3 4 5 6 7 8 9 a b c d e f | ||
| + | 00: -- -- -- -- -- -- -- -- | ||
| + | 10: -- -- -- -- -- -- -- -- -- -- -- -- -- -- -- -- | ||
| + | 20: -- -- -- -- -- -- -- -- -- -- -- -- -- -- -- -- | ||
| + | 30: -- -- -- -- -- -- -- -- -- -- -- -- 3c -- -- -- | ||
| + | 40: -- -- -- -- -- -- -- -- -- -- -- -- -- -- -- -- | ||
| + | 50: -- -- -- -- -- -- -- -- -- -- -- -- -- -- -- -- | ||
| + | 60: -- -- -- -- -- -- -- -- -- -- -- -- -- -- -- -- | ||
| + | 70: -- -- -- -- -- -- -- -- | ||
| + | </pre> | ||
| + | |||
| + | 3c is a hexadecimal number, it is the I2C address of OLED, if you can’t find this value, please shut down and reconnect shield and OLED, then run this command again, If you still can't find the OLED's I2C address, the OLED screen may be damaged. | ||
| + | |||
| + | |||
| + | '''PS''': Since the i2cdetect tool is not installed by default in pikvm os, you need to install it first. You can install it through the following command | ||
| + | <pre> | ||
| + | pikvm-update | ||
| + | rw | ||
| + | pacman -S i2c-tools -y | ||
| + | </pre> | ||
| + | |||
| + | 4. Then run the following command to enable OLED display: | ||
| + | rw | ||
| + | systemctl enable --now kvmd-oled | ||
| + | ro | ||
| + | </div> | ||
| + | </div> | ||
| + | |||
| + | <div class="toccolours mw-collapsible mw-collapsed"> | ||
| + | <div style="font-weight:bold;line-height:1.0;"> | ||
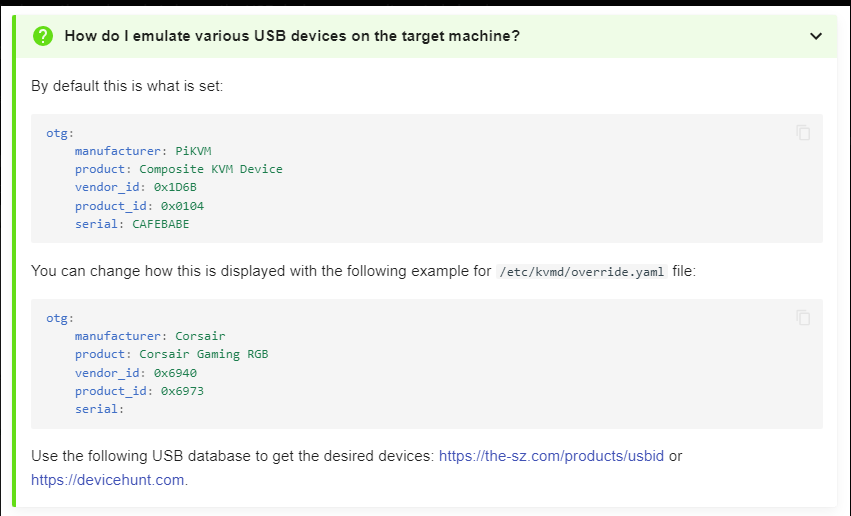
| + | Q. How do I emulate various USB devices on the target machine? | ||
| + | </div> | ||
| + | <div class="mw-collapsible-content"> | ||
| + | [[File:How-to-emulate-various-USB-devices-on-the-target-machine.png]] | ||
| + | |||
| + | More details, pls refer to: https://discord.com/channels/580094191938437144/896216359963332628/1021503994436276245 | ||
| + | </div> | ||
| + | </div> | ||
<!--Add review function! --> | <!--Add review function! --> | ||
Latest revision as of 14:37, 19 March 2025
PiKVM is first and foremost a trademark, which is controlled by https://pikvm.org, and it does not belong to Geekworm.
PiKVM is Free and Open Source Software released under the GPLv3.
Geekworm's KVM products use the open source pikvm software developed by pikvm.org under the GPLv3 without any modification. Geekworm will regularly donate to pikvm.org
About after-sales service of Geekworm KVM Products:
The after-sales service of all products sold by Geekworm should be the responsibility of our Geekworm team (email: support@geekworm.com), please DO NOT disturb the official PiKVM support team.
- First of all, we recommend you to get more FAQ information on the official website: official FAQ, or check the following FAQ;
- You can post a issue ticket at Geekworm forum or email to us (support@geekworm.com) and attached your installation pictures or videos to get some help.
- Blog sharing for reference: https://www.andysblog.de/kvm-over-ip-pikvm-als-bausatz
Q: Which pins are available on the KVM-A3?
Q. How to login pikvm os?
Q: How to connect to wifi?
Q. How to switch root user?
Q: Why is the X680 not working?
Q: Why is USB mass driver not recognized on X680?
Q: Does the x680 support audio?
Q: Does the X680 support PoE power? How to enable PoE Power?
Q: Why can't I switch to another PC on X680?'
Q: Why NVME SSD cannot be recognized on X680?
Q: How to boot from NVMe SSD on X680?
Q: Why OLED is not display?
Q. How do I emulate various USB devices on the target machine?

Enable comment auto-refresher